 Introduction
Microsoft Intune is a popular tool used by many IT administrators. By leveraging the capabilities of Intune, organizations can enforce security policies, apply software updates, manage applications, and monitor the overall health and performance of their virtual machines (VMs) running on Parallels Desktop. This article describes two possible ways to achieve that goal:
-
Prepare a provisioning package file and deliver it to your end users or
-
Embed the provisioning package file in the Sysprep image, then provide the Sysprep image to end users. To learn how to prepare a Sysprep image, please follow the instructions from KB 129529.
Please also be careful while creating the Sysprep image, as it must only be created from a Windows Enterprise ISO image.
Prerequisites
-
A Windows host machine to prepare a provisioning profile.
-
An active Microsoft Azure subscription with appropriate permissions to enroll new hosts in Azure.
-
A Windows Enterprise ISO image. If you're looking for an x86-compatible image, you can download it from https://www.microsoft.com/software-download/windows11. For an Arm-compatible image, please refer to our guide at KB 129607.
Parallels Desktop Enterprise v26.2.0 introduces Declarative Deployment: the new way to distribute golden images based on the latest standard Enterprise ISO from Microsoft, with easy OOBE bypass and straightforward Intune enrolment. Read more here.
Prepare a provisioning profile and deliver it to your end users manually
- Install Windows Configuration Designer from Microsoft Store or download it directly from the Microsoft website.
- Once it is installed, launch it and create a new project following the Provision desktop devices template.
- Once the project is created, you’ll see the following page:
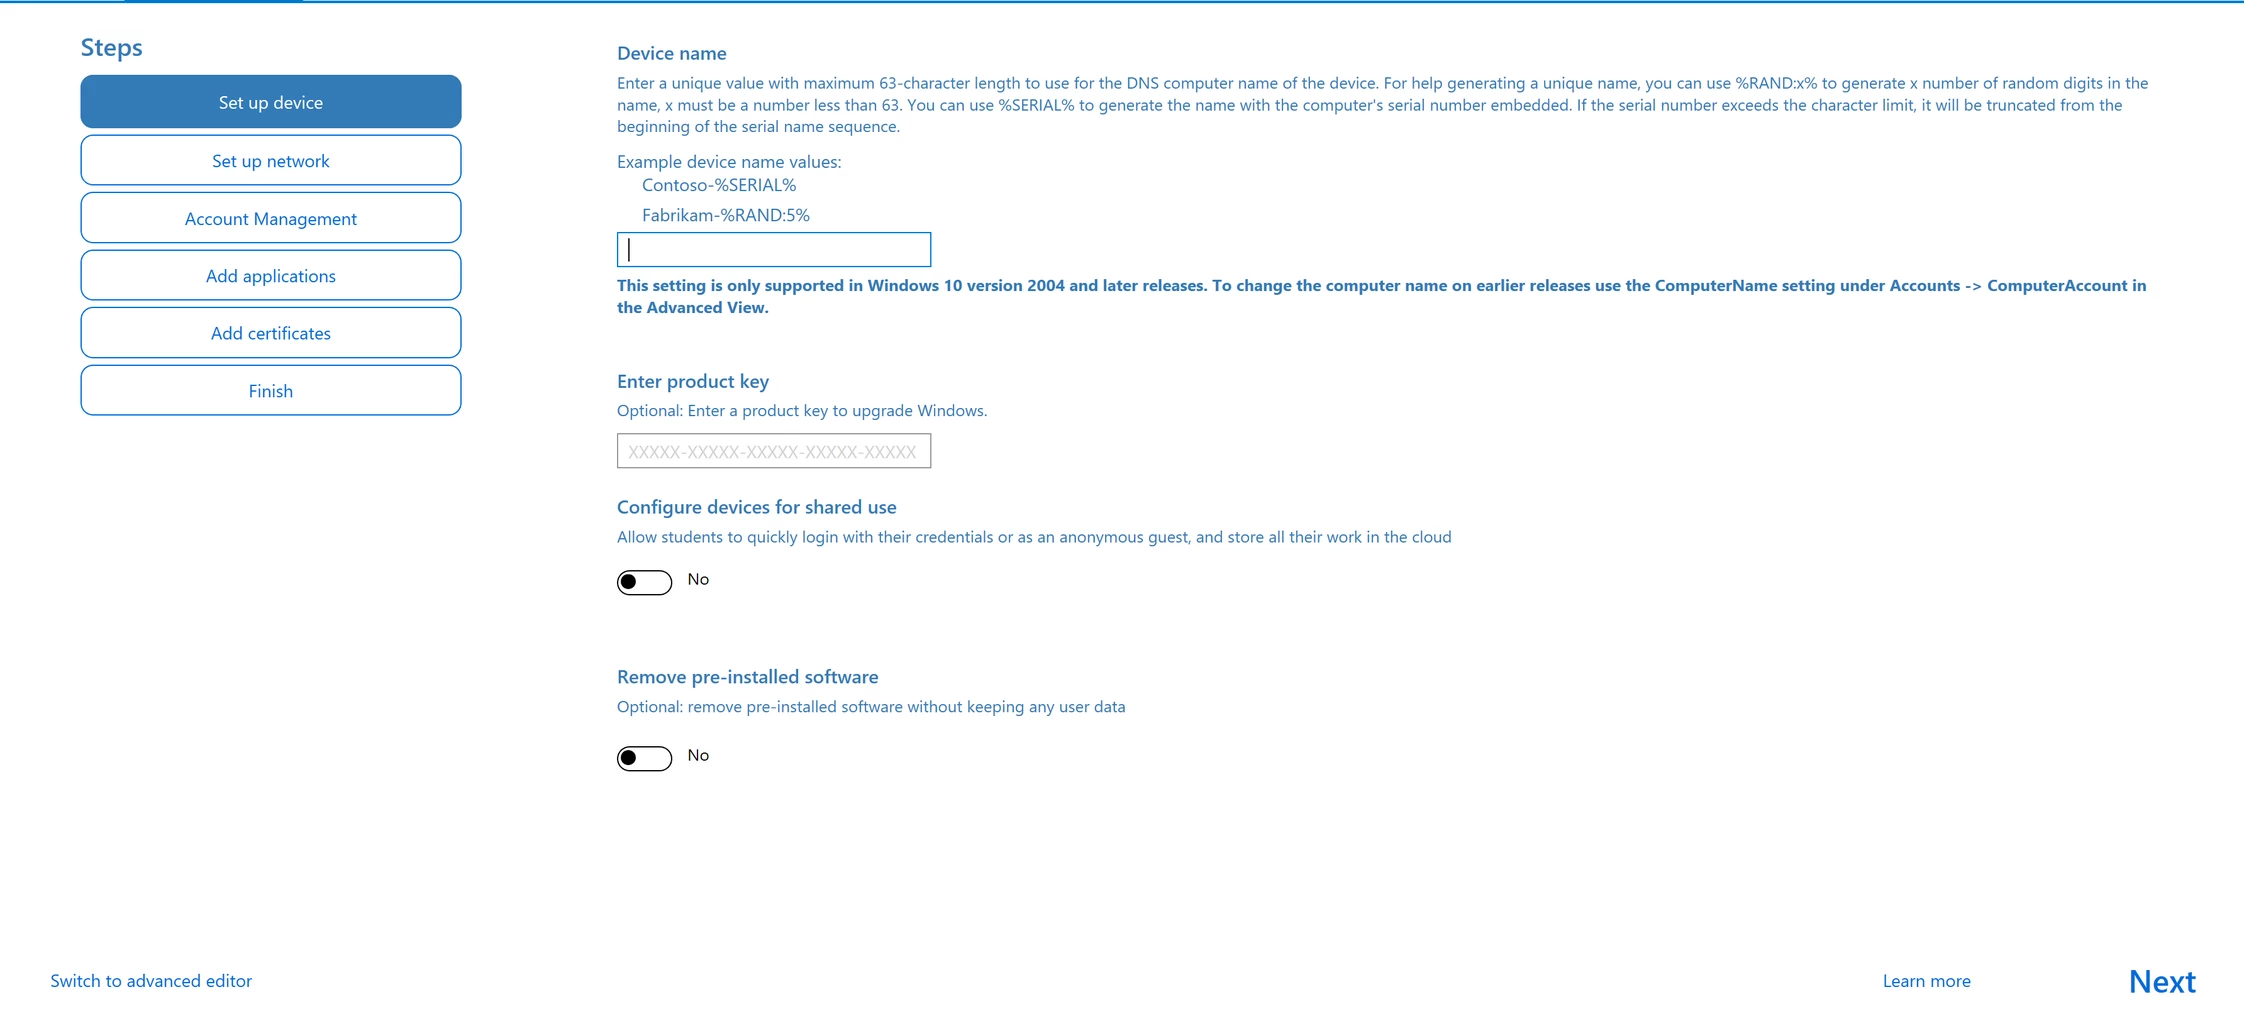
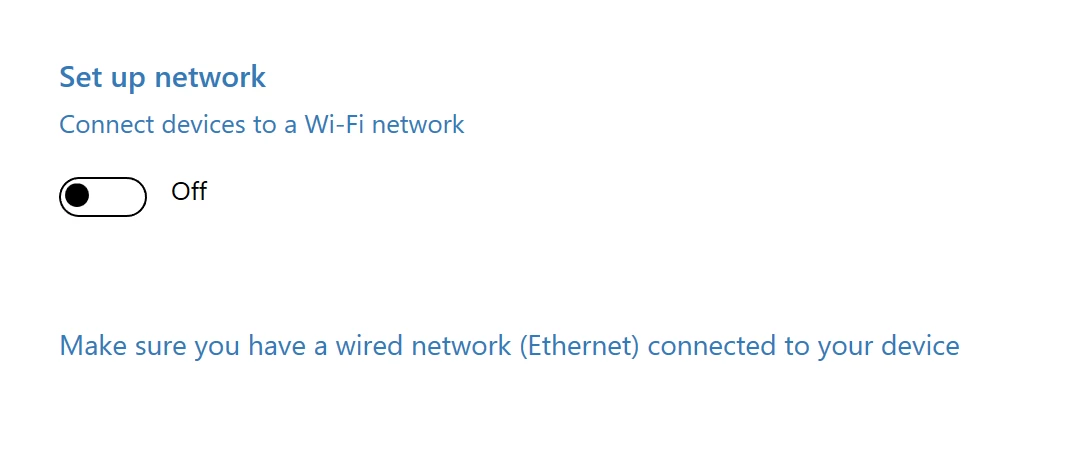
In this step, you need to choose a name convention. Once done, click Next and switch to the Set up network tab. Then you need to switch off the setup network toggle and click Next, proceeding to the Account Management page.
The following step is important: Select Enroll in Azure AD and obtain a bulk token.
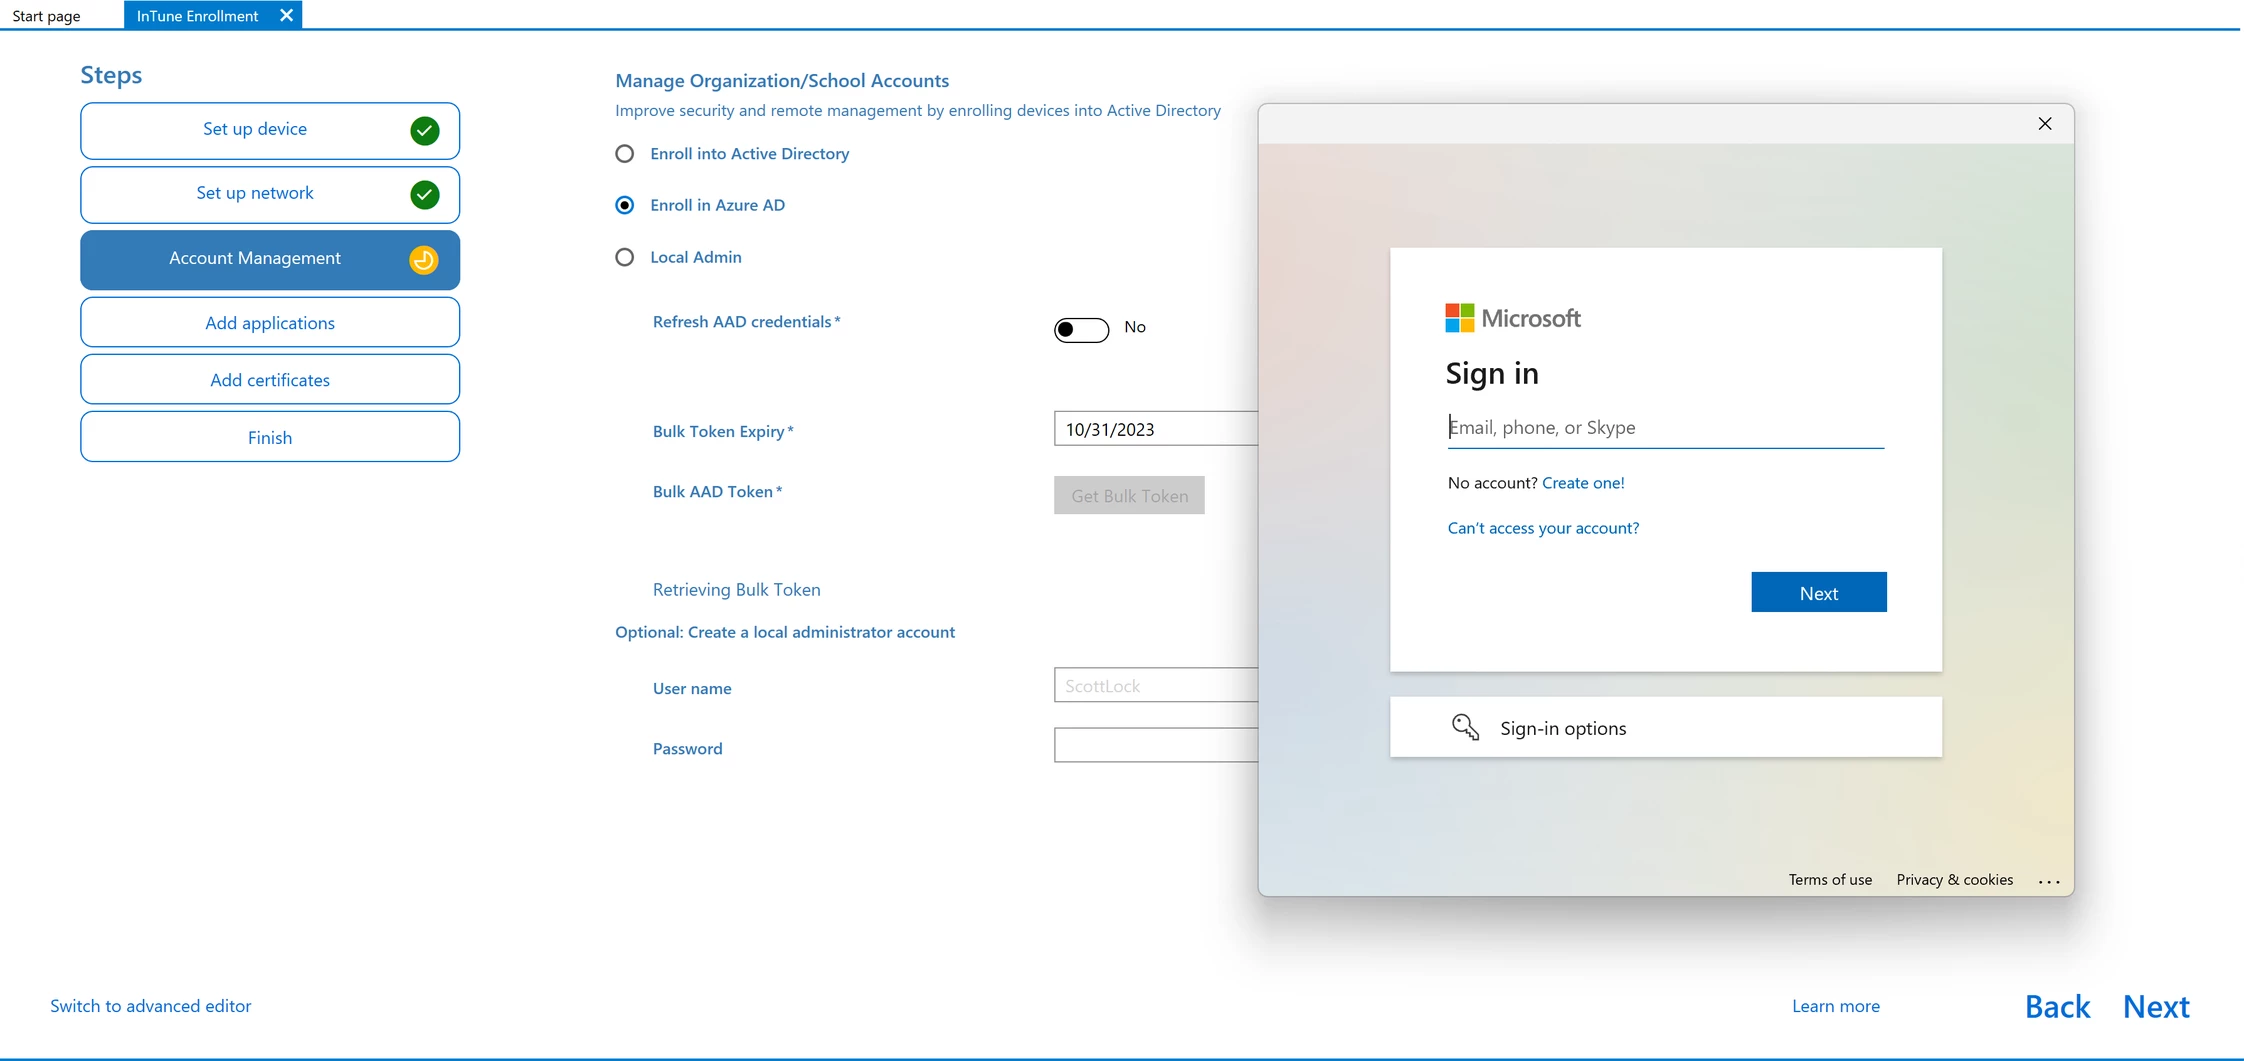
Here, you need to sign in with your Microsoft Azure credentials. Once you’ve successfully signed in, you’ll see the message confirming the successful receipt of the token.

Click Next. Feel free to skip the remaining steps by clicking Next on each one of them.
In the final step, double-check your configuration summary and ensure everything is correct.
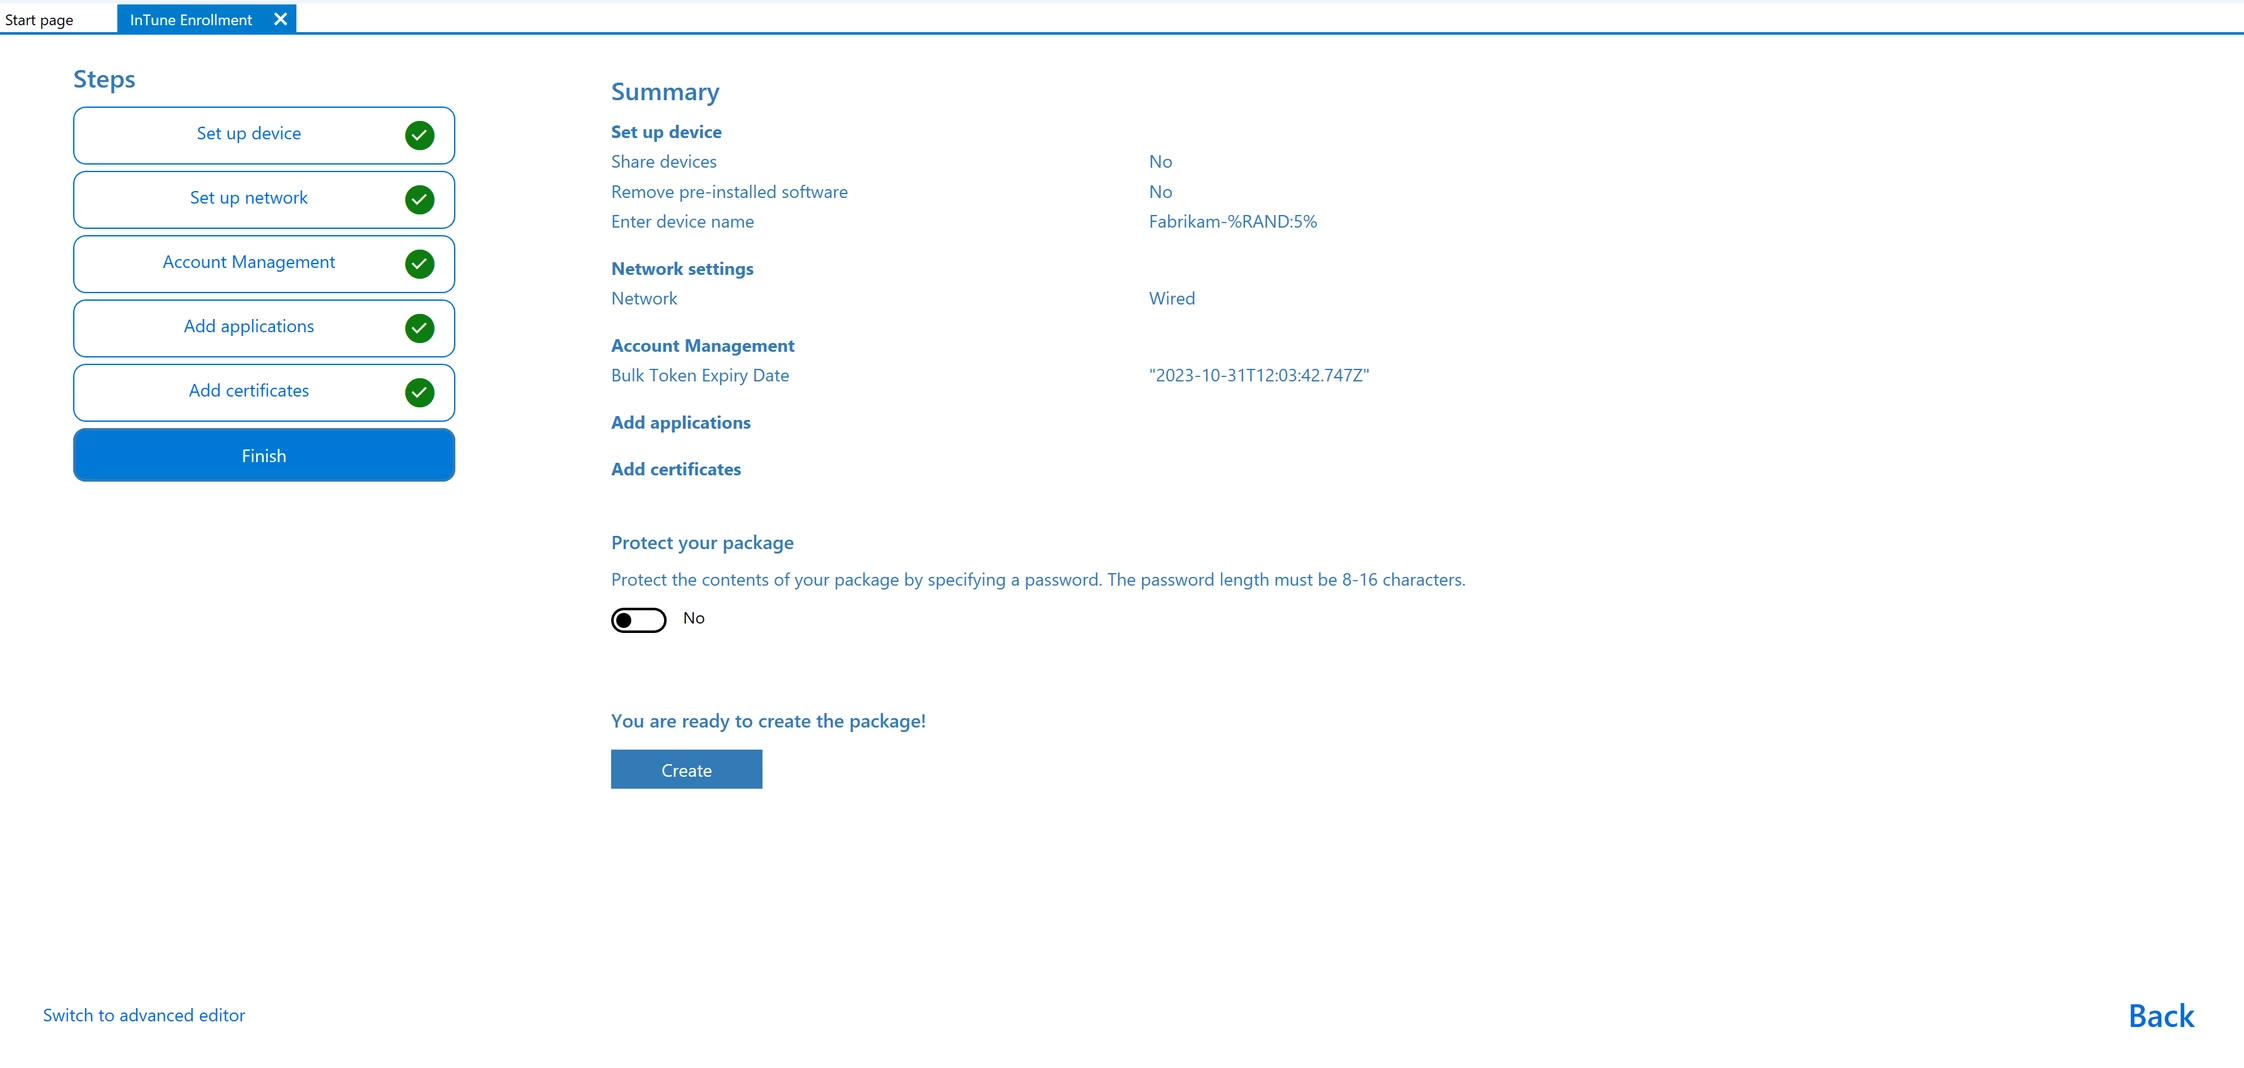
Click Create and memorize the path to the package file.
Now, you can begin providing the package to your end users, who will need to launch the package to enroll their virtual machines in Azure.
Embed the provisioning package file in the Sysprep image and deploy it to your end users
First, create a provisioning package as described above and embed it into a Sysprep image as outlined in KB 129529 (steps 1-5). Once done, you can choose how to deploy the Sysprep image to your end users.
Deploy via Golden Image
Note: Deploying the Sysprep image to enroll a virtual machine in Intune via Golden Images is supported in Parallels Desktop 20 and above.
This is the recommended and the most straightforward solution. Create a Golden Image via the Parallels Management Portal as outlined here, apply a policy, and create a group of users to apply your policy.
When a Parallels Desktop user initiates the process of creating a new virtual machine, Parallels Desktop checks if a Golden Image with the VM image link exists and is applicable to the Parallels Desktop license key used by this Mac computer. If the Golden Image exists, a dialog is shown to the user, inviting them to download and install the corporate virtual machine image. If the user accepts, the virtual machine is downloaded to the user's computer and is registered in Parallels Desktop. As a result, the virtual machine will be installed and enrolled in Intune.
Deploy via Parallels Autodeploy Package
1. Once the Sysprep image is created (steps 1-5 in KB 129529), shut down the virtual machine.
2. Right-click Parallels Desktop icon > Control Center. Right-click the virtual machine name > Clone. The machine will be cloned and registered in the Parallels Desktop Control Center, its name will look like "Copy of <VM name>".
3. Complete the last virtual machine configuration adjustments in the new VM by right-clicking the virtual machine in Control Center > Configure (select a VM profile, network mode, set CPU/RAM to Auto, change the VM name, etc).
4. Unregister the virtual machine to clear the VM Source UUID for the virtual machine by executing the command below. It'll be regenerated automatically once the virtual machine is registered on the end user's Mac that will regenerate the SMBIOS ID.
prlctl unregister <vm_UUID> --clean-src-uuid
For example:

5. As a result, your virtual machine will be unregistered from the Control Center. Locate your virtual machine and start preparing the Parallels Autodeploy Package. Learn more about how to prepare the Parallels Autodeploy Package in the Administrators Guide.
Note: Parallels Autodeploy Package tool provides an option to change the vm_reset_hwid parameter, affecting the way Microsoft Azure detects and accounts for machines. This article also describes how to change this parameter. Please note that changing the vm_reset_hwid parameter will trigger Windows reactivation. Take extra care and change the parameter only when you need to get Virtual machines enrolled in InTune.
6. Prior to mass deployment, you will need to make certain changes to the deploy.cfg file:
-
Open the Autodeploy Package by right-clicking on it and selecting “Show Package Contents”.
- Navigate to the License Key and Configuration folder and open the deploy.cfg configuration file using any text editor.
-
Once the file is opened, locate the following variable:

You need to comment the following string:
vm_reset_hwid="no"
And uncomment the following string:
#vm_reset_hwid="yes"
The resulting code should look like this:

Please be aware that changing this parameter may cause issues with preinstalled software licenses on deployed VMs. However, unless you change the parameter as described above, system's BIOS serial number will not change, and it will appear as the same board across all virtual instances, potentially causing licensing or management issues.
Note: This parameter is different to Computer Serial number, that Intune uses to identify unique computer instances. If you plan to enroll virtual machines more than once per host Mac, and an additional parameter needs to be changed, please see Troubleshooting section for details.
7. Deploy the virtual machine. Learn more in the Administrators Guide.
Troubleshooting
Update: This behaviour has been addressed in Parallels Desktop 26 and Mass Deployment package v26 or higher. Please use the latest available version of Parallels Desktop and package. If you happen to encounter this issue on v26 or above, contact Parallels Support and see the workaround section if required.
If you happen to run into the following error code: 8018000a when enrolling the virtual machine:
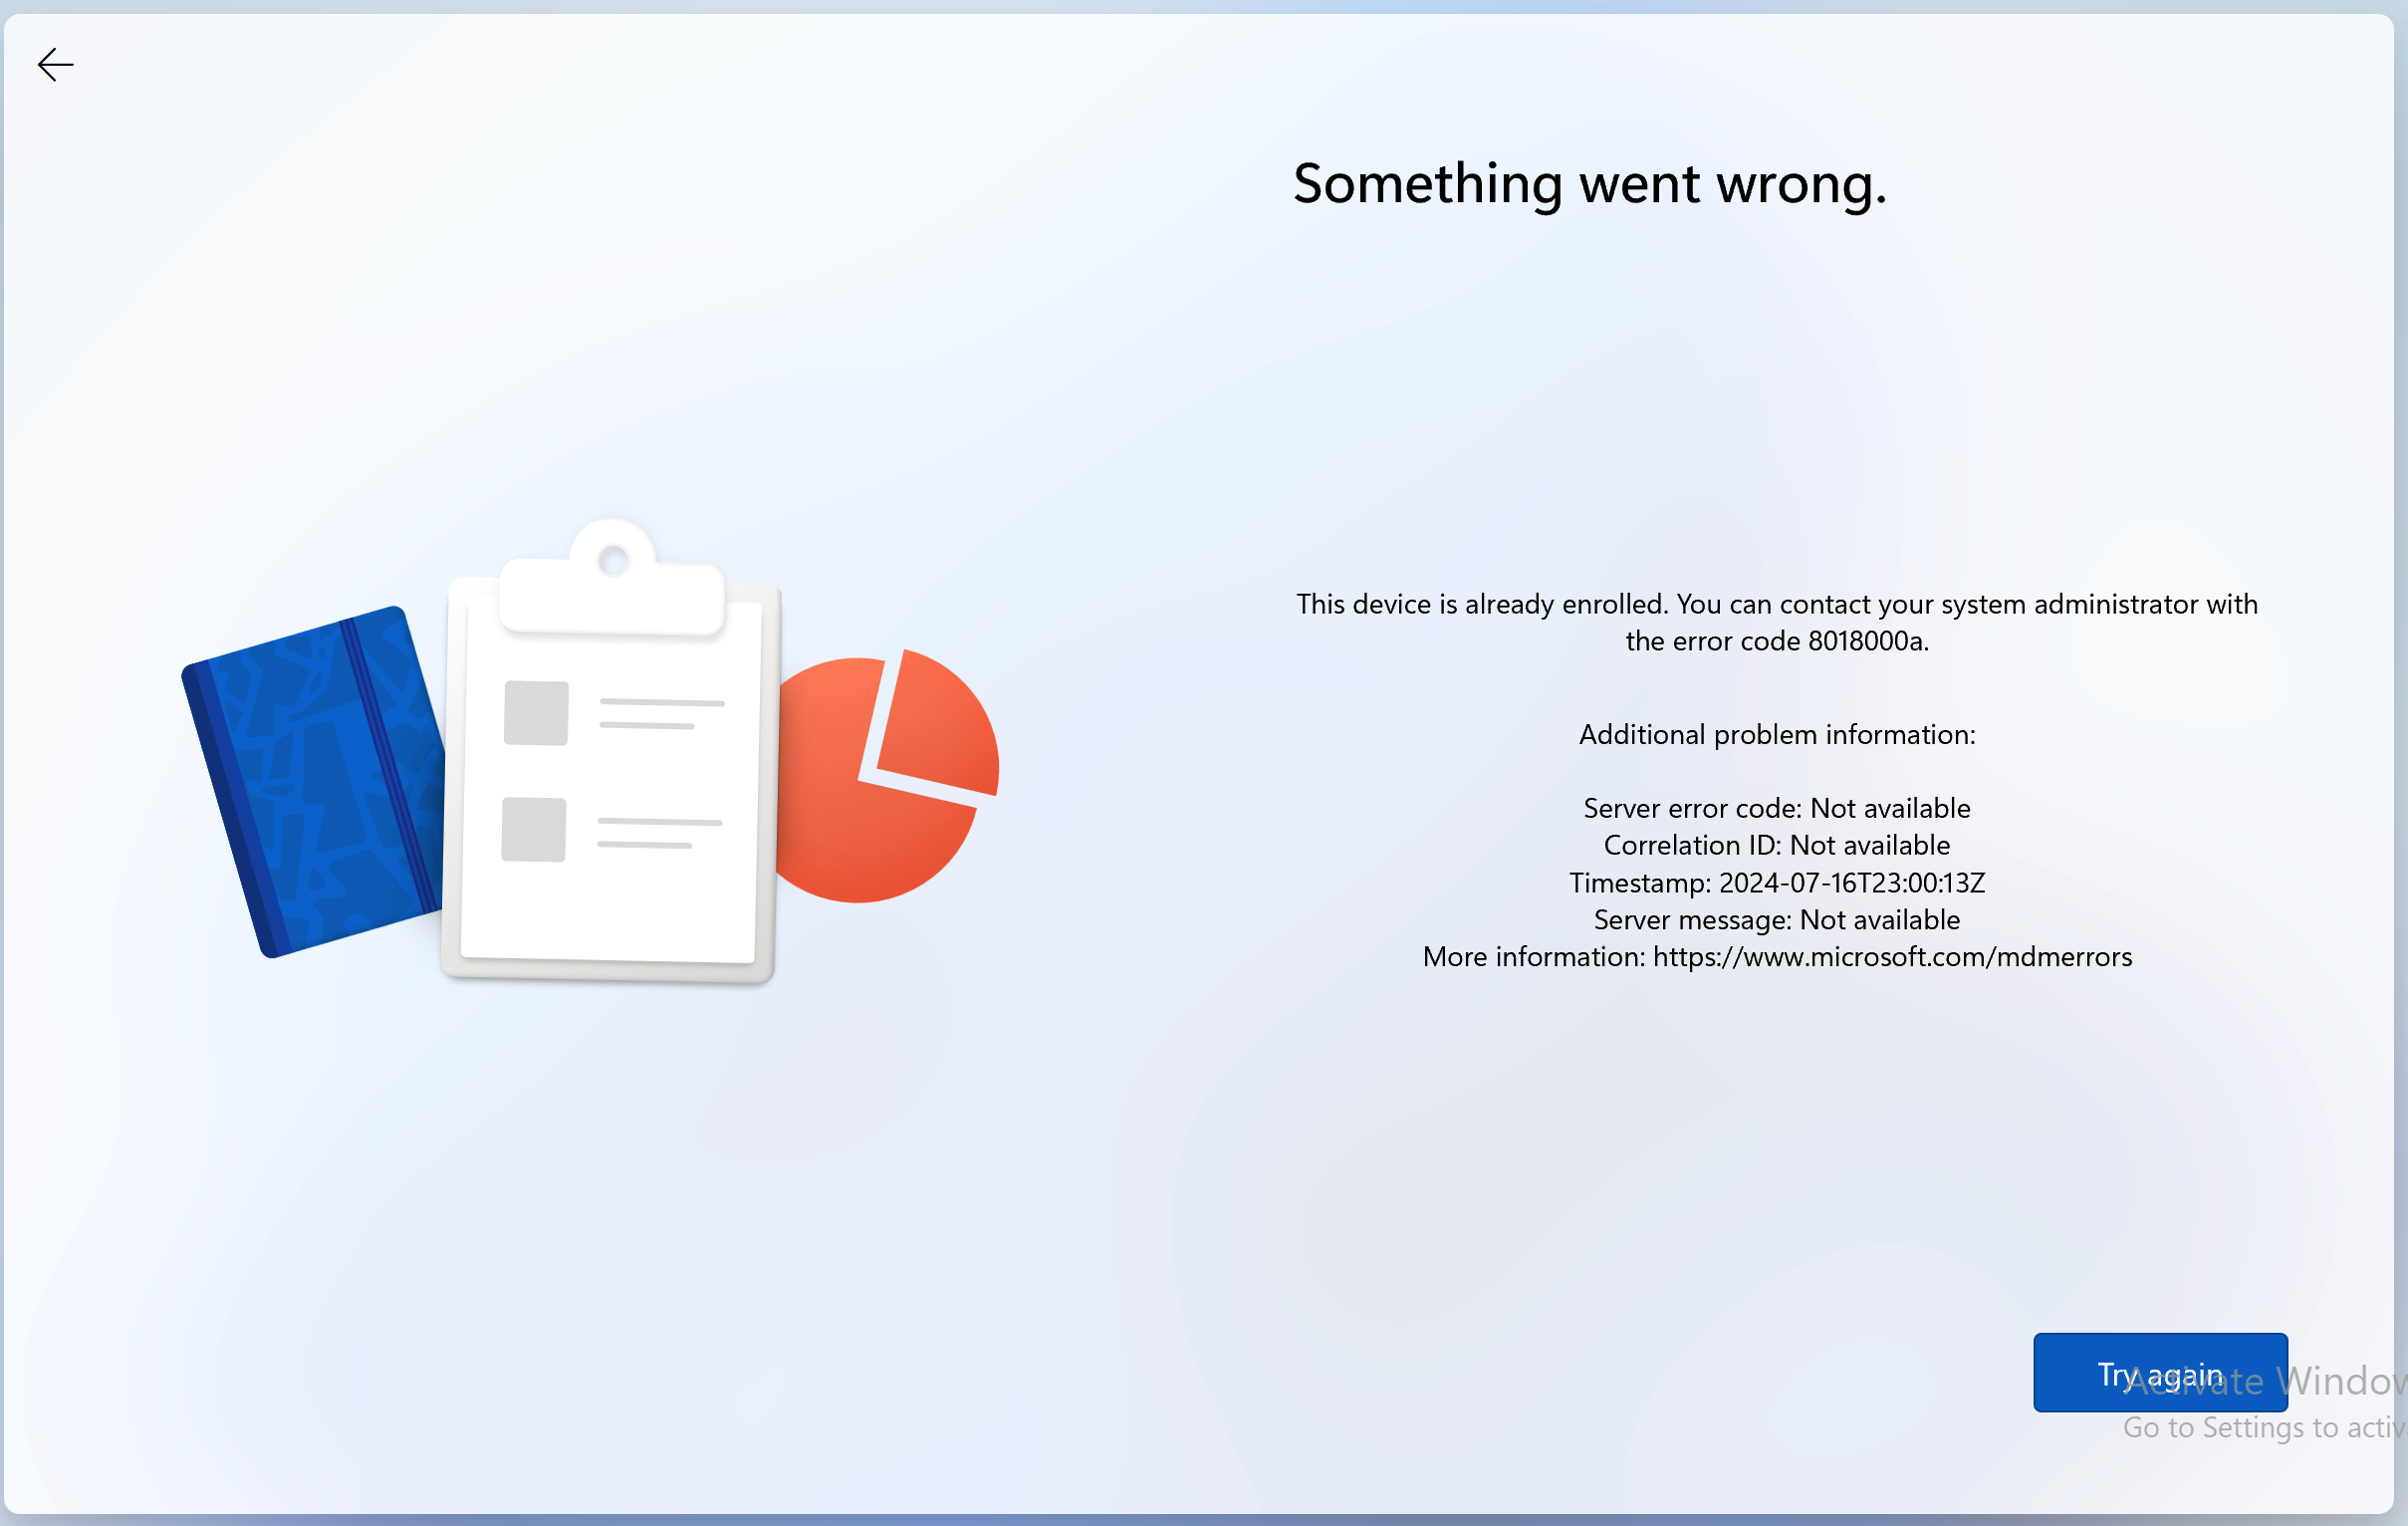
This likely means that one virtual machine has already been successfully enrolled in Intune from this specific Mac host, and Intune detects subsequent enrollments, as the same machine. Even though we have used reset_hwid option, this parameter does not affect the Computer Serial number that Intune uses to identify the uniqueness of the machine, at present, Parallels bases this value on the hosts Serial Number by default, so any virtual machines will seem as the same while an attempt to enroll it is made.
Workaround
You can set a custom serial number value for the virtual machine, by using prlctl command in macOS terminal:
prlctl set VM-UUID --smbios-serial-number "serialValue"
Seeing as this might be suboptimal during the deployment process for numerous machines, as an additional measure, we also offer a baseline script that can be modified and deployed alongside the virtual machines to your Mac hosts to avoid this situation.
Intended usage is:
1. Download the zipped script.
2. Locate the deployed virtual machine UUID, for instance with:
Note: An example mentioned in step 4 of the setting up for Deployment package.
3. Input the UUID in the someIDnumber variable in the script.
Note: Virtual machine UUID will stay the same across the systems.
4. (optional) Modify the random values or their prefix assigned to the serial number variable value to your organizational standards.
You can also use the scripts' principle as a basis for creating your own, if it doesn't happen to fit your purposes, or for other reasons.
Was this article helpful?
Tell us how we can improve it.