When you distribute Windows 11 VMs to your end-users' computers, you may need to manage those virtual machines (VMs) granularly: enroll them into domains, activate Windows licenses, differentiate PC names, enforce specific policies, enable company-wide licensing tools, etc. All that and more can be achieved with the help of Microsoft's Sysprep utility.
This guide explains how to prepare VMs for deployment on Parallels Desktop using MS Sysprep. You are free to selectively follow only the steps that you need to solve your particular task.
By leveraging Sysprep, you can avoid a frequently occurring problem where all VMs activated from the same image appear as a single machine to your endpoint licensing tool (e.g., a KMS server or a cloud-based licensing tool). Sysprep allows you to customize each VM individually, ensuring that they are recognized as separate entities by your licensing and management systems.
Following the steps outlined in this guide will help you streamline your VM deployment process, improve VM management capabilities, and ensure compliance with licensing requirements.
Parallels Desktop Enterprise v26.2.0 introduces Declarative Deployment: the new way to distribute golden images based on the latest standard Enterprise ISO from Microsoft, with easy OOBE bypass and straightforward Intune enrolment. Read more here.
How Sysprep works
Microsoft provides the Sysprep utility as a means to generalize a Windows 11 image. Using Sysprep, you can remove installation-specific information such as the SID (Security Identifier), GUID (Globally Unique Identifier), and other identifiers before deploying the image. This process allows you to create a standardized image that can be deployed across multiple machines.
You can begin preparing the image by installing all the necessary software, drivers, and security updates and customizing the default user profile. Once the image is ready, you can deploy it to individual devices as if each device had a separate Windows installation.
On a Windows machine, the Sysprep.exe utility can be found inside the C:\Windows\System32\Sysprep folder.
Sysprep also offers a way to automate a sequence of setup tasks using an answer file if you prefer to proceed this way. An answer file is an XML-based file that contains predefined settings and values that will be applied during the Windows setup process. Within the answer file, you can specify various setup options such as computer name, licensing information, workgroup or domain settings, and more. The answer file is typically named Unattend.xml but can bear any name you want.
A combination of Sysprep and an answer file streamlines the deployment process, ensures consistent settings across devices, and automates the setup tasks.
Note: It's important to refer to the official Microsoft documentation and guidelines for detailed instructions on utilizing Sysprep and creating answer files tailored to your specific deployment needs.
Sysprep Windows 11
Note: before you start and when following the steps below, we highly recommend you use snapshots to save the current state of the virtual machine as a restore point for you. Learn more about snapshots in KB 5691.
1. Create a Windows 11 VM
First, you need to create a Windows 11 virtual machine. Kindly refer to KB 125375 to create a Windows 11 VM on a Mac with Apple silicon and to KB 4729 to create a Windows 11 VM on a Mac with an Intel processor.
2. Enter System Audit Mode
Start the reference VM created above and then launch Audit mode. To launch Audit mode, launch Sysprep (C:\Windows\System32\Sysprep\sysprep.exe) with the following arguments:
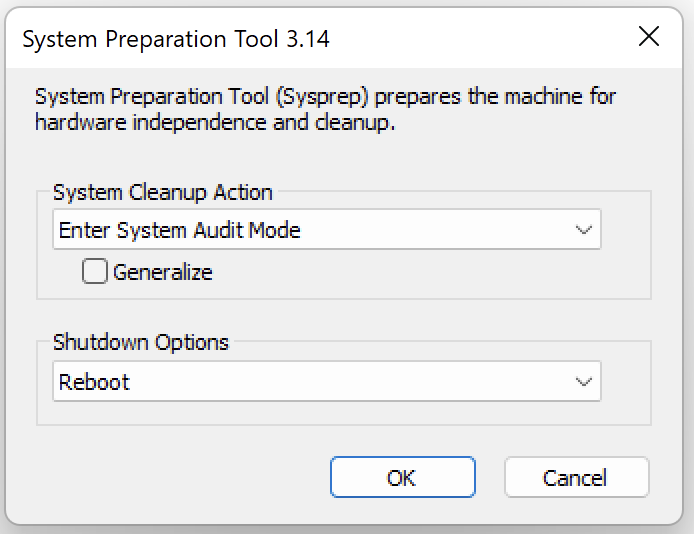
Once it's done, click OK to reboot the virtual machine.
The Audit mode is typically used in conjunction with Sysprep (System Preparation) to prepare a Windows installation for deployment.
The Audit mode allows system administrators to customize the installation by installing additional applications and drivers or making configuration changes before the system is sealed and captured for deployment. It provides a way to access and modify the system without triggering the Out-of-Box Experience (OOBE) that usually launches when a new installation is first booted.
By entering Audit mode, administrators can perform tasks such as installing software updates, customizing the user profile, configuring system settings, or preparing the system for deployment in a specific environment. Once the desired modifications are made, Sysprep can be run to generalize the installation and prepare it for imaging or cloning.
In summary, Audit mode is required for Sysprep to enable administrators to customize and configure the Windows installation according to their specific requirements before it is sealed and deployed to multiple systems.
3. Configure the system
After the reboot, once you enter the Audit mode, you will need to install the necessary applications, drivers, settings, Windows updates, and other required components.
Important: do not enroll this reference machine in the domain and do not install or update any Microsoft Store apps.
If you plan to enroll Virtual Machines (after Sysprep) into Azure AD or InTune, refer to this KB article which will walk you through the process. Ignore the entire article or parts of it if you don’t plan to enroll your VMs into AAD or InTune.
Note: in the case of Windows 11 Arm virtual machines, it is also necessary to disable system disk encryption, that is enabled by default, for sysprep to run correctly. To do so, you can use the following command in Windows Terminal:
manage-bde -off C:
You can also verify the status of disk encryption by using the command:
manage-bde -status C:
4. [Optional] Prepare the answer file
4.1 Create the answer file
If you're going to mass-deploy the created image in a generalized state, you might want to prepare your own version of the answer.xml file. This will enable you to enroll freshly installed VMs in the domain, randomize their names and IDs, set up customs locales, assign cloud-based licenses correctly, and more.
Note: it's not necessary to create the answer.xml file, you can skip this part if you find this option easier for your use case.
You may find our sample file for both x86-64 and Arm Windows versions here, the file can be used with either architecture. Since the answer file covers both x86 and ARM architectures, any changes to the file should be done to the part of the file that matches the end user's architecture. Download the file and open it in a text editor of your choice. Change the specified parameters as needed and activate the ones you plan on using by uncommenting the corresponding strings. To uncomment the strings, remove the “<!--” sequences at the beginning and the “-->” sequences at the end of them, along with the explanations, as displayed in the image below.


Rename the file to answer.xml.
Once you’re done, go to C:\Windows\Setup, create a folder named Scripts, and copy your configured answer.xml file there.
4.2 Set up a way to erase the answer file for the end user
The answer file contains usernames and passwords in plain text, which is not secure. However, there is a way to automatically delete the answer.xml file once the setup process is complete. Create a new file in a text editor and add one line to it:
Erase C:\Windows\Setup\Scripts\answer.xml
Save the file as setupcomplete.cmd and copy it to the C:\Windows\Setup\Scripts directory. During the setup process, before the login screen appears, Windows will automatically execute setupcomplete.cmd and erase the answer.xml file.
Make a second copy of setupcomplete.cmd, rename it to ErrorHandled.cmd, and copy it to the C:\Windows\Setup\Scripts directory. This way, the answer.xml file also gets deleted if the setup process crashes with critical errors.
5. [Optional] Enroll the VM into Intune
If you want to enroll the VM into Intune after the installation process, you need to perform the steps below:
1. Create a provisioning package as outlined in How to enroll Parallels Desktop Virtual Machines to Azure Active Directory to prepare the InTuneEnrollment.ppkg.
2. Once the package is prepared, go to C:\Windows\Setup, and create a folder named Scripts if you have not done it yet.
3. Open any text editor, create a new file and add the command below to this file to trigger the execution of the prepared package during the Windows installation process in the VM that will be deployed to the end users. Save the file as SetupComplete.cmd and put it into the Scripts folder.
@echo off

start /wait %windir%\System32\WindowsPowerShell\v1.0\powershell.exe -NoProfile -NonInteractive -ExecutionPolicy Bypass Install-ProvisioningPackage -PackagePath C:\Windows\Setup\Scripts\InTuneEnrollment.ppkg -QuietInstall
Note: Execution of SetupComplete.cmd is triggered by and presumes usage of answer.xml file, it will be required to use it if SetupComplete.cmd is utilized.
6. [Recommended] Create a backup of the image
Before moving on to the next step, consider creating a backup or saving the image in case it needs to be updated with Windows Updates or if there is a need to change the set of preinstalled applications.
Note: you can take a snapshot of the virtual machine to save the current state. You can do that by clicking the Actions item in the Mac menubar > Take a snapshot. Learn more in KB 5691.
Don't forget to delete a snapshot from the VM when you start deploying it to the end users.
This step also ensures that you have a copy of the system's current state, including any modifications or configurations made so far. This backup serves as a restore point and allows you to revert to this state if necessary.
By having a backup, you can maintain a reliable and consistent starting point for future deployments or updates, ensuring a smooth and efficient process while minimizing the risk of data loss or system instability.
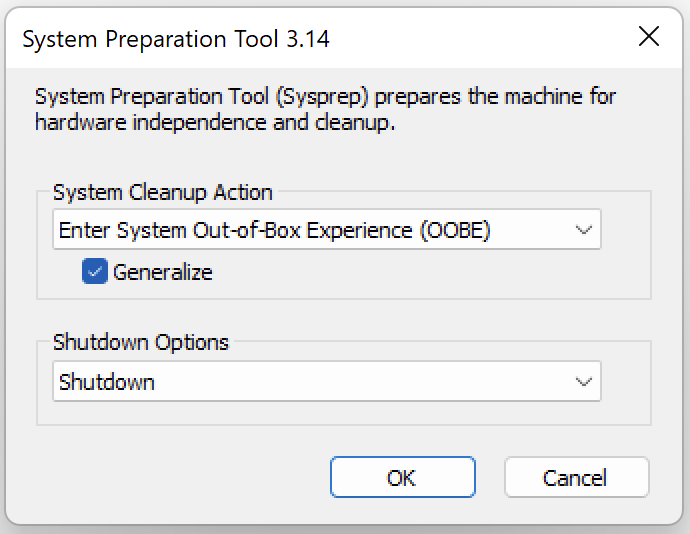
7. Generalize the installation
At this step, the only thing that's left is to generalize the image before deploying it to the end users.
If you don't use the answer.xml file:
Start the sysprep.exe (C:\Windows\System32\Sysprep\sysprep.exe) and select OOBE, tick the Generalize button and select Shutdown:
If you use the answer.xml file:
Open the Windows Command prompt and execute the following commands to generalize the installation and shut down the VM:
C:\Windows\System32\Sysprep\Sysprep.exe /unattend:C:\Windows\Setup\Scripts\answer.xml /oobe /generalize /shutdown
8. [Optional] Test the image locally
You can create a copy of your virtual machine to start and see how the installation process will look for your end users.
A copy can be created easily: after completing step 7, the VM will shut down. You can open Control Center (right-click the Parallels Desktop icon in Dock > Control Center) > right-click the VM name > Clone > create a name for the new VM (e.g. "Clone of Sysprep image") and click Save.
Then, start the clone VM and check the installation process. If the test is successful, remove the snapshots from the original VM (click the Actions item in the Mac menubar > Manage snapshots) to proceed to the deployment phase.
9. Deploy the VM
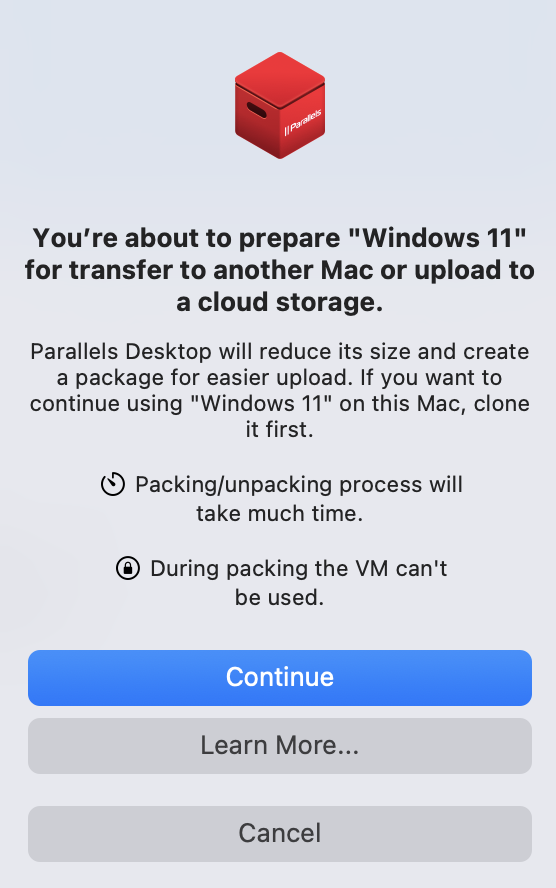
To prepare a final image for your end-users, open the Parallels Desktop Control Center, select the VM where you’ve completed the steps above, right-click on it, select the Prepare for Transfer option to compress the VM, and then click Continue.
![]()
Once the process is completed, right-click on the same VM and select Show in Finder to locate the resulting image.
![]()
After the VM is ready, Parallels Desktop for Mac Enterprise Edition allows you to easily distribute it in your organization using the Golden Images feature.
Note: Using SharePoint/OneDrive to store the VM image isn't supported. Please use a solution that doesn't require authentication so Parallels Desktop can download the image to the targeted Macs.
Was this article helpful?
Tell us how we can improve it.