Information
This article describes how to install KVM on Ubuntu Server 18.04 running on ESXi hypervisor.
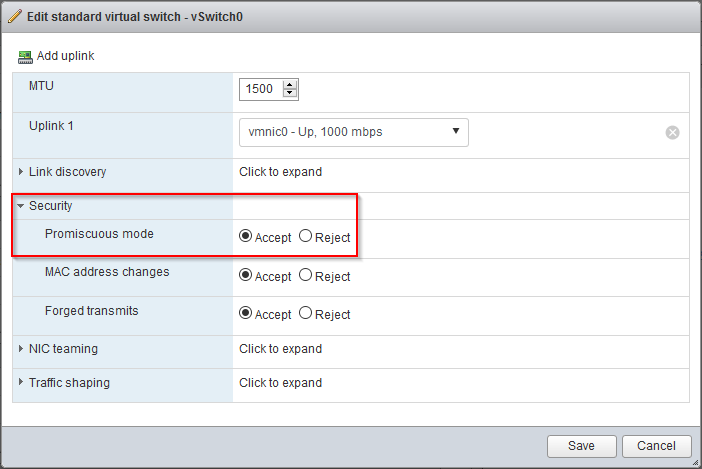
- Enable promiscuous mode for the virtual switch switch where the Ubuntu VM will be attached to:

- Create a new Virtual Machine on your ESXi host. Indicate guest OS family "Linux" and guest OS version "Ubuntu Linux (64-bit)":

- Select the appropriate storage on the next step 3 and proceed to step 4;
- Select amount of RAM and disk space according to system requirements;
- Take into account to enable hardware virtualization in CPU preferences:

- Map Ubuntu Server installer .ISO to Virtual DVD and start the installation;
- Configure the installation on steps 1-8 according to your needs;
- On step 9 please specify username and password using only simple characters (letters and numbers):

- Skip any unwanted snaps on the next page, press "Done" and reboot the server when prompted:

- Login to the system with credentials from step 7 and verify that CPU virtualization is enabled. To do it, launch command egrep -c '(vmx|svm)' /proc/cpuinfo :

If its output is greater than 0, everything is OK with CPU virtualization. If not, please check the settings of VM and ESXi; - Open the sources list launching sudo nano /etc/apt/sources.list and edit it as on the image below:

Press Ctrl+X , Y and <Enter> to save changes and close the file; - Launch sudo apt update to retrieve the updated package lists and sudo apt upgrade to install updates;

- Install KVM and its dependencies running command sudo apt install qemu qemu-kvm libvirt-bin bridge-utils virt-manager :


- Verify that libvirtd service is up and by running command: service libvirtd status

- Configure network bridge for virtual machines by editing netplan configuration file: sudo nano /etc/netplan/50-cloud-init.yaml
Take into account the name of your network interface and edit this example accordingly. Pay attention that tab characters aren't allowed for YAML and you must use spaces to format the code:

- Apply changes executing command sudo netplan apply
- Verify the bridge state executing these commands:
ip address

sudo networkctl status -a

- If the bridge interface fails to receive IP address, it's state is DOWN and the VM can't ping any host, it may be caused by Ubuntu netplan bug 1736975.In this case you may workaround it by manually configuring bringing up the interface.
To do it, please create file /etc/systemd/network/br0.network: sudo /etc/systemd/network/br0.network and fill it as below:

Press Ctrl+X , Y and <Enter> to save changes and close the file. Reboot the VM and verify that the bridge is OK as it was described in the previous step.
Installation of KVM is complete.
If you want to manage it's virtual machines graphically, please refer to this article for instructions on installation and configuration of Virtual Machine Manager.
Please refer to this article for instructions on adding configured KVM provider to RAS.
Was this article helpful?
Tell us how we can improve it.