Preparation
Client should be configured to use only RAS Universal Printing technology in Connection Properties > Printing
- In RAS Universal Printing technology in Connection Properties > Printing > Options dialog EMF format should be specified.
- All tests below should be carried out using the same printer, same client machine and same server machine (except step 14).
To troubleshoot margin issues it is important to understand if issue is related to specific published application, specific printer or specific driver. Following procedure will help to collect all the required information to narrow down the cause of the issue.
Procedure
- Please collect environment information following this article.
Enable logging on a client side:
- open Parallels Client > in menu bar navigate to Tools > Options and check Enable Logging.
Configure printer to keep spooler job:
Open Control Panel > Hardware and Sound > Devices and Printers > right-click the printer in question > Printer Properties > Advanced > check Keep printer documents > Apply:
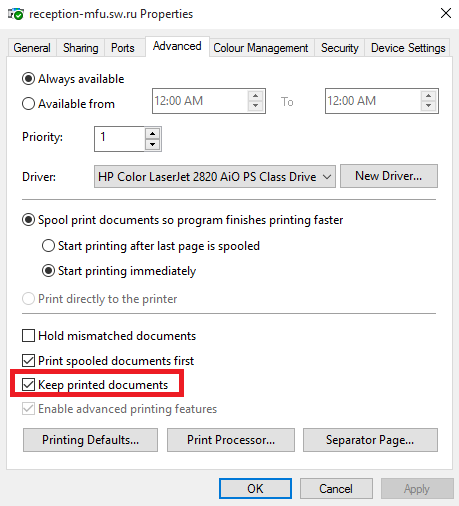
Note: if option is greyed out, return to General tab and click on Change Properties.
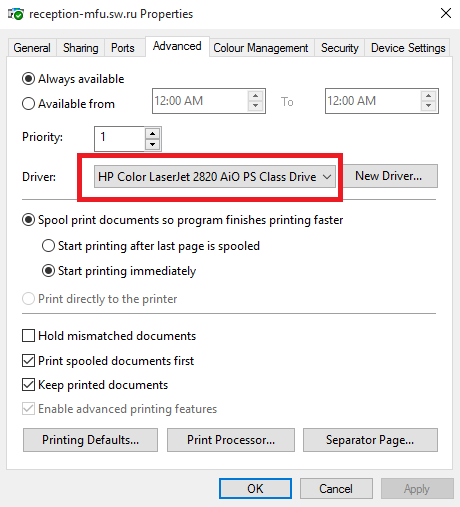
Take screenshots of printer driver properties:
open Control Panel > Hardware and Sound > Devices and Printers > right-click the printer in question > Printer Properties > Advanced and note Driver name:
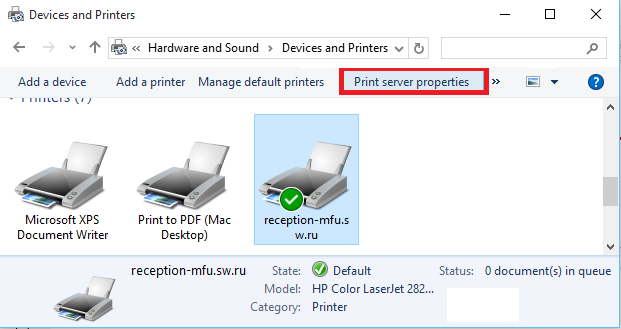
navigate back to Control Panel > Hardware and Sound > Devices and Printers > select printer and click on Print server properties:
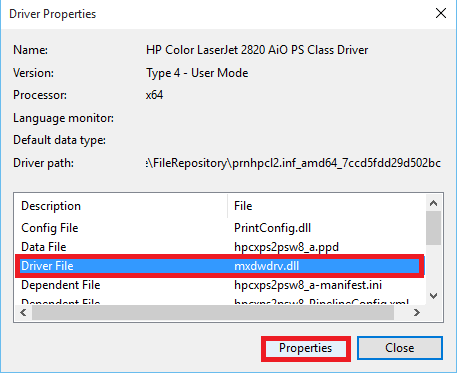
in the opened dialog switch to Drivers tab > find required driver, select it and click on Properties
take a screenshot of this Driver Properties dialog and call it driver_properties.
locate and select Driver File and click on Properties:
in the opened dialog switch to Details tab and take a screenshot of Details tab and call it driver_details:

Collect printer info locally from a client machine:
- download CollectPrinterInfo.exe tool.
- open Command Prompt as administrator and navigate to a folder where tool is located.
execute a tool adding printer name as an argument e.g.:
CollectPrinterInfo.exe "reception-mfu.sw.ru"tool will generate 3 files:
rasprintersdata.xml
<printer_name>.custompapers
<printer_name>.standardpapers.
Compress these files in an archive and call it CollectPrinterInfo_local.
Note if tool does not generate files because of incorrect printer name, execute command without any parameters and it will collect info for all printers. Then delete needless files.
Collect redirected printer info from Terminal server:
- download and copy the same CollectPrinterInfo.exe on a Terminal server.
- publish Terminal Server Desktop.
- connect from affected client to published Terminal Server Desktop.
- on Terminal Server open Command Prompt as administrator and navigate to a folder where tool is located.
execute a tool adding redirected printer name as an argument e.g.:
CollectPrinterInfo.exe "reception-mfu.sw.ru for rasadmin by Parallels"- Compress three files generated by tool in an archive and call it CollectPrinterInfo_server.
Run printer hardware test locally from a client machine:
- download HWPrnTest.exe
- open Command Prompt as administrator and navigate to a folder where tool is located.
execute the tool:
HWPrnTest.exe- once tool is opened click on Test Print Job.
- choose affected printer and click OK.
- make a scan/photo of the printout and call it HW_test_local.
Run printer hardware test from a Terminal server:
- download and copy the same HWPrnTest.exe on a Terminal server.
- publish Terminal Server Desktop.
- connect from affected client to published Terminal Server Desktop.
- on Terminal Server open Command Prompt as administrator and navigate to a folder where tool is located.
execute a tool:
HWPrnTest.exe- once tool is opened click on Test Print Job.
- choose redirected printer and click OK.
- make a scan/photo of the printout and call it HW_test_server.
Collect printer registry settings from the client:
open Registry Editor and export the following keys:
HKEY_LOCAL_MACHINE\SYSTEM\CurrentControlSet\Control\Print HKEY_LOCAL_MACHINE\SOFTWARE\Microsoft\Windows NT\CurrentVersion\Print- compress them in archive and call it reg_client.
Collect printer registry settings from the server:
- open published Desktop and launch Registry Editor
export the following key:
HKEY_LOCAL_MACHINE\SYSTEM\CurrentControlSet\Control\Print- compress it in archive and call it reg_server.
Collect print job data of incorrect printout from server:
make sure that folder C:\Windows\System32\spool\PRINTERS is empty on a local client machine (spooler keeps jobs here).
open published Desktop, run the custom application and print using redirected printer.
on Terminal server locate SavedJob folder in C:\Users\<
username>\AppData\Local\Temp\,where
<username>is username that specified in Parallels Client Connection Properties.- compress this folder and call it ServerSavedJob_app.
Collect print job data of incorrect printout from client:
locally on a client machine locate ClientSavedJob in C:\Users\<
username>\AppData\Local\Temp\,where
<username>is a user you logged in with to a client machine.compress this folder and call it ClientSavedJob_app.
to collect spooler job, compress C:\Windows\System32\spool\PRINTERS folder, call it spool_app_incorrect and delete content of this folder.
- make a scan/photo of the printout and call it pub_app_printout.
Collect print job data of correct printout:
To collect this data you should either have same application installed on a client or install affected printer locally on Terminal server. If you install printer locally on Terminal server, then you should configure printer to keep spooler job following step 3 on Terminal server. Preferably, test should be carried out using the same application installed locally on a client. Following should be done:
- print from the custom application using the same printer that is installed locally.
collect spooler job compressing C:\Windows\System32\spool\PRINTERS folder, call it spool_app_correct and delete content of this folder.
- make a scan/photo of the printout and call it local_app_printout.
Collect print job data using Notepad from a server using redirected printer:
make sure that folder C:\Windows\System32\spool\PRINTERS is empty on a local client machine (spooler keeps jobs here).
Download Lorem Ipsum.zip on Terminal server and unpack it.
open published Desktop, open Lorem Ipsum.txt with Notepad and print using redirected printer.
on Terminal server locate SavedJob folder in C:\Users\<
username>\AppData\Local\Temp\,where
<username>is username that specified in Parallels Client Connection Properties.- compress this folder and call it ServerSavedJob_notepad.
Collect print job data using Notepad from a client using redirected printer:
locally on a client machine locate ClientSavedJob in C:\Users\<
username>\AppData\Local\Temp\,where
<username>is a user you logged in with to a client machine.compress this folder and call it ClientSavedJob_notepad.
to collect spooler job, compress C:\Windows\System32\spool\PRINTERS folder, call it spool_notepad_pub and delete content of this folder.
- make a scan/photo of the printout and call it pub_notepad_printout.
Collect print job data using Notepad locally:
make sure that folder C:\Windows\System32\spool\PRINTERS is empty on a local client machine (spooler keeps jobs here).
Download Lorem Ipsum.zip on a local machine and unpack it.
open Lorem Ipsum.txt with Notepad and print using affected printer.
collect spooler job compressing C:\Windows\System32\spool\PRINTERS folder, call it spool_notepad_local and empty this folder.
- make a scan/photo of the printout and call it local_notepad_printout.
Collect print job data on the server using ANOTHER redirected printer:
make sure that folder C:\Windows\System32\spool\PRINTERS is empty on a local client machine (spooler keeps jobs here).
open published Desktop, run the custom application and print using ANOTHER redirected printer.
on Terminal server locate SavedJob folder in C:\Users\<
username>\AppData\Local\Temp\,where
<username>is username that specified in Parallels Client Connection Properties.- compress this folder and call it ServerSavedJob_app_2.
Collect print job data on the client using ANOTHER redirected printer:
locally on a client machine locate ClientSavedJob in C:\Users\<
username>\AppData\Local\Temp\,where
<username>is a user you logged in with to a client machine.compress this folder and call it ClientSavedJob_app_2.
to collect spooler job, compress C:\Windows\System32\spool\PRINTERS folder, call it spool_app_2 and delete content of this folder.
make a scan/photo of the printout and call it pub_app_printout_2.
- specify another printer name/model in the downloaded template.
Upload following files to ftp share provided by Support team representative:
template.txt

Step 1:
    RASAttachment.zip, archive

Step 4:
    driver_properties, screenshot
    driver_details, screenshot

Step 5:
    CollectPrinterInfo_local, archive

Step 6:
    CollectPrinterInfo_server, archive

Step 7:
    HW_test_local, photo/scan

Step 8:
    HW_test_local, photo/scan

Step 9:
    reg_server, archive

Step 10:
    reg_client, archive

Step 11:
    ServerSavedJob_app, archive

Step 12:
    ClientSavedJob_app, archive
    spool_app_incorrect, archive
    pub_app_printout, photo/scan

Step 13:
    spool_app_correct, archive
    local_app_printout, photo/scan

Step 14:
    ServerSavedJob_notepad, archive

Step 15:
    ClientSavedJob_notepad, archive
    spool_notepad_incorrect, archive
    pub_notepad_printout, photo/scan

Step 16:
    spool_notepad_local, archive
    local_notepad_printout, photo/scan

Step 17:
    ServerSavedJob_2, archive

Step 18:
    ClientSavedJob_2, archive
    spool_app_2, archive
    pub_app_printout_2, photo/scan
In a reply also answer the following questions:
1. Client OS version (also specify if it is x64 or x32 OS):
2. Parallels Client version and build:
3. Printer Model:
4. Printer driver download link (so we could install the same driver and replicate the issue):
5. Another printer name/model (used in steps 17-18):
Was this article helpful?
Tell us how we can improve it.