As a developer or a knowledge worker, you might need a local database to work with. However, many databases are based on x86_64 architecture, which means they might not run on the latest Mac with Apple silicon; this is the case with Microsoft SQL where it doesn't yet run in Windows 11 on a Mac with Apple silicon.
There are two solutions that you can utilize:
- Run Microsoft SQL Server in an Ubuntu Linux VM with enabled emulation and connect to it from your work Windows 11 VM;
- Run Microsoft SQL Server Express LocalDB in a Windows 11 VM.
In this article, we will explore both solutions in detail so you can run SQL Server on the newest highly performant virtual machines (VMs) using Parallels Desktop.
Solution: run SQL Server on Linux
Note: to use the solution below your Parallels Desktop application must be activated with a Parallels Desktop Pro or Business Edition subscription.
Starting Parallels Desktop 19 if you activate Parallels Desktop with a Parallels Desktop Pro or Business Edition subscription you get access to the Ubuntu Linux virtual machine with Rosetta enabled. This feature allows running x86-64 binaries in Linux virtual machines, for purposes such as running x86 Docker containers in Linux virtual machines on Mac computers with Apple silicon, or some of the x86-64 software binaries directly. You can read more about this here.
As a result, you can quickly install the virtual machine with Docker Engine preinstalled and set up the Microsoft SQL Server. If needed, you can establish a connection to the VM and get your job done.
Install Ubuntu with x86_64 emulation
First, you need to install the Ubuntu VM with x86_64 emulation enabled. It can be done pretty quickly:
1. Start Parallels Desktop and right-click the Parallels Desktop icon in the Dock > Control Center > +.
2. Select Ubuntu with x86_64 emulation under the list of Free Systems and follow on-screen instructions to download and install the VM.

Note: if you don't see this option under the list of Free Systems, please make sure that Parallels Desktop is activated with a Parallels Desktop Pro or Business Edition license.
Configure the Ubuntu VM
1. Start the created VM and create a password for the local user for the VM.
2. Optional: adjust the power settings of the VM: open Settings inside Linux > Power > Screen blank > set it to Never to prevent the VM from going to sleep. If the virtual machine is suspended or in sleep mode, the remote connection to it will be interrupted unless the VM is running again.
3. Optional: open the configuration settings of the virtual machine > Options > Startup and Shutdown > select the Always ready in the background option to make your virtual machine start when your Mac starts.
Install Microsoft SQL Server
Open Terminal in Ubuntu and execute the command below to create a Docker container with Microsoft SQL Server 2022 Developer installed:
sudo docker run -e "ACCEPT_EULA=Y" -e "MSSQL_SA_PASSWORD=VeryStr0ngP@ssw0rd" --name sql -p 1433:1433 -v sql_server:/var/opt/mssql -d --restart=always --hostname sql --platform linux/amd64 -d mcr.microsoft.com/mssql/server:2022-latest
The command above is just an example. You can adjust it for your needs based on the Microsoft documentation. We'll highlight a few of them below:
-e "ACCEPT_EULA=Y" - by using this variable you confirm your acceptance of the End-User Licensing Agreement. Required setting for the SQL Server image. SQL Server is licensed the same way for both Windows and Linux. For more information, see How to license SQL Server.
-e "MSSQL_SA_PASSWORD=VeryStr0ngP@ssw0rd" - the parameter sets up an initial password for the Microsoft SQL Server SA (System Administrator) account. We recommend creating a strong and complex password.
--name sql - a name of target Docker container where your Microsoft SQL Server will be running.
-p 1433:1433 - the parameter maps the container’s port 1433 (default port for Microsoft SQL Server) to the Ubuntu VM's port 1433. For more advanced scenarios additional ports may need to be exported. The Microsoft documentation describes how to do this.
-v sql_server:/var/opt/mssql - the parameter is important. Specify a Docker volume to ensure Microsoft SQL Server data is not lost when the container is deleted. You can use an unnamed volume or simply save the data in the Ubuntu filesystem. In the example provided above we mapped the folder sql_server to the container folder /var/opt/mssql.
-d mcr.microsoft.com/mssql/server:2022-latest - select the Microsoft SQL Server image. The SQL Server container images are published and available on the Microsoft Container Registry. You can adjust your command be selecting another image.
You can verify the container status by executing the sudo docker ps -a command:

Connect to Microsoft SQL Server
There are multiple ways to connect to the Microsoft SQL Server. We'll outline the most popular ones below. However, it's important to note that if you want to connect from an app running in your Windows 11 VM to the SQL Server running in the other VM (Ubuntu VM in this case), please make sure both VMs are connected to the same network. By default, all virtual machines are connected to the Shared network so you shouldn't have any issues unless you change the network settings of the VMs.
Connect from SQL Server Management Studio
Since SQL Server Management Studio can be easily installed and run in a Windows 11 VM, you can start it and specify the connection details:
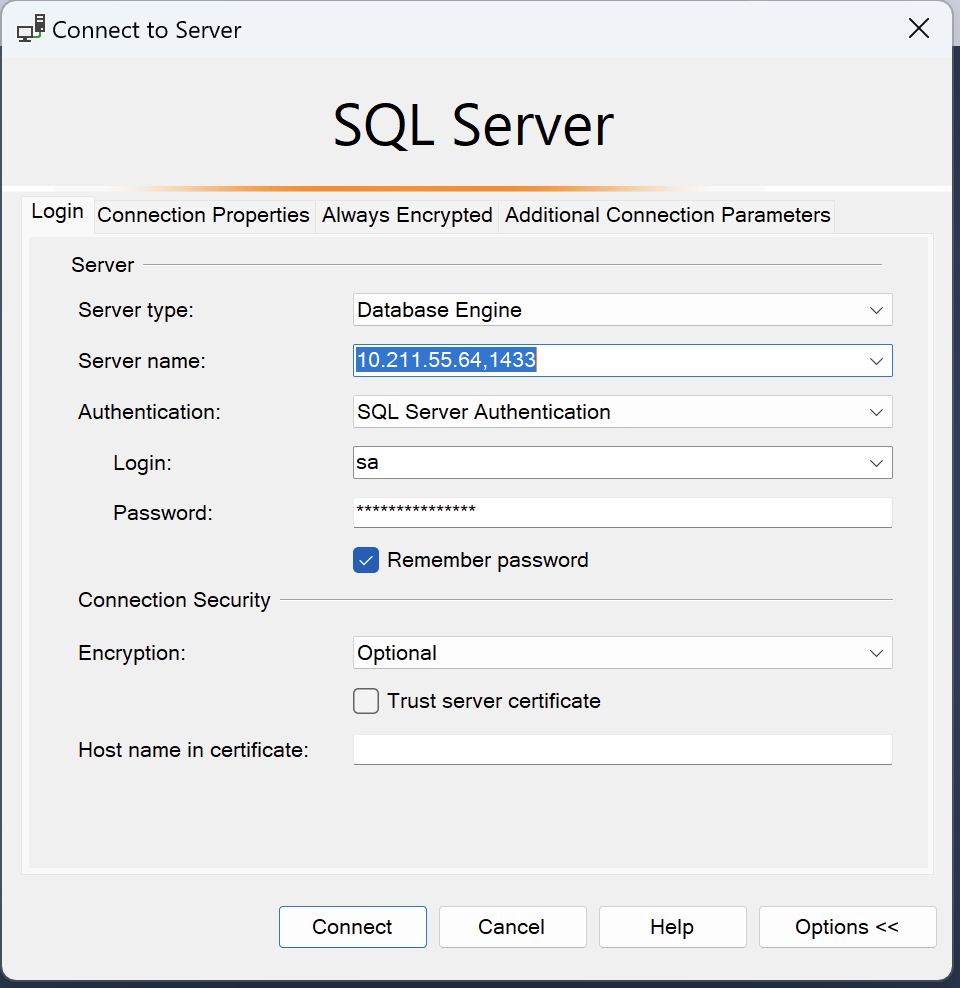
where the Server name is the IP address of the Ubuntu VM and the port delimited by a comma.
Connect from Visual Studio Code
If you run Visual Studio inside a Windows 11 VM, you can install the SQL Server extension (mssql) and connect to the SQL Server by entering the IP address of the Ubuntu VM, database name and selecting SQL login (use sa as login and the password you set up when creating the container with SQL Server before.
Connect from Visual Studio
Connecting to the SQL Server from Visual Studio (the results of our testing apply to Visual Studio 2022 Community Edition performed on May 14, 2024) running in a Windows 11 VM is pretty tricky and requires performing some additional steps:
1. Download the Microsoft.Data.SqlClient.SNI.arm64.dll file from nuget.info: navigate to build > net462 and download the .dll file.
2. Copy and paste the downloaded .dll file into C:\Program Files\Microsoft Visual Studio\2022\Community\Common7\IDE\Extensions\Microsoft\SQLDB\DAC folder.
3. Launch Visual Studio again and set up a new connection to the database using the IP address of the Ubuntu VM as Server name.

Congratulations! You have successfully set up Microsoft SQL on your Apple silicon Mac using Parallels Desktop. Now you can work.
Alternative solution (connect to LocalDB)
The solution above allows you to connect to the full instance of the Microsoft SQL Server. If you need a local database running inside your Windows 11 VM and the limitations outlined in this Microsoft article aren't critical for you, you can install Microsoft SQL Server Express LocalDB which is a feature of SQL Server Express targeted to developers. Meanwhile, the solution might work for those who prefer to use a Parallels Desktop Standard Edition license.
LocalDB Installation
Install via a native installer
You can install LocalDB through the Microsoft SQL Server Express installer: start the installation > select Download Media > select LocalDB and the installation path.
Once the files are downloaded, open the path selected before and launch the SqlLocalDB installer to set up LocalDB.
Install through Visual Studio
Alternatively, you can install it through the Visual Studio Installer, as part of the Data Storage and Processing workload, the ASP.NET and web development workload, or as an individual component.
Connect to LocalDB
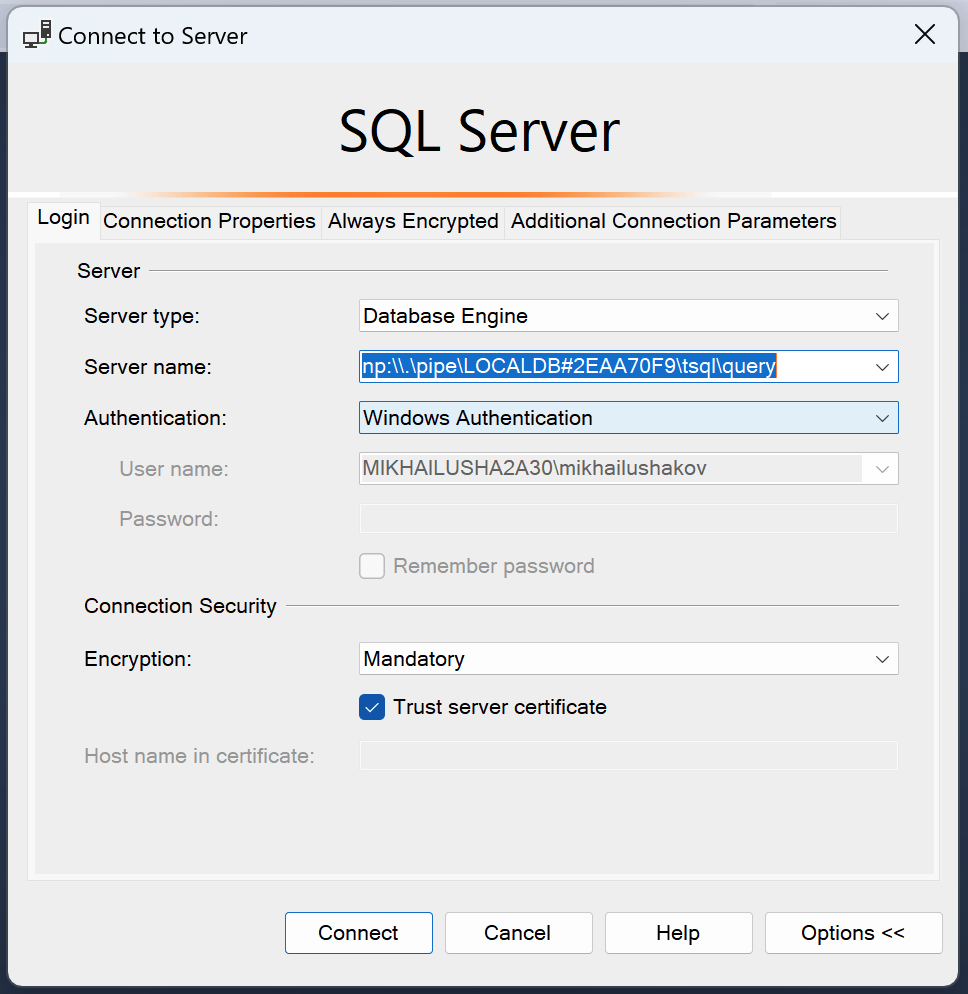
Establishing a connection to LocalDB is a process similar to the one outlined above: you can do that right from Visual Studio or from SQL Management Studio.
Start LocalDB by executing the SqlLocalDB.exe start command in the Command Prompt.
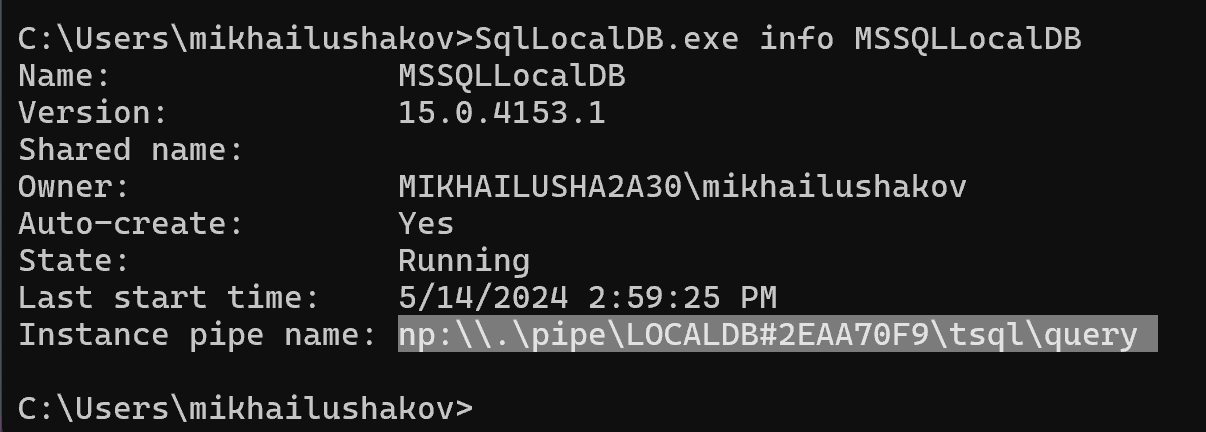
To get the Server name you can execute the SqlLocalDB.exe info MSSQLLocalDB command in Command Prompt. Copy the Instance pipe name and paste it into the Server name field to set up the connection.
Notes:
1. If you want to connect to LocalDB from Visual Studio, add the Microsoft.Data.SqlClient.SNI.arm64.dll file to the Microsoft Visual Studio folder as outlined here.
2. LocalDB can't be managed remotely via SQL Server Management Studio.
Was this article helpful?
Tell us how we can improve it.