Parallels Desktop 20.2.0 brings the early preview of the technology that allows running Intel-based (x86_64) operating systems on Macs with Apple silicon. While still in active development, the technology may be useful for tech enthusiasts who need to boot into their existing Windows 10 or some Linux VMs and access data or test some scenarios.
Note: This feature is available in Parallels Desktop Pro, Business and Enterprise editions.
What to expect
You can use an existing Windows 10, 11, Windows Server 2019/2022 or a Linux virtual machine (VM) in Parallels Desktop on a Mac with an Intel processor (only UEFI BIOS, legacy BIOS is not supported). Alternatively, you can create a new virtual machine following the steps outlined below.
1. It is slow, really slow.
-
Windows boot time is about 2-7 minutes, based on your hardware. The responsiveness of the operating system is low.
-
Do not open several applications at once: first close and start another.
-
If you meet unfamiliar Windows behavior, restart Windows.
-
Creation of a new Intel-based virtual machine might take a significant amount of time (e.g., installation of a new Windows Server or Windows 10 21H2 VM can take 20-30 minutes, while installation of Fedora 40 might take about 2 hours). The heavier the image is, the more time it takes to create a virtual machine.
2. Emulated Windows is limited in features
-
If you import a virtual machine from a Mac with an Intel processor, you can run Intel-based Windows 10, Windows 11*, Windows Server 2019/2022, and Linux distributives** with UEFI BIOS via Emulator. Earlier Windows versions (e.g., Windows 7) aren't supported; if you want to run a Linux VM, we recommend using Linux distributions with lightweight desktop environments like XFCE for optimal performance and avoiding heavyweight or outdated distros
-
You can create new Windows 10 and Windows Server 2022 VMs. There are issues with creating a new Intel-based Windows Server 2019, Windows 10 22H2 (there is a workaround for these VMs). You won't be able to create a Windows 11 or Windows Server 2025 VM (no workaround at the moment). Creation of other Linux VMs can be tested, but the process is quite unstable;
-
BSD (Berkeley Software Distribution) systems aren’t supported;
-
USB devices are not supported;
-
No sound;
-
Windows updates may fail to install;
-
Only 64-bit operating systems are supported;
-
Only 1 vCPU is supported. When you import your Intel-based VM to an Apple silicon Mac, Parallels Desktop will reset the CPU count for the VM to one automatically;
-
You can’t assign more than 8 GB of RAM to the Intel-based virtual machines;
-
Parallels hypervisor can’t be used, and, as a result, nested virtualization isn’t available (e.g., it might be needed for WSL2);
-
Legacy BIOS isn’t supported;
-
Parallels Tools might fail to install in newly created Intel-based Linux virtual machines;
-
If your Intel-based virtual machine contains a snapshot taken on your Mac with an Intel processor when the virtual machine was not stopped, you won’t be able to revert to the snapshot on your Apple silicon Mac.
-
The Parallels Team recommends shutting down your virtual machine on a Mac with an Intel processor before migrating it to the Apple silicon Mac. Otherwise, you’ll need to reset the virtual machine state, which might cause some data corruption stored inside the virtual machine;
-
Such a virtual machine occupies a lot of resources on the Mac. More than an Arm-based virtual machine. E.g., an Intel-based Windows 10 VM with 4GBs of RAM assigned will take 8GBs of your Mac’s memory.
* x86_64 Windows 11 (build 26100 and newer) may encounter issues due to requirements of more than 1 vCPU or TPM which are currently not supported;
** The following imported Linux operating systems have been tested by us to run via Emulator:
- Kubuntu 24.04.1 (KDE/Plasma)
- Lubuntu 24.04.1 (LXQt)
- Ubuntu 22.04.5
- Debian 12.4\12.6\12.7\12.8
- Fedora - While it can be installed, one of the common libraries crashes, making the system difficult to use, this behaviour is being investigated.
Important: At present any Linux virtual machine migrated with Parallels Tools or they are installed on newly created system, it will hang. We are investigating this behaviour, but it is not recommended to install them at this point. If you need to uninstall them for migration, please check the following article: Uninstall Parallels Tools in Linux
Note: please note that if you want to migrate a virtual machine created on a Mac with an Intel processor, it must be shut down before the migration. Parallels Desktop sets the default configuration for the Intel-based virtual machines, which have a configuration different from the supported one. E.g., if your Windows 10 virtual machine created earlier on an Intel Mac has 4 vCPUs then Parallels Desktop will reset the number of vCPUs to one upon trying to start the VM on an Apple silicon Mac using the Parallels Desktop Emulator.
How to start an Intel-based virtual machine using Parallels Emulator
-
Right-click on the target virtual machine > select “Start using Emulator”.

Once the virtual machine is started, it will be marked as 'Intel x86 system', and you can start it the same way you would any other virtual machine.
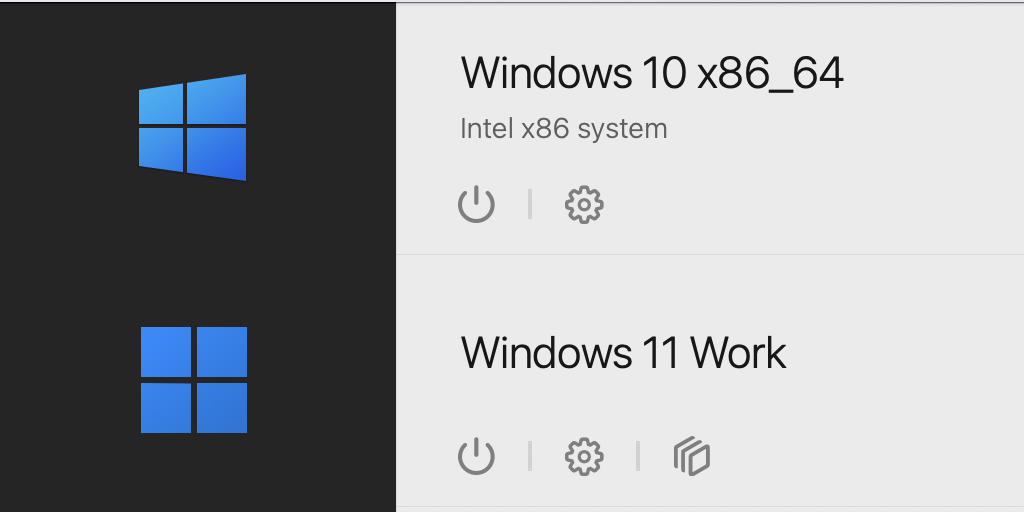
Alternative solution: you can start the virtual machine by using our Command-Line Interface utility.
How to prepare an Intel-based Linux virtual machine for a transfer
By default, Linux virtual machines (VMs) created on Macs with Intel processors have Legacy BIOS enabled, unless you manually enable it during the installation process. If you want to run a Linux VM on a Mac with Apple silicon chip, follow the steps below:
-
Download an x86_64 ISO of the respective Linux distributive
-
Start Parallels Desktop on a Mac with an Intel processor and click File > New..
-
Click ‘Install Windows, Linux, or macOS from an image file’ > select the ISO and click Continue.
-
Click ‘Customize settings before the installation’ > Create.
-
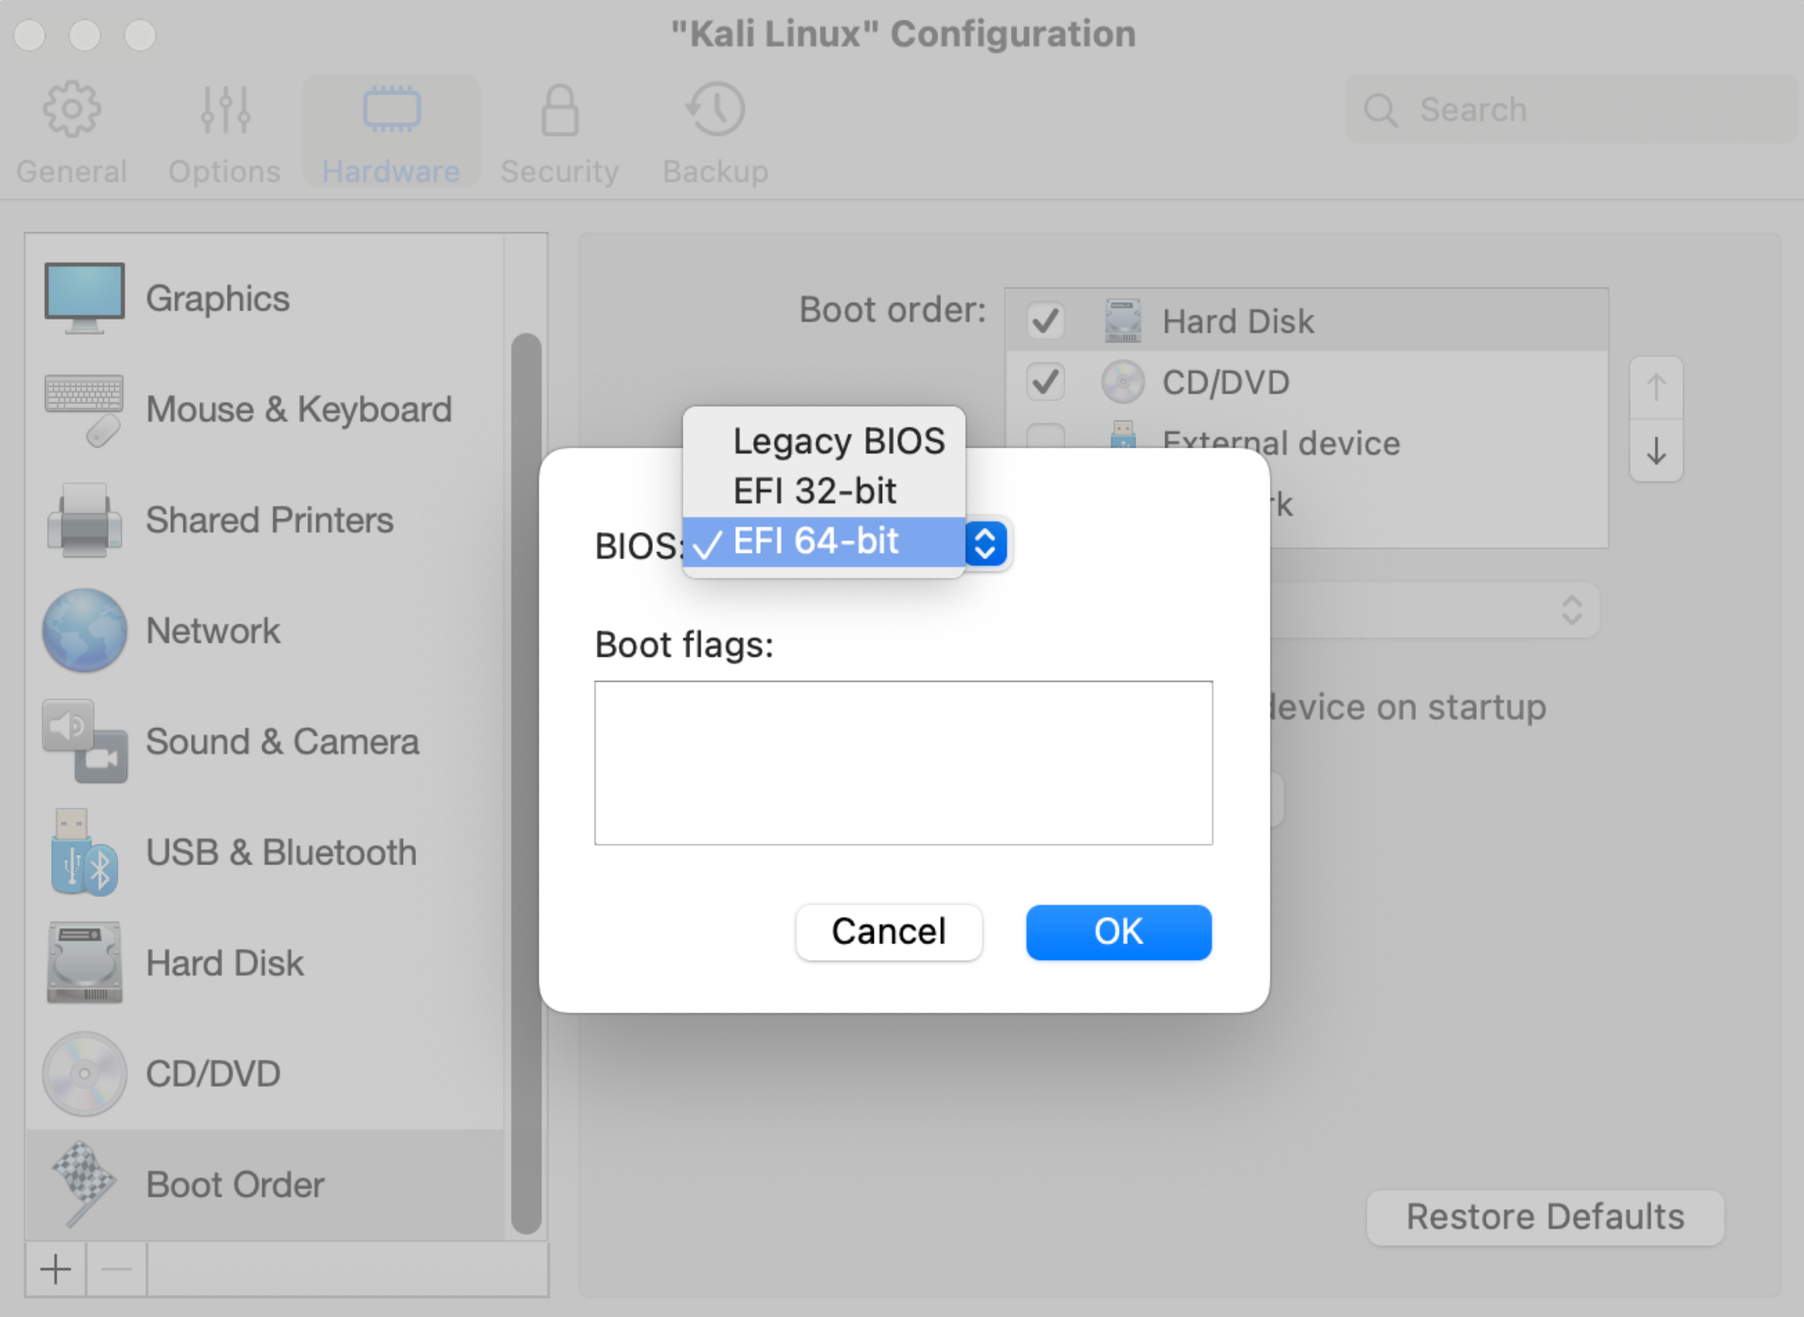
Once the configuration window of the VM opens up, open ‘Hardware' tab > Boot order > Advanced > select 'EFI 64-bit’ > OK. Close the window and proceed with the installation.
-
Once the VM is created, you can move it to the Apple silicon Mac and start there by following the steps described above.
How to create a new virtual machine from an ISO with Intel-based operating system
Note: the process will take a lot of time. Don’t forget to grab a cup of your favorite drink and settle in. Only Windows 10 and Windows Server 2022 are supported. To create a Windows 10 22H2 and Windows Server 2019 VM, follow the steps outlined below.
-
Download an x86_64 ISO image. E.g. Windows 10 ISO* can be downloaded from here.
-
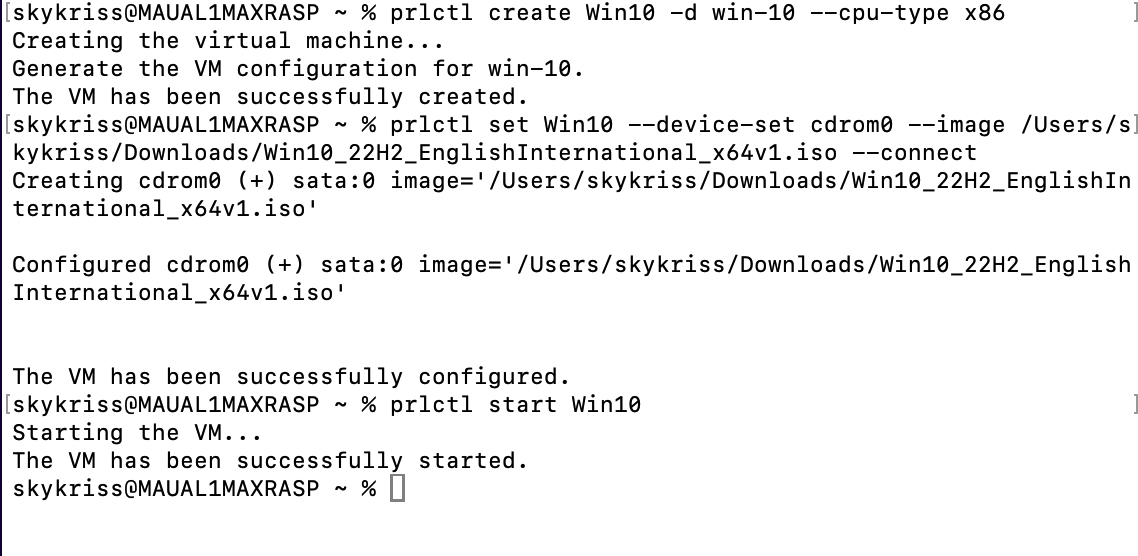
Open the Terminal utility and execute the commands below one by one to create and start the installation of a new x86_64 VM:
prlctl create <vm_name> -d <distro> --cpu-type x86
prlctl set <vm_name> --device-set cdrom0 --image <x86_iso_path> --connect
prlctl start <vm_name>
Note: to see a full list of possible options for <distro> variable, run the following command in Terminal and pick the one matching your operating system:
prlctl create <vm_name>-d -list
Example:
-
Follow on-screen instructions to proceed with the installation of the operating system.
Troubleshooting
There is no 'Start using Emulator' option
1. Make sure Parallels Desktop is activated with a Trial/Parallels Desktop Pro/Parallels Desktop Business or Enterprise Edition license.
2. If it's a Linux virtual machine, it means that your virtual machine doesn't have EFI enabled. Follow the instructions from here to recreate the virtual machine.
3. If it's a Windows 8.1 or earlier virtual machine, the option wouldn't exist since these Windows VMs aren't supported to run via this technology.
4. In case of imported Windows 10 virtual machine, if could be that it also uses legacy bios. You can verify that by using terminal command:
prlctl start "YourVirtualMachineName"
If message returned is:
It means your virtual machine uses Legacy bios, and machine also uses legacy bootlader. In that case, its recommended to create a new x86 emulated virtual machine, and attach\move the contents of the hard drive of Legacy machine to the new one.
Can't create a new x86_64 Windows 22 H2 or Windows 2019 VM
1. If you create a new x86_64 Windows 10 22H2 or Windows Server 2019 VM, you'll likely encounter the following error:
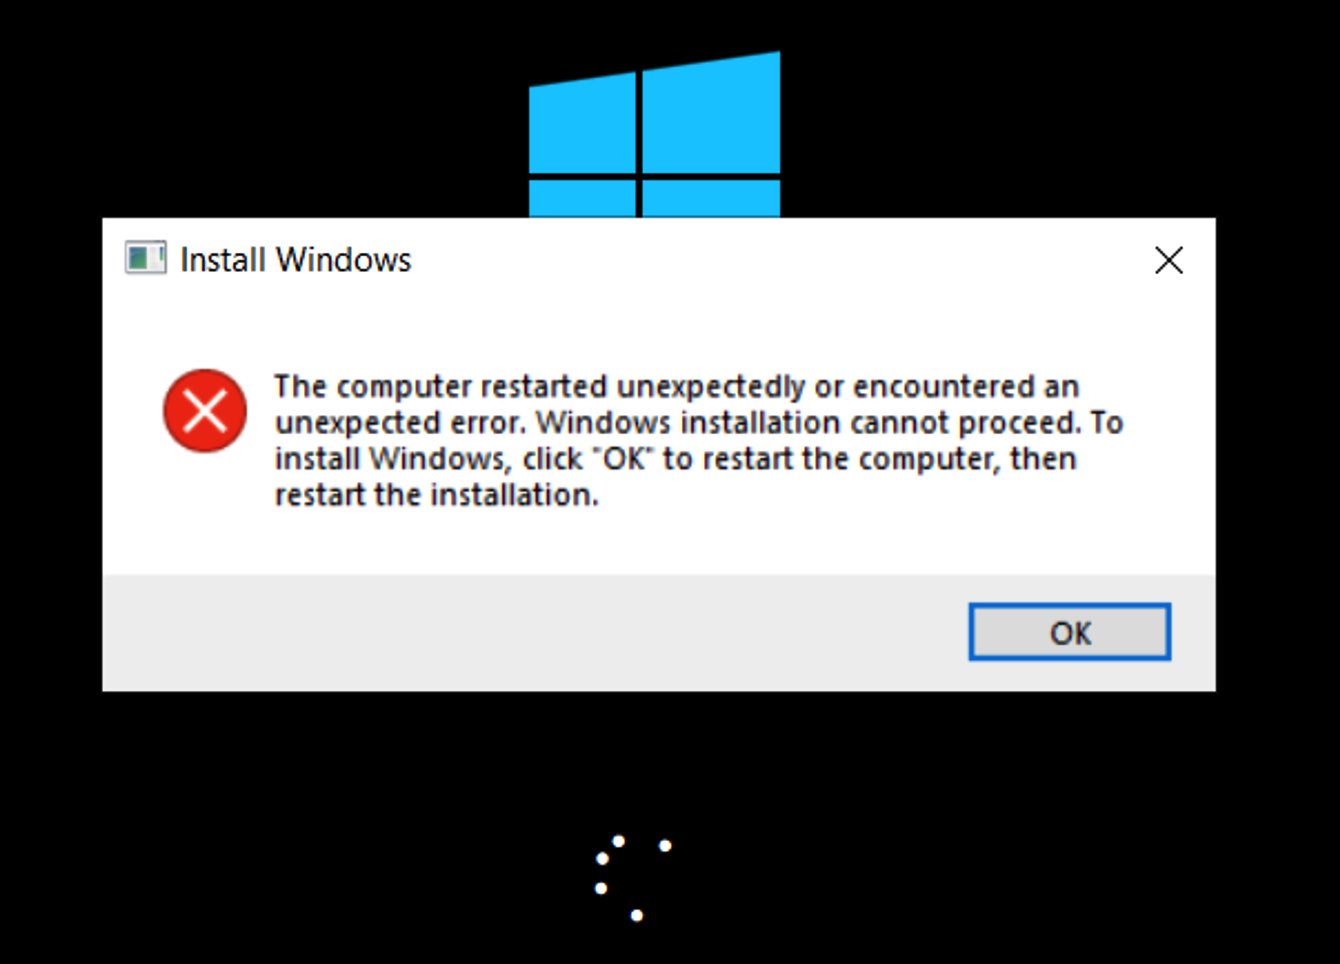
To work around the issue when the error occurs:
- Press Shift + Fn + F10 to open Command Prompt.
- Type
regedit.exeand press Enter. - Locate the registry key:
HKEY_LOCAL_MACHINE\SYSTEM\Setup\Status\ChildCompletion. - Change the
setup.exevalue to3(create the value if it doesn’t exist).
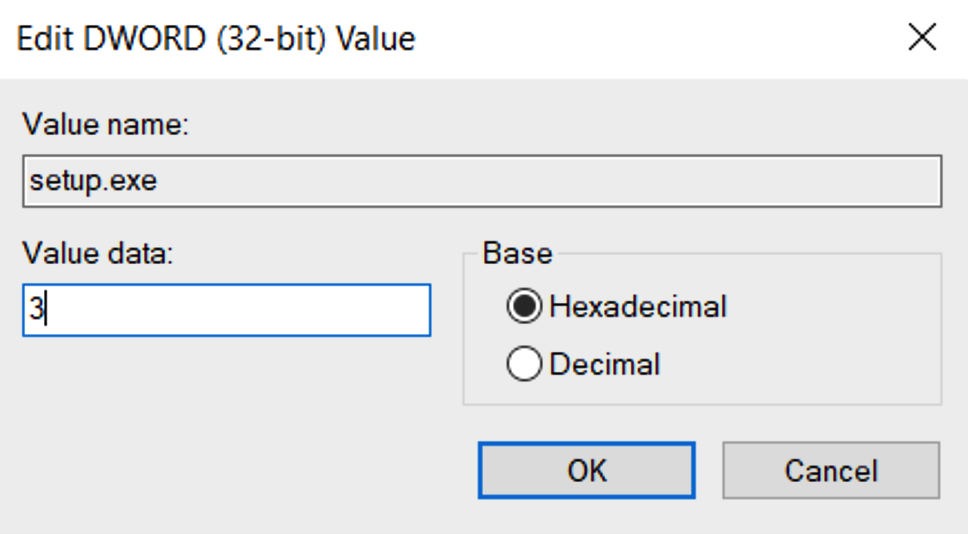
- Restart your VM to continue the installation.
Can't start an imported x86_64 VM from Terminal
If you start an x86_64 VM imported from an Intel Mac using the prlctl start utility and get the 'Failed to start the VM: operation has been cancelled' error message, it means that the VM wasn't shut down prior to the import from an Intel-based Mac. To start it, you need to reset the state of the VM by executing the steps below:
- Reset the state of the VM by executing the command:
prlctl stop <vm_name or UUID> --drop-state
- Start the VM again by using the prlctl start command
Imported VM is not identified as x86_64 after migration and cannot be started
If you encounter a virtual machine that doesn't have a "Start Using Emulator" option in Control Center after migration, it's possible it were last started in older versions of Parallels Desktop, below v19.
Due to the changes in configuration file, Parallels cannot identify the architecture correctly, and working around this issue would require an Intel Mac, at present time there is no other workaround:
- Move virtual machine to the Intel Mac.
- Start it in Parallels Desktop 19 or 20.
- Migrate it back to your Apple silicon and try starting it again.
Imported Windows 11 23h2 hangs on login screen
To work around this issue, we recommend one of the following:
1. Reset the virtual machine(Actions > Reset). It should trigger the Parallels Tools update, and system should behave normally afterwards.
2. Re-import the virtual machine without Parallels Tools installed, which would infer going back to the source Intel Mac > removing Parallels Tools and importing the machine again, in this case this issue should not present itself.
Share your feedback
Your feedback is always appreciated - please share your feedback and use cases in this Forum section.
Was this article helpful?
Tell us how we can improve it.