Symptoms
The appliance does not successfully boot, an error is shown in the VM console.
In certain circumstances, the file system of the appliance might be in trouble (unclean shutdown, file system corruption, ..) which results in the appliance not booting anymore, and users not being able to access the portal/Workspace after a reboot.
This may happen when there was for example a power cut (to the hypervisor) or the appliance had to be shut down in a forceful way.
The most common error on the VM console when an appliance is in this state is similar this:
FileNotFoundError: [Errno 2] No usable temporary directory found in ['/tmp', '/var/tmp', '/usr/tmp', '/']

Cause
Disk corruption occurred, highly likely because the machine was shut down in an improper way.
Resolution
This guide will focus on VMware ESXi but the procedure is almost the same for every hypervisor, except for how to load the virtual disk to boot from.
This guide will also help to resolve other ESX4-fs errors which may be shown in the VM console
- Download an Ubuntu Desktop ISO: https://ubuntu.com/download/desktop
This guide will use the Parted GUI so that's why we download the desktop release of Ubuntu. - Store the ISO on an ESXi datastore.
- Open the Edit settings dialog on ESXi to edit the appliance VM. Click on Add another device and select CD/DVD drive.
- Once the virtual CD drive has been added, open the drop-down menu of the New CD/DVD Drive and select Datastore ISO file. A dialog will appear to select the Ubuntu Desktop ISO from the data store you saved it to, if not select [Browse] and find the Ubuntu ISO. Make sure the option Connect at power on is checked.

- In the same dialog window, navigate to VM Options > Boot Options and tick the checkbox for Force BIOS setup.
- Start the VM so it will enter the BIOS: under boot make the CD-ROM drive the first device to boot from. Exit the BIOS and save the changes.
- Once the Ubuntu Desktop ISO has booted, select Try Ubuntu. This will launch a full Ubuntu Desktop.
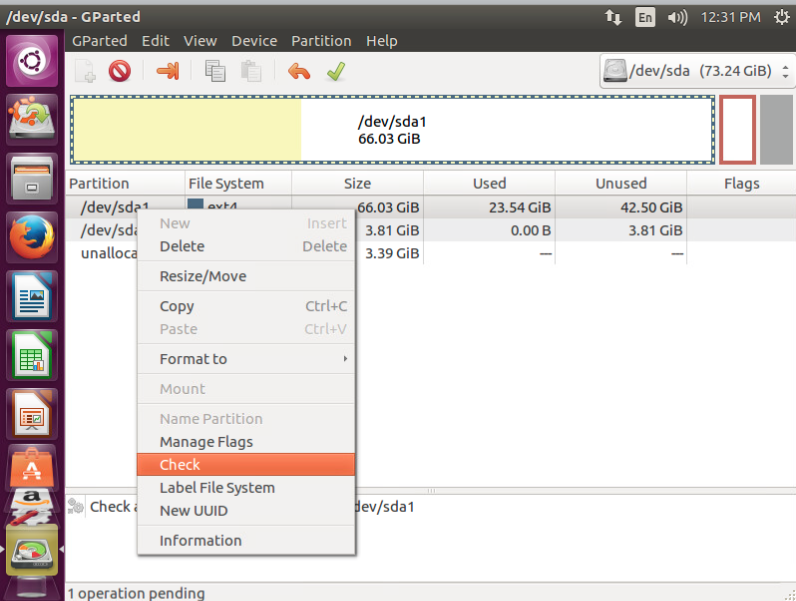
- Once the desktop is booted, start GParted Partition Editor. Right-click the /dev/sda1 partition and choose Check.
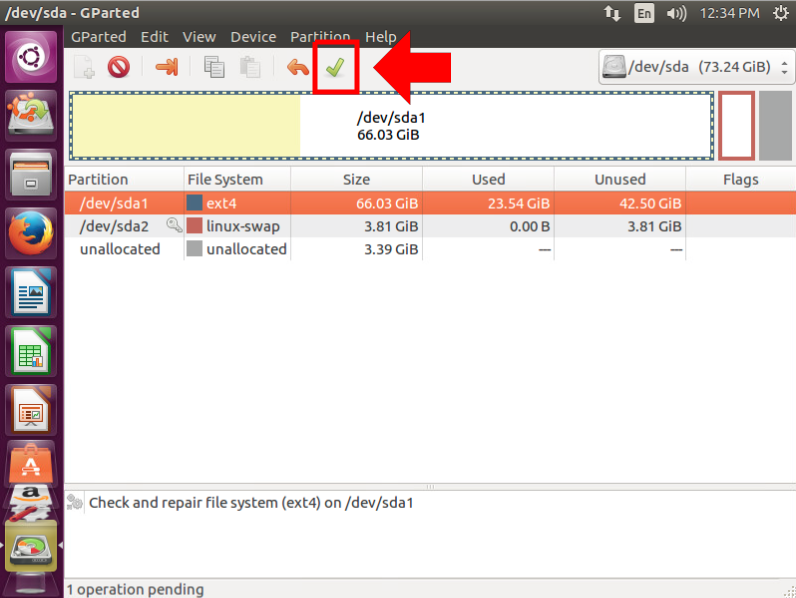
- The file system check is now queued, select Apply all operations to execute the check.
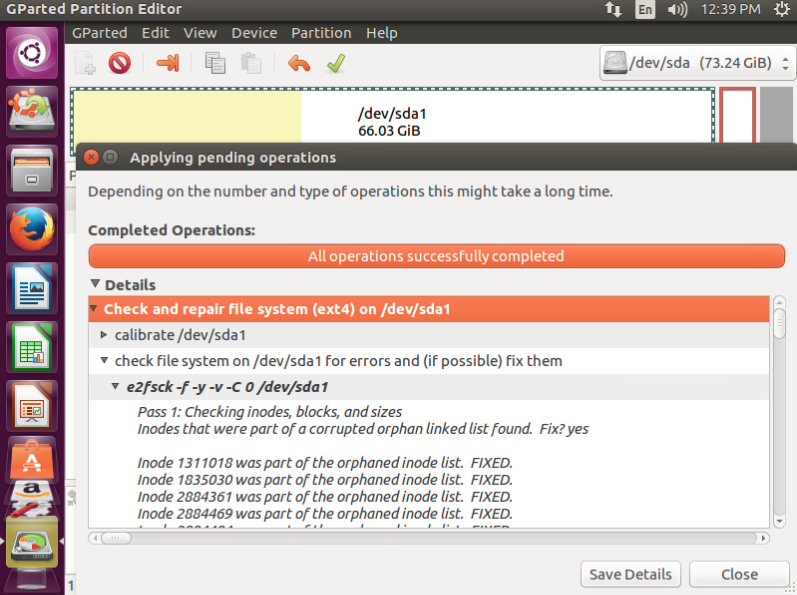
- The pending operations will now be applied and the file system will be repaired. You can view the report on what has been repaired on the file system.
- Shut down the appliance, edit the VM again. Disconnect the CD/DVD Drive 1. Otherwise, the VM will boot again from the Ubuntu Desktop ISO.
- Start your appliance again. If the repair went well, it should boot normally. If not, contact the support team.
Was this article helpful?
Tell us how we can improve it.