The below guide is a step-by-step configuration guide for deploying AWS Elastic load balancing (ELB) to front-end and load-balance Parallels RAS Environment.
Prerequisites and Assumptions
It is assumed that reader has a basic understanding of both AWS ELB solutions (Application Load Balancer (ALB)/Network Load Balancer (NLB)) and Parallels RAS. This guide will focus on the configuration of AWS ELB and Parallels Secure Client Gateways load balancing. It is assumed that Parallels RAS environment have already been deployed and configured on EC2 instances with 443 Inbound rule on the Parallels Secure Client Gateways security groups.
Note: Steps 1-5 focusing on AWS NLB configuration that will allow connectivity from native Parallels Clients. Should you need to configure load balancing for HTML5 clients only or in addition to the native Parallels Clients, please also review the configuration at Step 6.
More information AWS Elastic Load Balancing available here: https://docs.aws.amazon.com/AmazonECS/latest/developerguide/service-load-balancing.html
Document process flow
The process that will be discussed in more detail is as illustrated below:
- Configure your Target Group.
- Configure Target Group attributes.
- Choose the Load Balancer type.
- Configure Load Balancer and Listener.
- Test and Evaluate Load Balancing.
- Using Network Load Balancer Access feature
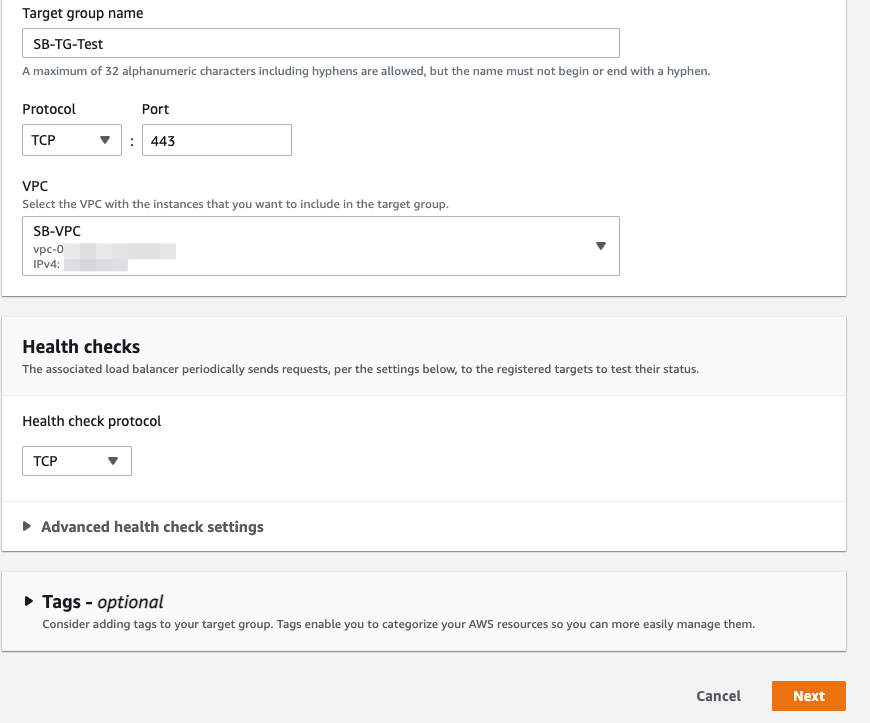
Step 1: Configure your Target Group
Create a target group, which is used in request routing. The rule for your listener routes requests to the registered targets in this target group. The load balancer checks the health of targets in this target group using the health check settings defined for the target group.
To configure your target group
- Open the Amazon EC2 console at https://console.aws.amazon.com/ec2/.
- In the navigation pane, under Load Balancing, choose Target Groups.
- Choose Create target group.
- Keep Target type as instance.
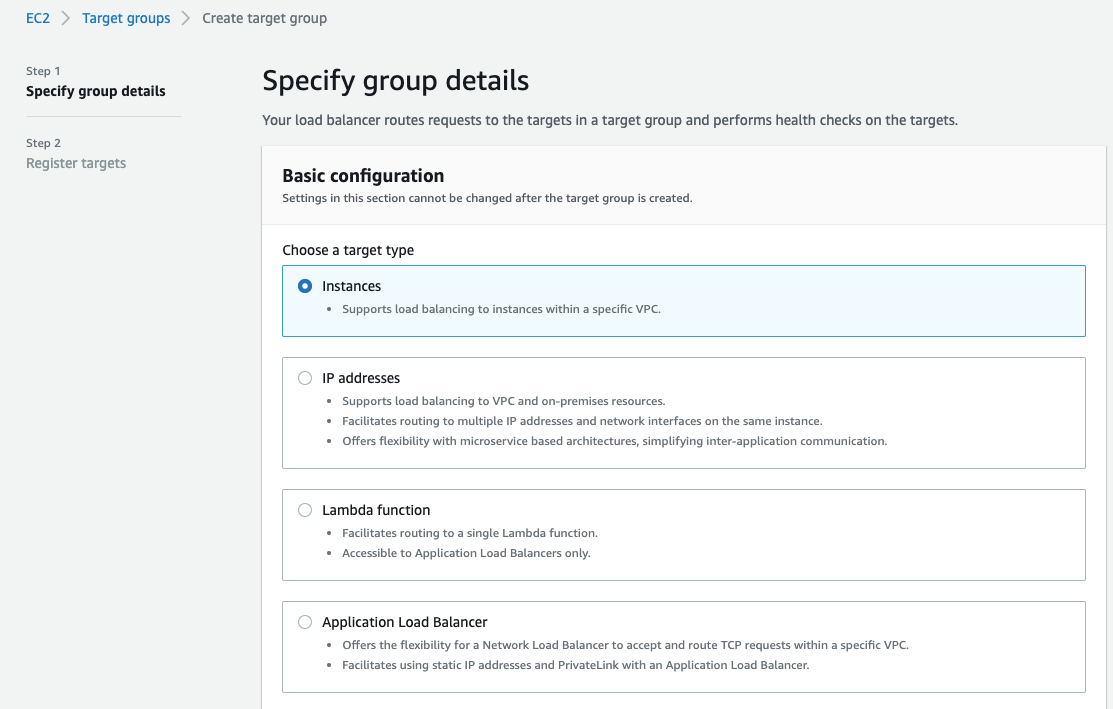
- For Target group name, enter a name for the new target group.
- Set Protocol as TCP, and Port as 443.
- Select the VPC containing your instances.
- For Health checks, keep the default settings.
- Choose Next.
![]()
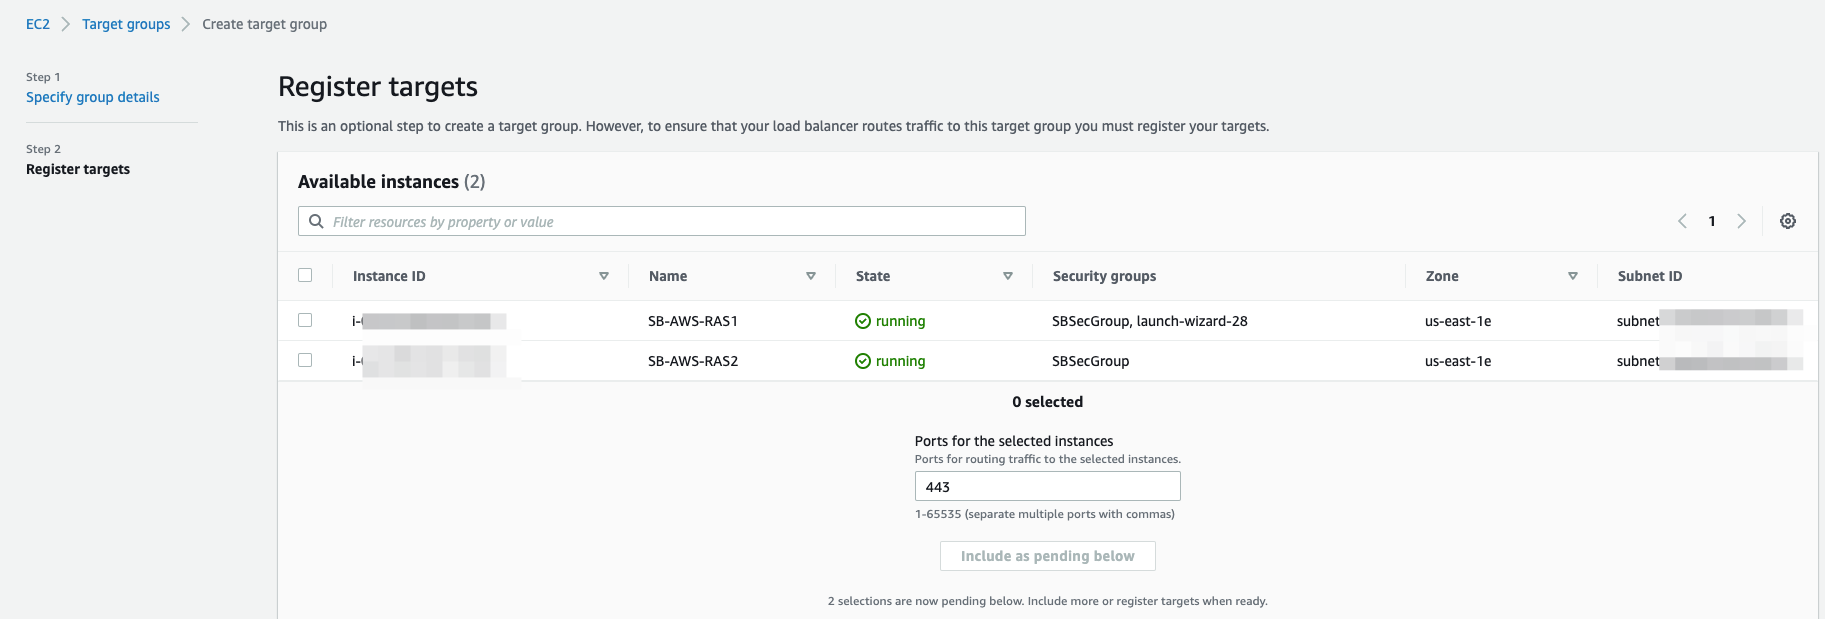
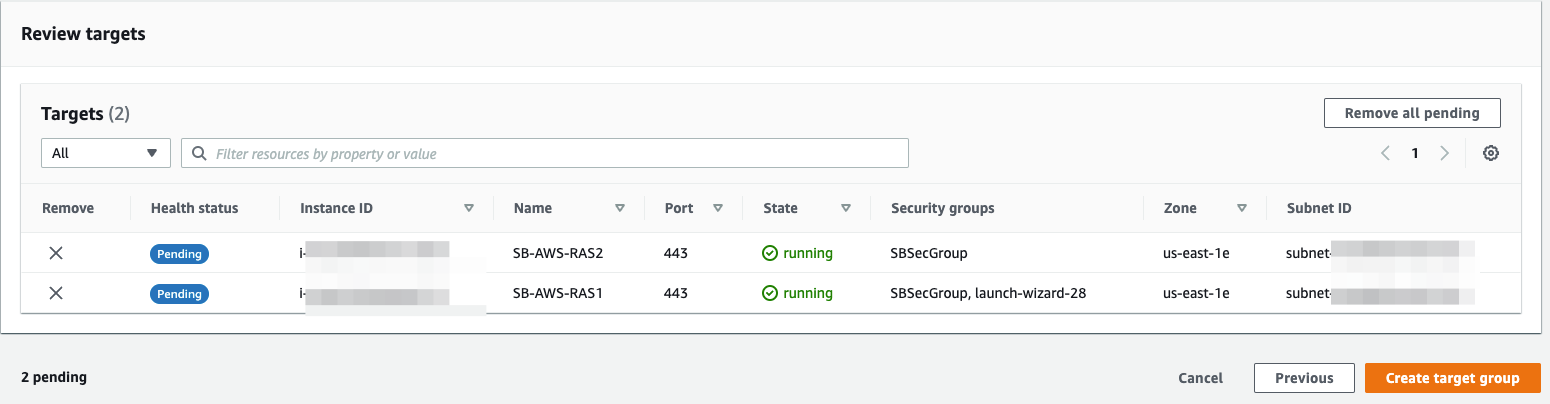
- On the Register targets page, complete the following steps. This is an optional step to create a target group. However, you must register your targets if you want to test your load balancer and ensure that it is routing traffic to your targets.
- For Available instances, select one or more instances.
- Keep the default port 443, and choose Include as pending below.
![]()
- Click on Create target group.
![]()
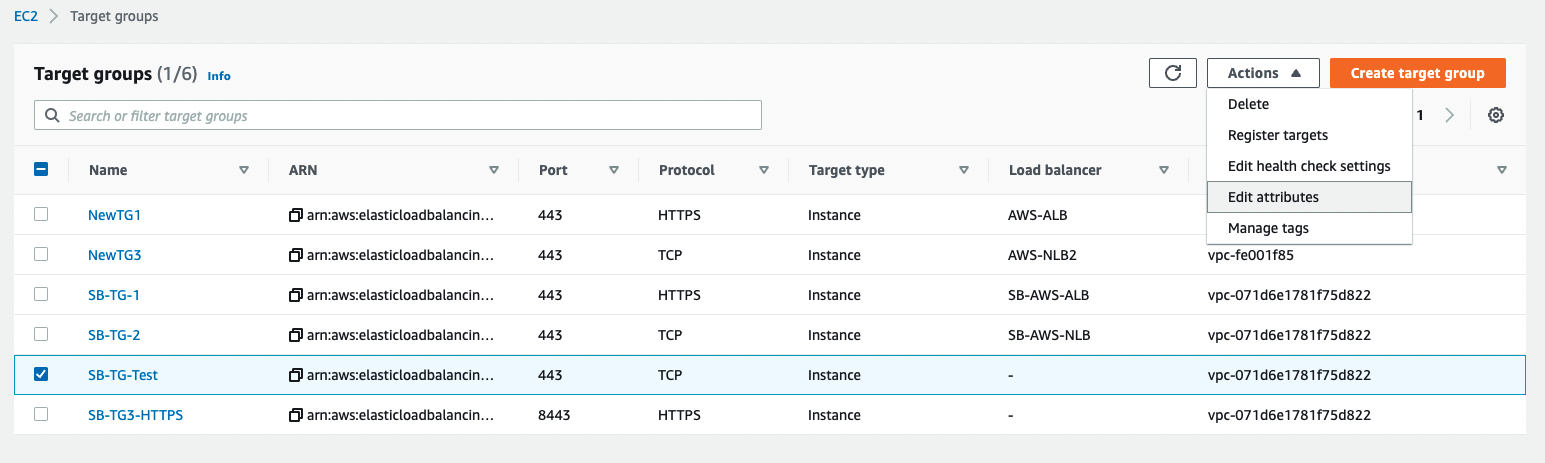
Step 2: Configure Target Group attributes
Once target group created successfully, open AWS navigation pane and go to Target groups. Choose the Target group created in Step 1 above > Actions > Edit attributes.
![]()
Edit the Deregistration delay from default 300 to 0 and click Save Changes.
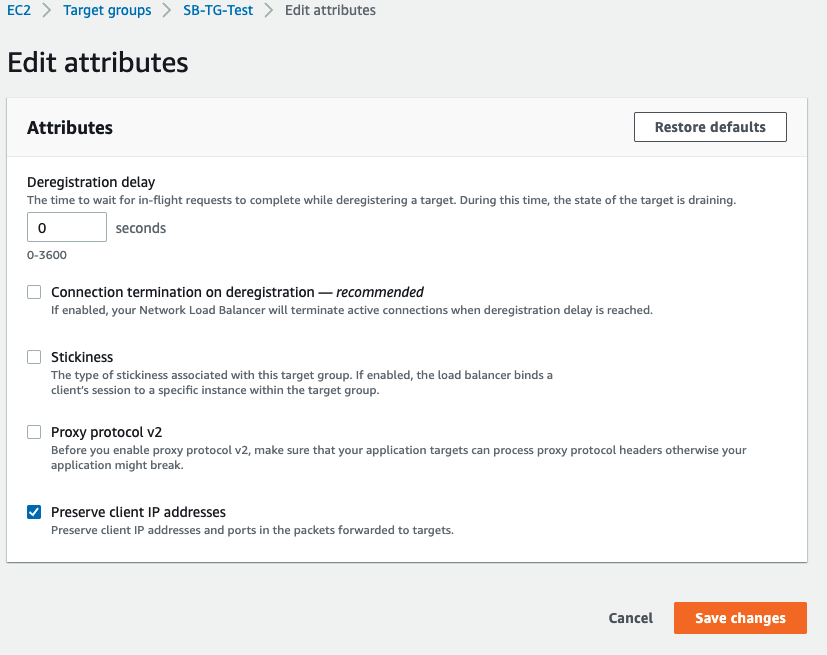
![]()
Please see here for more information regarding deregistration delay.
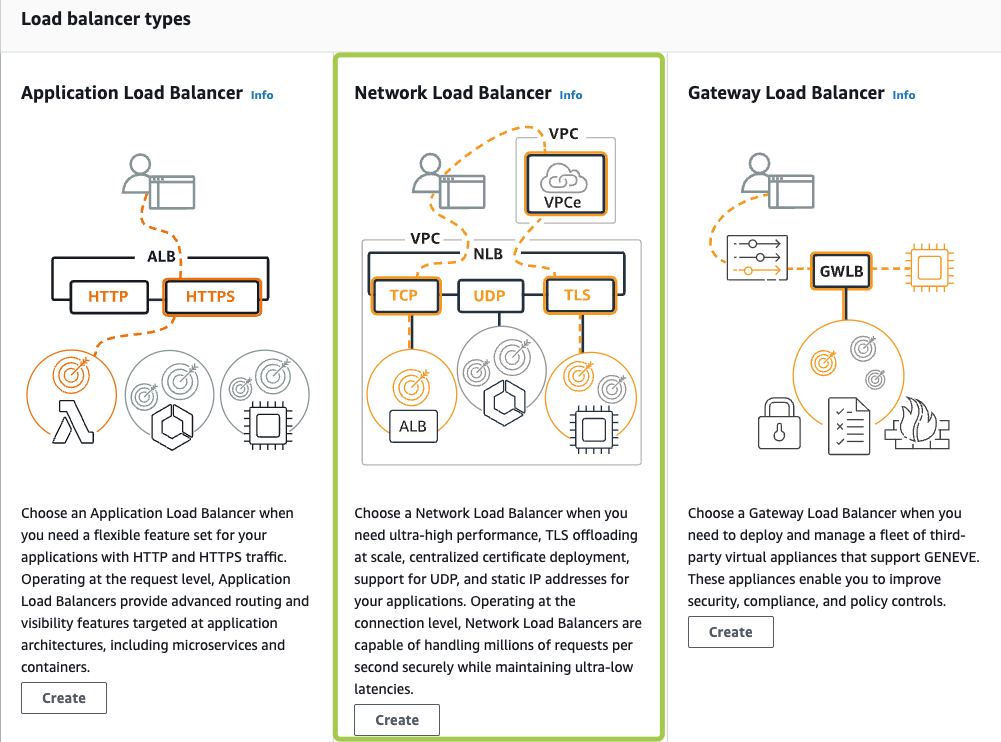
Step 3: Choosing the Load Balancer Type
A load balancer serves as the single point of contact for clients. The load balancer distributes incoming traffic across multiple targets, such as Amazon EC2 instances acting as Parallels RAS Secure Client Gateways.
Elastic Load Balancing supports the following types of load balancers: Application Load Balancers, Network Load Balancers, Gateway Load Balancers and Classic Load Balancers (will be retired on August 15th, 2022).
For native Parallels Clients connectivity the Network Load Balancer can be used.
![]()
For more information on AWS Network Load Balancer please check this article
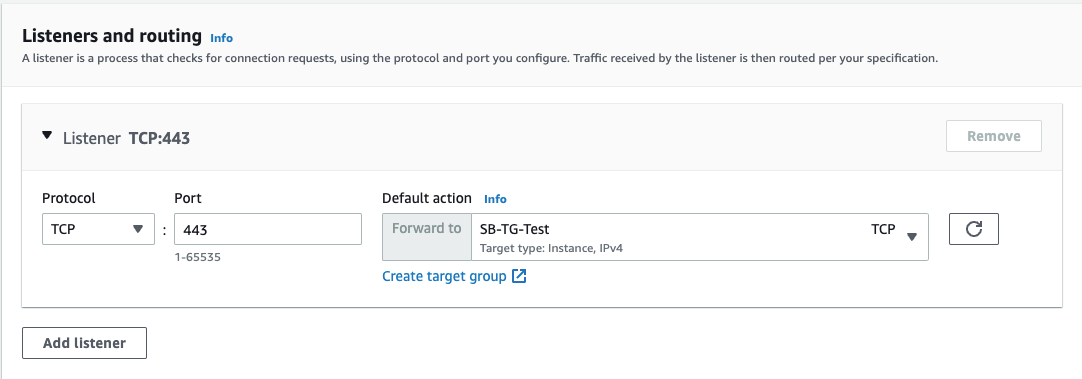
Step 4: Configure Load Balancer and Listener
|
1 |
Basic Configuration |
|
|
Name |
Provide a significant name for your load balancer |
|
|
Scheme |
Internet-facing |
|
|
2 |
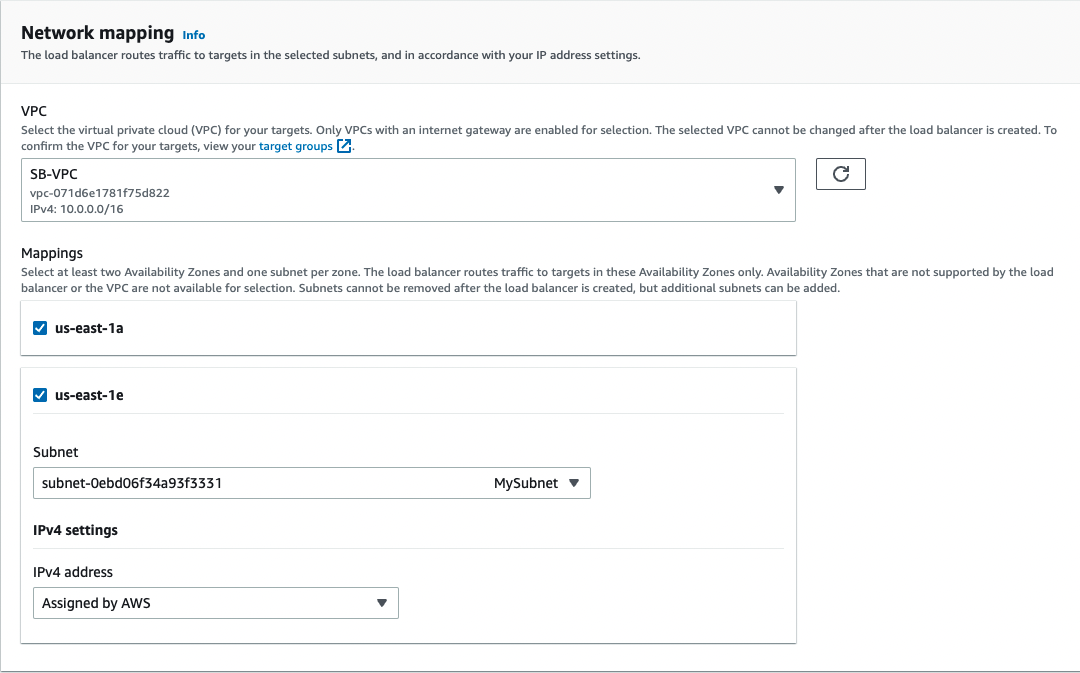
Network Mappings |
|
|
Select the appropriate VPC and choose the availability zones where your instances reside in |
||
|
3 |
Listeners and routing |
|
|
Protocol |
TCP |
|
|
Port |
443 (or an alternate port in case AWS ALB used for HTML5 clients. See Step 6 below) |
|
|
Default action |
Select the target group created and registered in Step 1 |
|
- For Load balancer name, enter a name for your load balancer. For example, MY-AWS-NLB
- For Scheme and IP address type, keep the default values.
- For Network mappings, select the VPC that you used for your EC2 instances. For each Availability Zone that you used to launch your EC2 instances, select the Availability Zone and then select one public subnet for that Availability Zone.
By default, AWS assigns an IPv4 address to each load balancer node from the subnet for its Availability Zone. Alternatively, when you create an internet-facing load balancer, you can select an Elastic IP address for each Availability Zone. This provides your load balancer with static IP addresses.
- For Listeners and routing, keep the default, which is a listener that accepts TCP traffic on port 443.
- For Default action, select the target group that you created and registered in step 1.
- (Optional) Add a tag to categorize your load balancer. Tag keys must be unique for each load balancer.
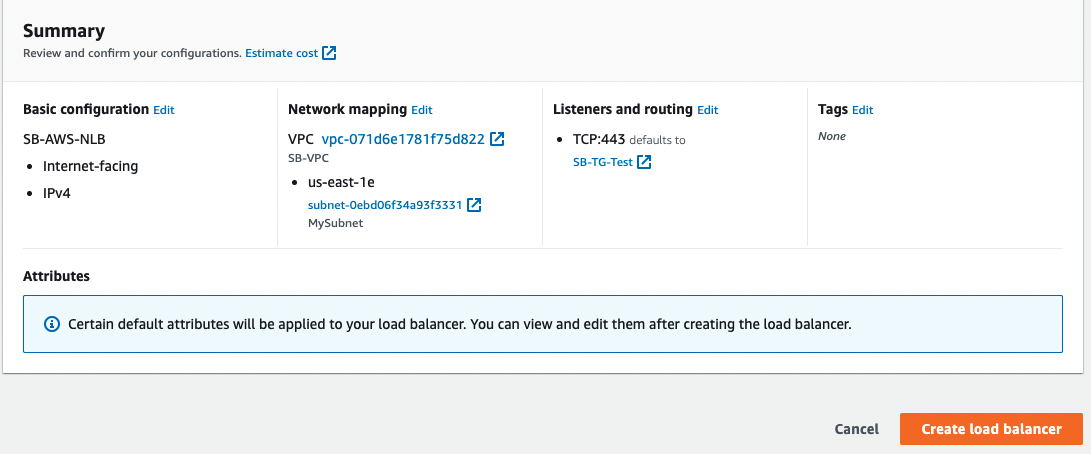
- Review your configuration, and choose Create load balancer. A few default attributes are applied to your load balancer during creation. You can view and edit them after creating the load balancer. For more information, see Load balancer attributes.

![]()
![]()
![]()
![]()
Step 5: Test and Evaluate Load Balancing
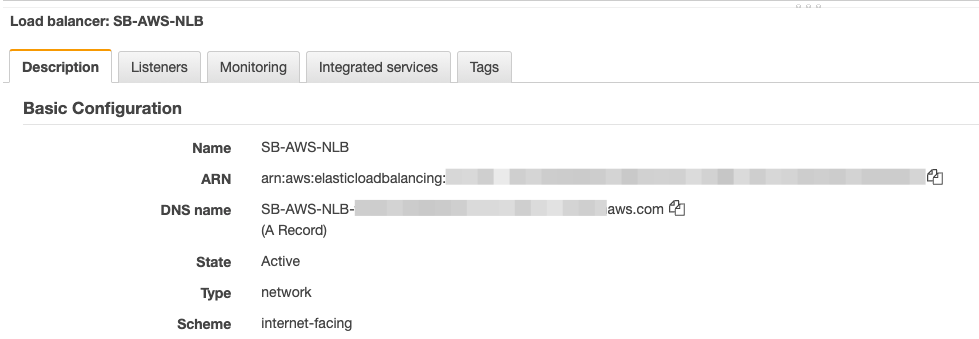
You can test Load balancer configuration by taking note and copying the DNS name given to the Load balancer as shown from Load balancers – Description – Basic configuration
![]()
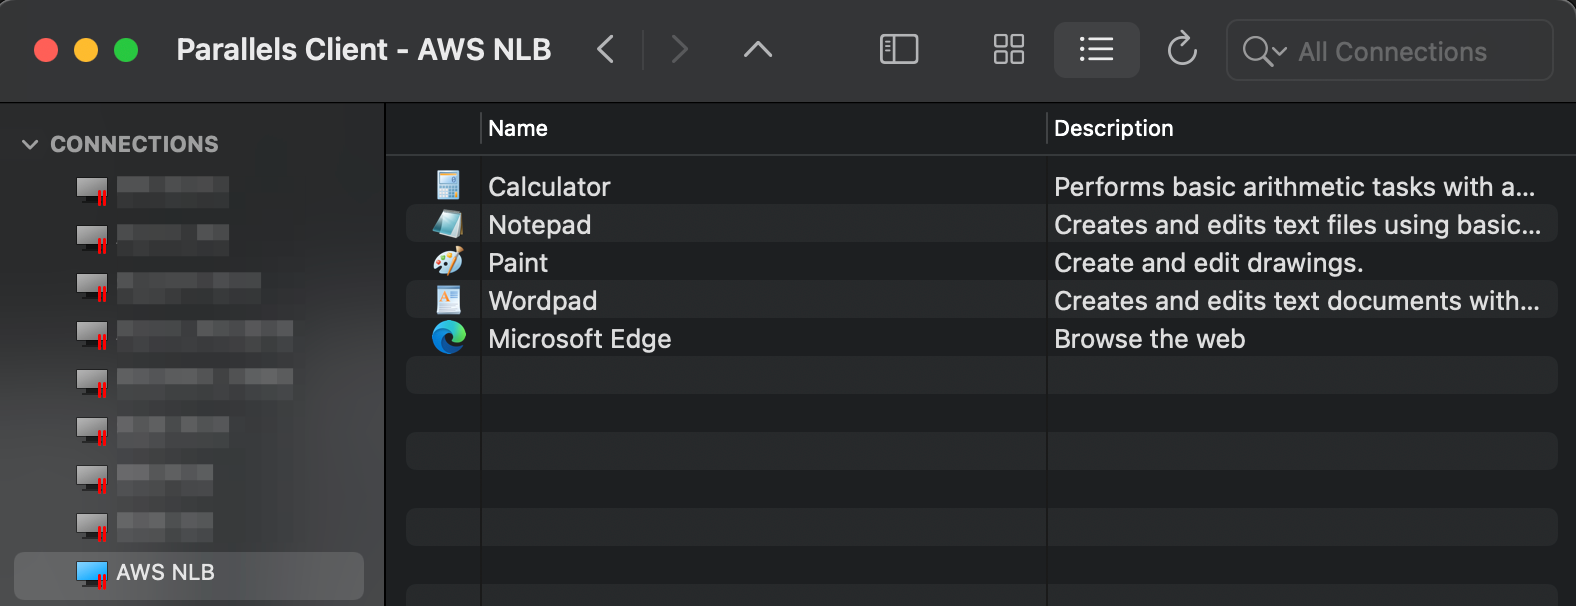
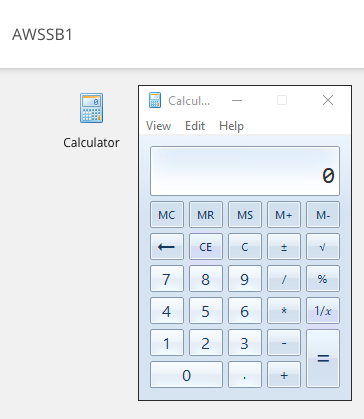
Log on from Parallels Client and confirm application launching:

Step 6: Using "Network Load Balancer Access" feature
The aforementioned configuration enables support for native Parallels Clients, but connections over HTML5 client using a web browser will fail as TCP does not support stickiness. The Network Load Balancers access feature is intended for deployment scenarios where third-party front-end load balancers such as Amazon Web Services (AWS) Elastic Load Balancers (ELBs) are used. It allows you to configure an alternate hostname and port number to be used by the Network Load Balancer (NLB). This is needed to separate hostnames and ports on which TCP and HTTPS communications are carried out because AWS load balancers don't support both specific protocols over the same port.
When one need to utilize both, native Parallels and HTML5 connections, in addition to AWS NLB, AWS ALB needs to be deployed.
In this case, below please find the recommended configuration:
Parallels RAS Console
1. In RAS Console > Gateways > right-click on the required Gateway Agent > Properties > HTML5 tab (one can also apply this configuration to all RAS gateways within the site by modifying the Site defaults):
2. In the Network load balancer section do the following:
- Check Use alternate port and specify an alternate port number (in our example, port 8443). The port must not be used by any other component in the RAS Farm or Site. When the alternate port is enabled, all native Parallels Clients will use this port to connect to the RAS Farm or Site.
- Check Use alternate hostname and specify the hostname of your AWS NLB (When the alternate hostname is enabled, all platform-specific Parallels Clients will use this hostname to connect to the RAS Farm or Site)
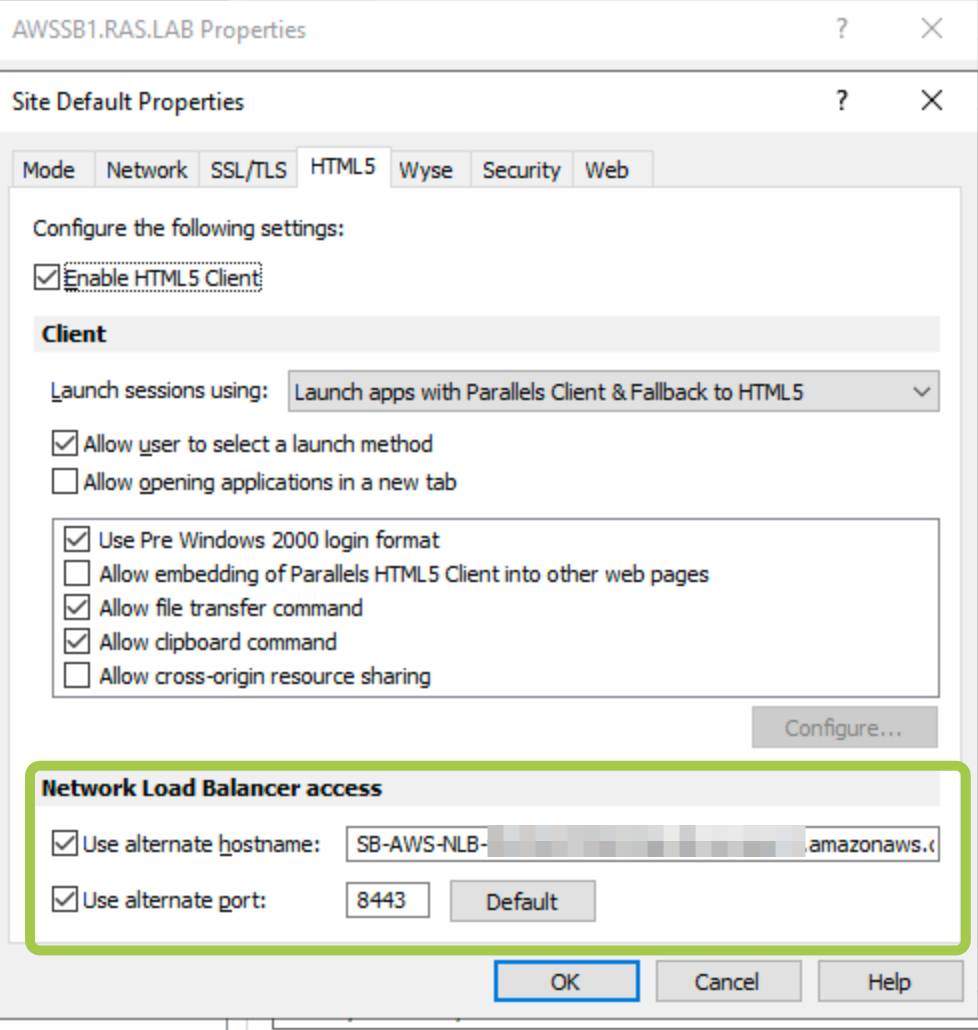
Check this article for more information
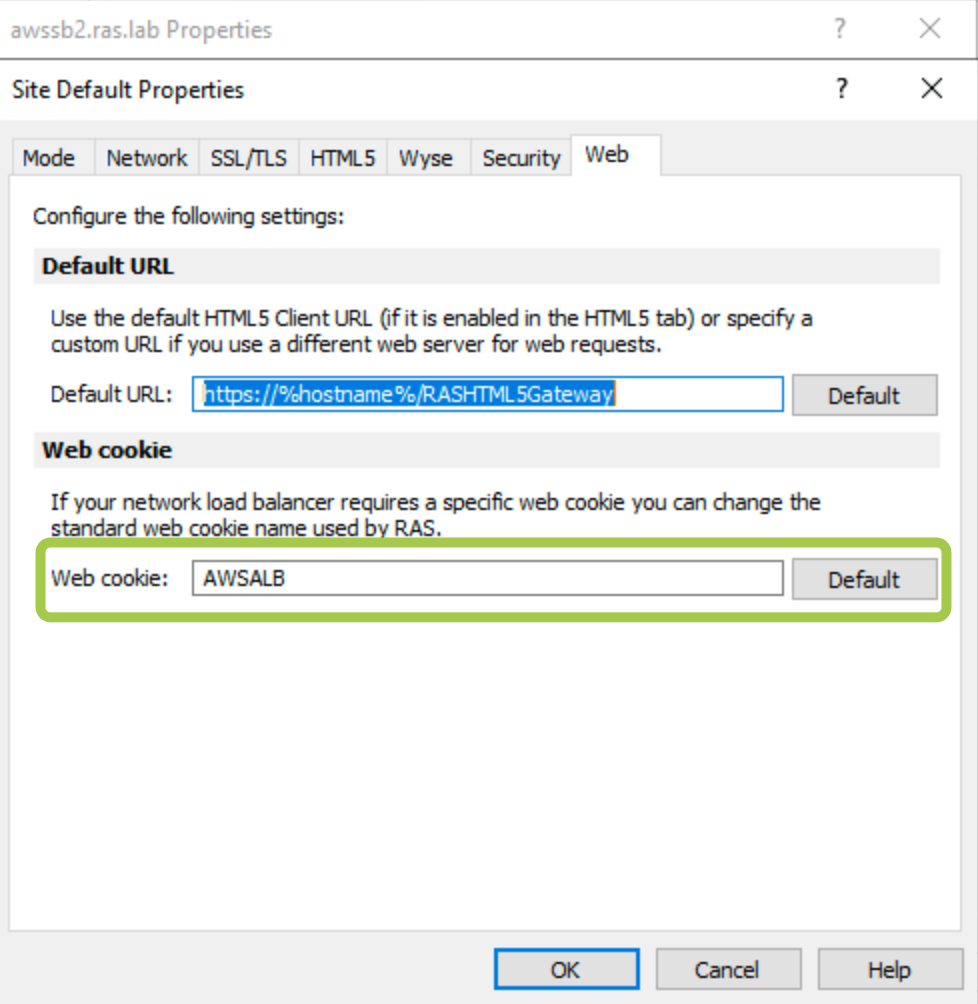
3. Switch to the Web tab and set the web cookie as AWSALB
AWS Application Load Balancer
Configure AWS Application Load Balancer (ALB) as described here: https://docs.aws.amazon.com/elasticloadbalancing/latest/application/application-load-balancer-getting-started.html
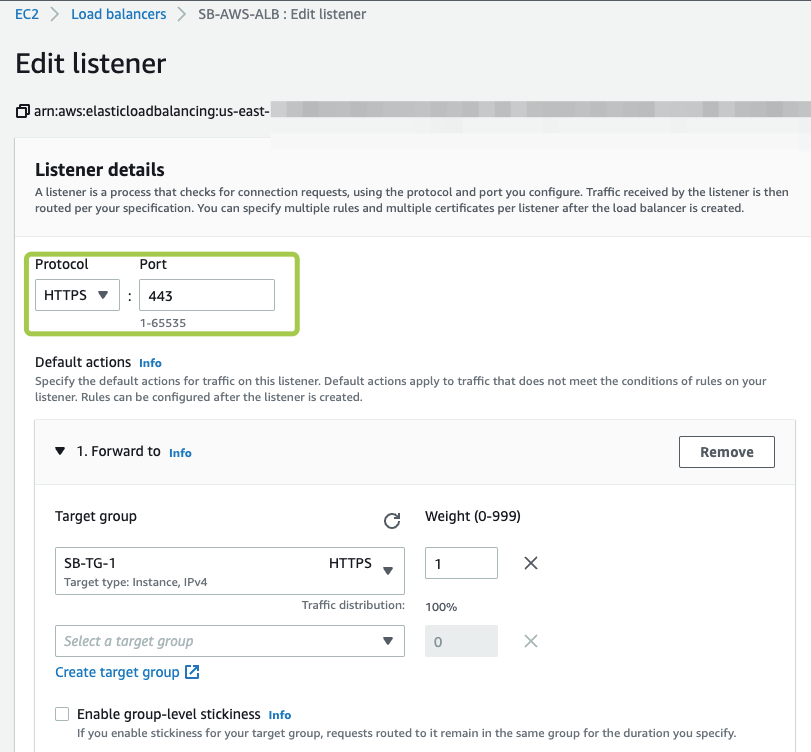
For AWS ALB Listener we suggest the following configuration:
Protocol: HTTPS
Port: 443
Add the required target group(s), specify the security settings and click Save Changes

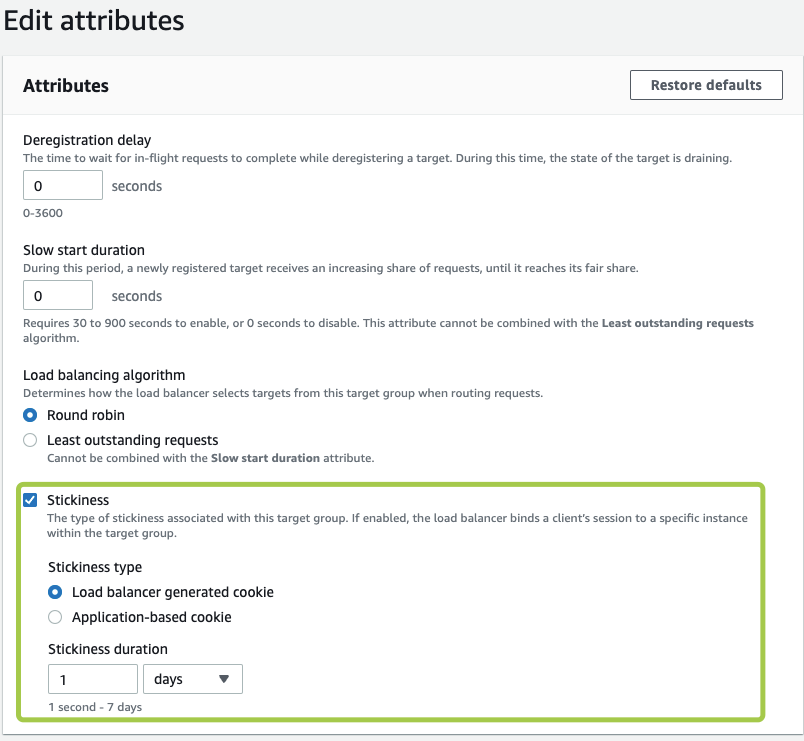
Target Group settings for AWS Application Load Balancer:
- Target type: Instance
- Protocol HTTPS
- Port 443
Ensure you have enabled session stickiness for the target group associated with your AWS ALB:
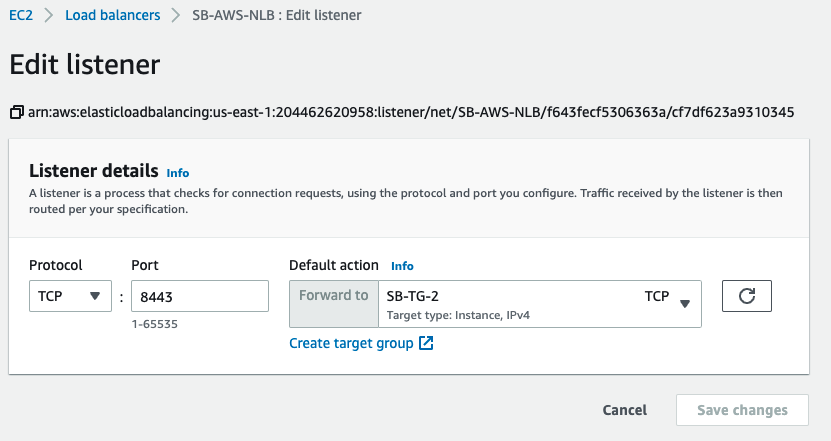
AWS Network Load Balancer
AWS NLB Listener port needs to be changed to an alternate one that we configured in Parallels RAS Console above (in our example, 8443)
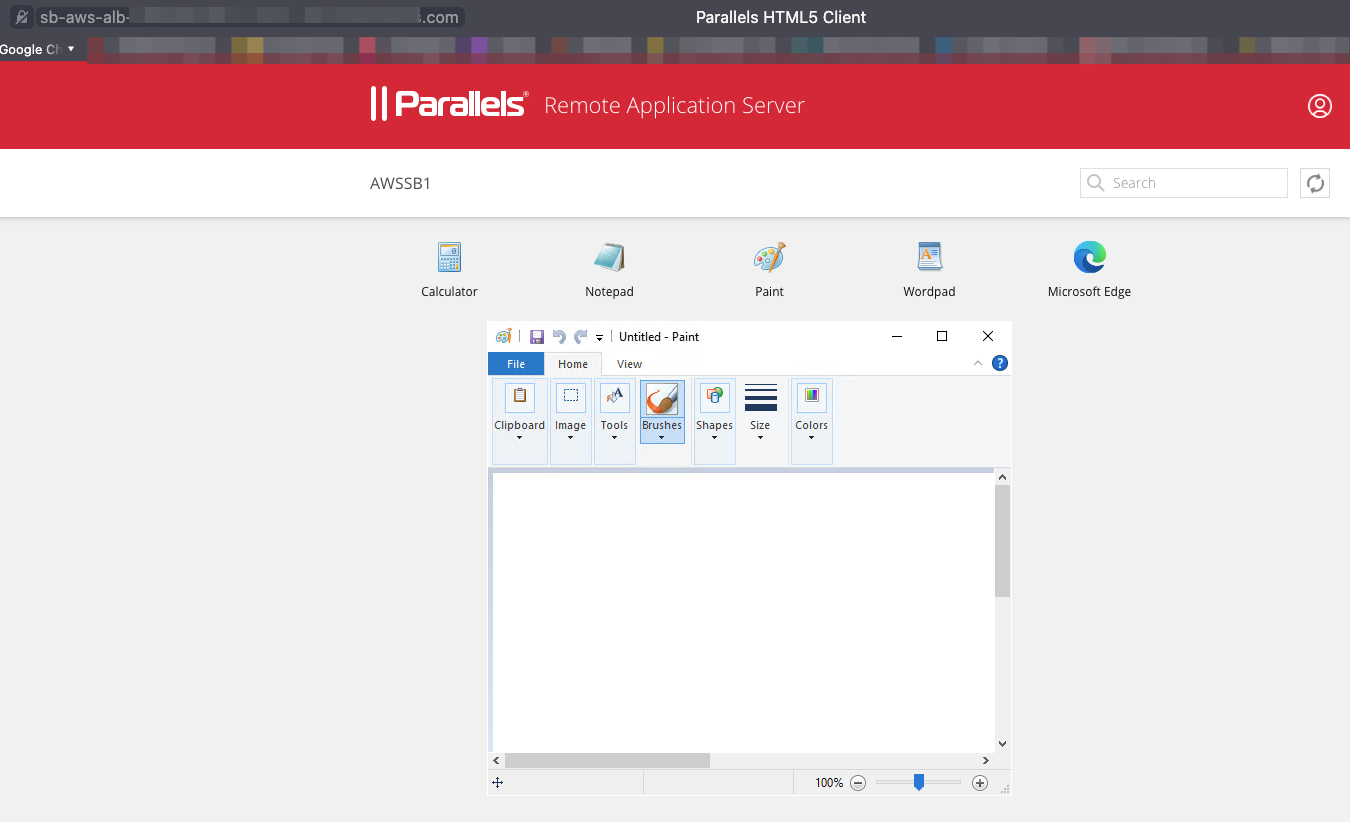
Testing Load Balancing using Parallels HTML5 Client
Copy the DNS hostname of AWS ALB in AWS Console (e.g. SB-AWS-ALB-########.us-east-1.elb.amazonaws.com) and try accessing this using the web browser.
To test the work of AWS ALB (connection is being done over HTTPS):
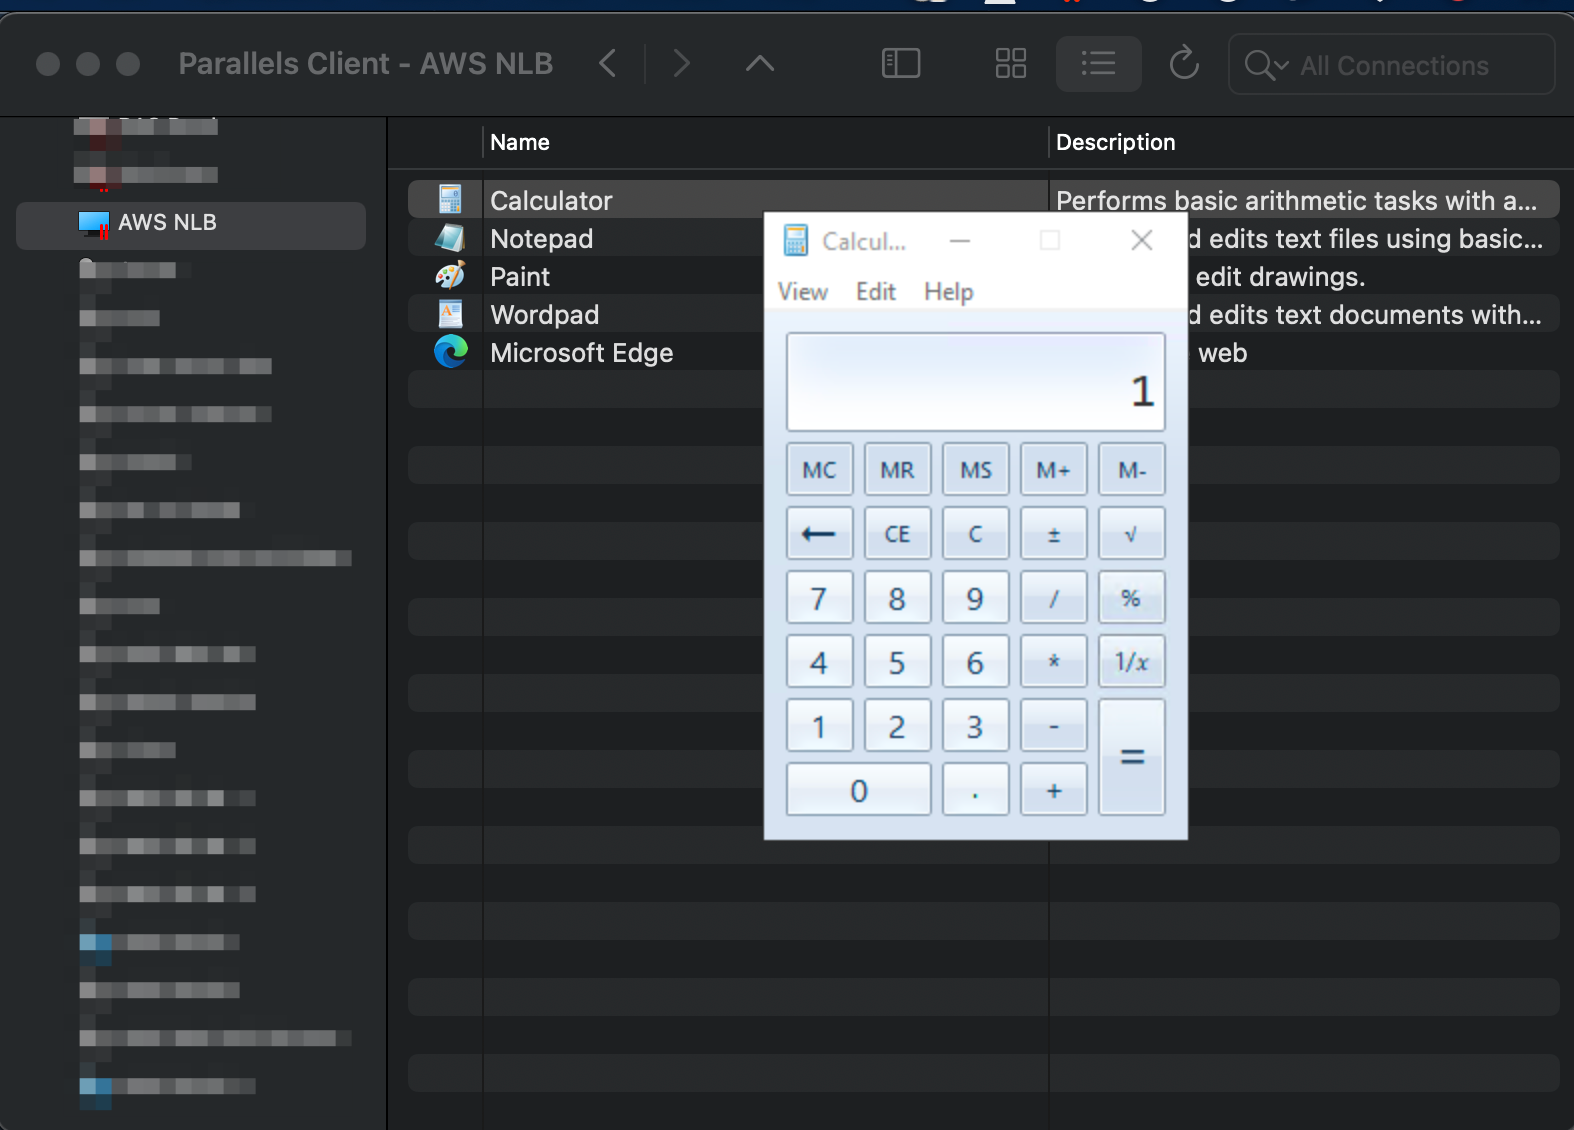
Right-click on an app > Open in Parallels HTML5 Client
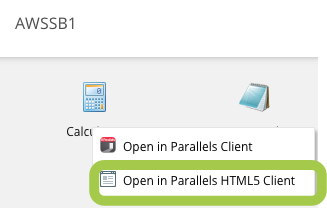
To check the load balancing over TCP, in the same Parallels HTML5 portal, right-click on an app > Open in Parallels Client
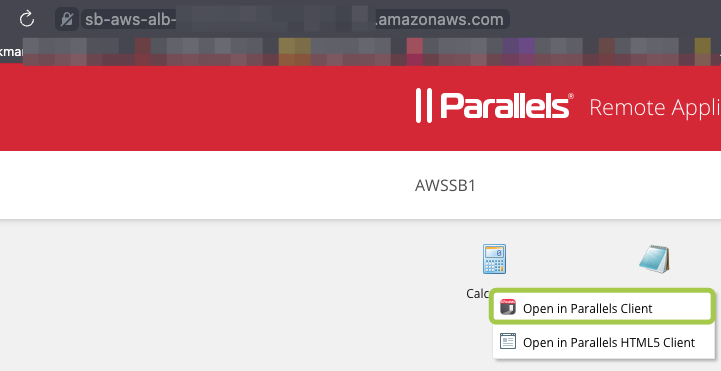
You will notice that the native Parallels Client is establishing connection using the alternate hostname:
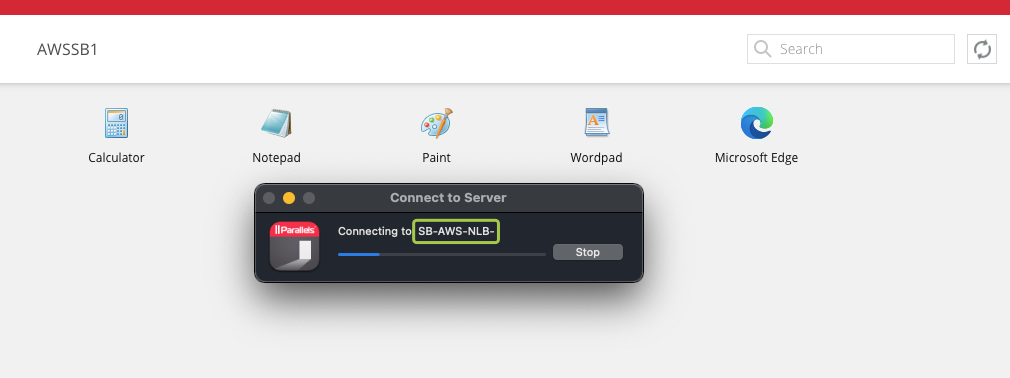
Testing Load Balancing using Parallels Client
Since recent modification, at Parallels Client we need to specify the alternate port that was set in Parallels RAS Console and AWS NLB Listener.
Connect and launch a published app
Links for reference
For more information regarding Parallels RAS please see here: https://www.parallels.com/products/ras/remote-application-server/
For more information regarding AWS ELB please see here: https://docs.aws.amazon.com/elasticloadbalancing/index.html
Was this article helpful?
Tell us how we can improve it.