The Device Manager feature allows the administrator to convert Windows devices running Windows 7 up to Windows 11 into a thin-client-like OS. In order to be managed, Windows devices must be running the latest version of Parallels Client for Windows.
Install Parallels Client on a Windows computer
1 Download the Parallels Client for Windows from https://www.parallels.com/products/ras/download/client/.
2 Double click the RASClient.msi or RASClient-x64.msi and follow the on-screen instructions to complete the installation wizard.
3 Create a new Parallels RAS connection by clicking File > Add New Connection
4 Select Parallels Remote Application Server and click OK
5 Next, configure the following connection properties:
• Primary Connection — Specify the Parallels RAS FQDN or IP address.
• User Credentials — Enter username, password, and domain.
6 Click OK to create the connection and then double-click it to connect to Parallels RAS.
Upon completion, the Windows device will appear in the Parallels RAS Console in Device Manager > Devices.
Windows Device Enrolment
You can configure Parallels RAS to enroll a Windows device automatically or you can opt to do it manually.
To manually enroll a Windows device in Parallels RAS:
1 In the RAS Console, navigate to Device Manager > Devices.
2 Select a device on the Devices tab.
3 Click Tasks > Manage Device.
The device state will change to Pair pending until the device reconnects. Ensure the Device Manager Port option is enabled for a gateway. To verify this:
1 Navigate to Farm > > Secure Gateways.
2 Select a gateway and click Tasks > Properties.
3 Click the Network tab and make sure that the Device Manager Port option is selected
Once the device reconnects, the enrollment process is complete and the device state is updated to Logged On, which indicates that it's now managed by Parallels RAS. The user running Parallels Client on their Windows PC can also verify that the PC is managed by clicking Help > About on the main Parallels Client menu. The information includes the RAS Secure Gateway information that the Parallels Client uses to communicate with Parallels RAS.
You can also set Parallels RAS to automatically manage Windows devices. To do so:
1 In the RAS Console, select the Device Manager category.
2 Click the Options tab.
3 Enable the Automatically manage Windows devices option.
The administrator can now check the state of the device and perform power operations, such as Power On, Power Off, Reboot, and Logoff.
Lock a Windows device
To lock a Windows device that has an active session, select it in the list and then click the Lock item in the toolbar at the bottom. Note that the Lock icon is only enabled when the selected device is in the Logged On state.
You can also lock a device (or a device group) using the scheduler.
Shadow a Windows device
By shadowing a Windows device, you gain full access to the Windows desktop on the device and can control local and remote applications.
To shadow a Windows device:
1 In the RAS Console, navigate to Device Manager > Devices.
2 Select a device and click the Shadow item in the toolbar at the bottom.
The Windows user will be prompted to allow the administrator to take control over the device and can choose to deny access. The Request Authorization prompt can be deactivated by the administrator. To do so:
1 In the Parallels RAS Console, select the Device Manager category and click the Windows Device Groups tab in the right pane.
2 Right-click a group and choose Properties.
3 In the Windows Device Group dialog, select the Shadowing tab and clear the Request Authorization option.
Desktop Replacement
The Replace desktop feature limits users from changing system settings or installing new applications. When this feature is enabled, the Windows desktop is replaced by Parallels Client, which converts it into a thin-client-like OS without actually replacing the operating system. This way the user can only deploy applications from Parallels Client, which gives the administrator a higher level of control over connected devices.
Additionally, the Kiosk mode allows you to limit the user from power cycling a device (power actions are still available in the Admin mode; see below for details.).
To enable the Replace desktop feature:
1 In the Device Manager category, select the Windows Device Groups tab.
2 Right-click a group and choose Properties.
3 Click the OS Settings tab.
4 Enable the Replace desktop option and optionally the Kiosk mode option.
5 Click OK.
Switching to Admin Mode
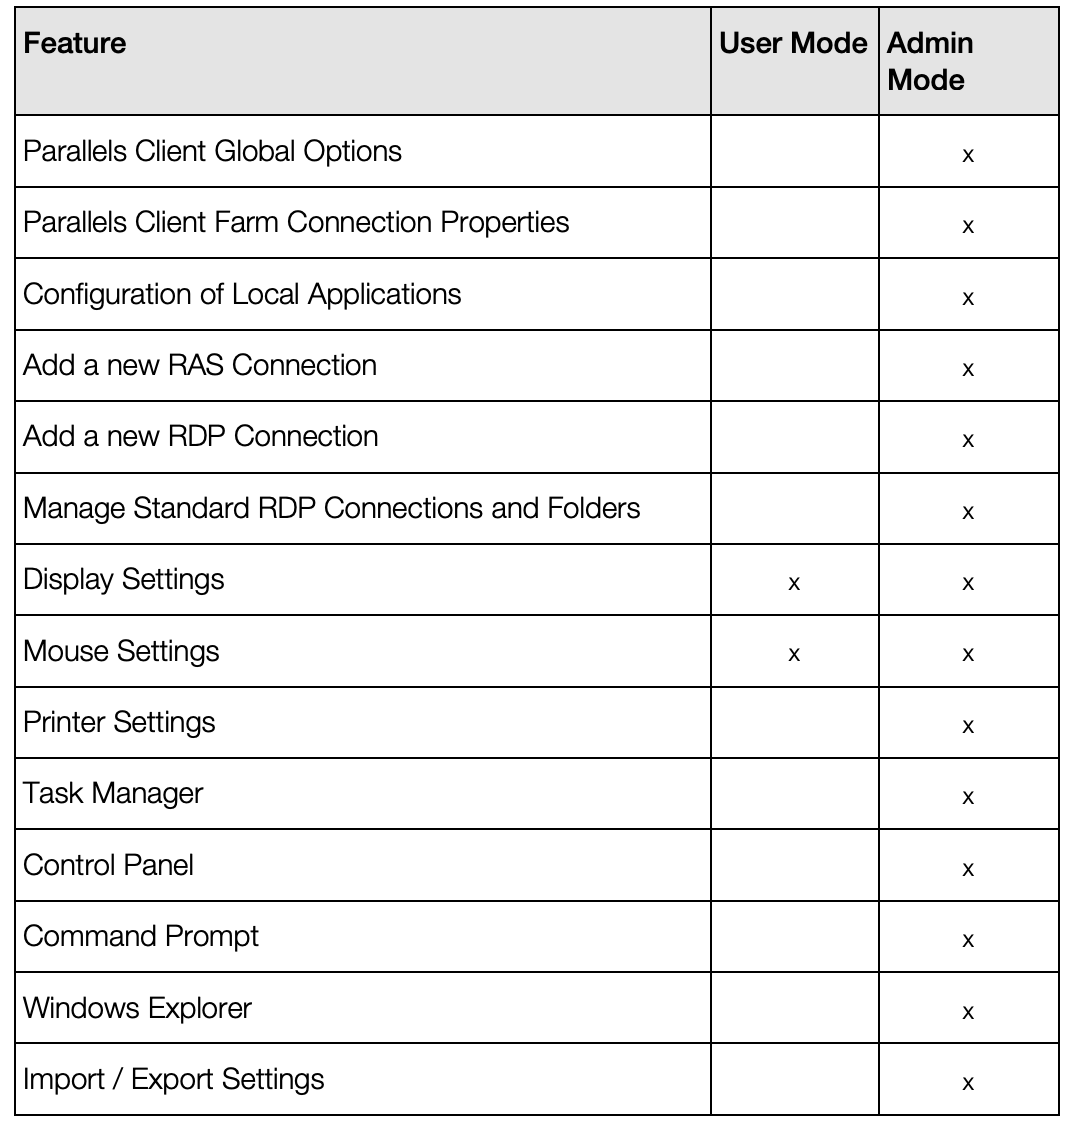
In User mode, the user is restricted to use only the applications provided by the administrator. In order to change system settings, switch the device to the Admin mode.
To switch to the Admin mode, right-click on the system tray icon and select Switch to admin mode. Type the password when prompted.
The following table outlines features that are available in Admin and User modes.
Configuring local applications when using Parallels Client desktop replacement
With the Replace Desktop option enabled, the administrator’s goal should be to deploy remote applications or remote desktops and use the native OS to simply deploy the software needed to connect remotely. However, in some instances, local applications may be required. The administrator still has the ability to configure local applications to be shown within the Parallels Client Desktop Replacement, however it is necessary to switch to the Admin mode prior to it.
Publish a local application according to the following steps:
1 Shadow the user’s session or use the user device station directly.
2 Switch the Parallels Client Desktop Replacement to admin mode.
3 Click File > Add New Application
4 Fill in the application information
5 Applications added will be visible in the Application Launcher.
6 Switch back to user mode once all the applications needed are configured.
Was this article helpful?
Tell us how we can improve it.