Overview
Virtual Trusted Platform Module (TPM) is a cryptographic component that can be added to Windows 10 and newer Windows virtual machines (VM) with UEFI BIOS. Virtual TPM is an optional layer of security for a virtual machine and allows you to protect data from unauthorized access and use additional Windows security features.
After adding a virtual TPM chip to a VM, Parallels Desktop creates an encrypted file within the virtual machine bundle that acts as a TPM storage. Parallels Desktop encrypts this file using Advanced Encryption Standard (AES) with 128 bits key length and puts the password in Mac System Keychain, which, in turn, is encrypted physical storage, and only Parallels Desktop (or Mac admin) can read the TPM password from Mac Keychain.
Note: adding a TPM chip will automatically enable Secure Boot in your VM.
TPM availability in Parallels Desktop
Starting with Parallels Desktop 17, virtual Trusted Platform Module (TPM) 2.0 support is available for all Parallels Desktop for Mac Editions: Standard, Pro, and Business. Moreover, Parallels Desktop 17 adds support for a virtual TPM on Mac computers with Apple M1 chip.
In Parallels Desktop 15 and 16 for Intel-based Mac computers, a vTPM chip is available for Pro and Business Editions only. All Editions of Parallels Desktop 16 support this feature on Mac computers with Apple M1 chips starting with Parallels Desktop 16.5.2.
Upgrade to Windows 11
On September 16, 2021, Microsoft has announced the change that aligns the enforcement of the Windows 11 system requirements on Virtual Machines (VMs) to be the same as it is for physical PCs.
So, a virtual TPM chip is required for upgrading to Windows 11.
Note: Starting with Parallels Desktop 17.1.0, a virtual TPM chip is added automatically to new Windows 11 virtual machines.
Enable TPM
Important: it is not recommended to move, copy or clone a virtual machine with enabled TPM. Always have a backup of important information, especially recovery keys. When TPM is enabled, the virtual machine is restricted from running on other Mac computers, and by default, it cannot be started on another computer if copied or moved.
Note: if a vTPM chip isn't presented in the list of devices on your Intel-based Mac to add upon clicking Hardware > +, it means your Windows virtual machine is based on Legacy BIOS. TPM chip will work with UEFI/EFI BIOS only. To check a BIOS type, follow the steps from KB 115815.
1. Shut down Windows.
2. Open the virtual machine's configuration > Hardware > click + > select TPM chip > click Add
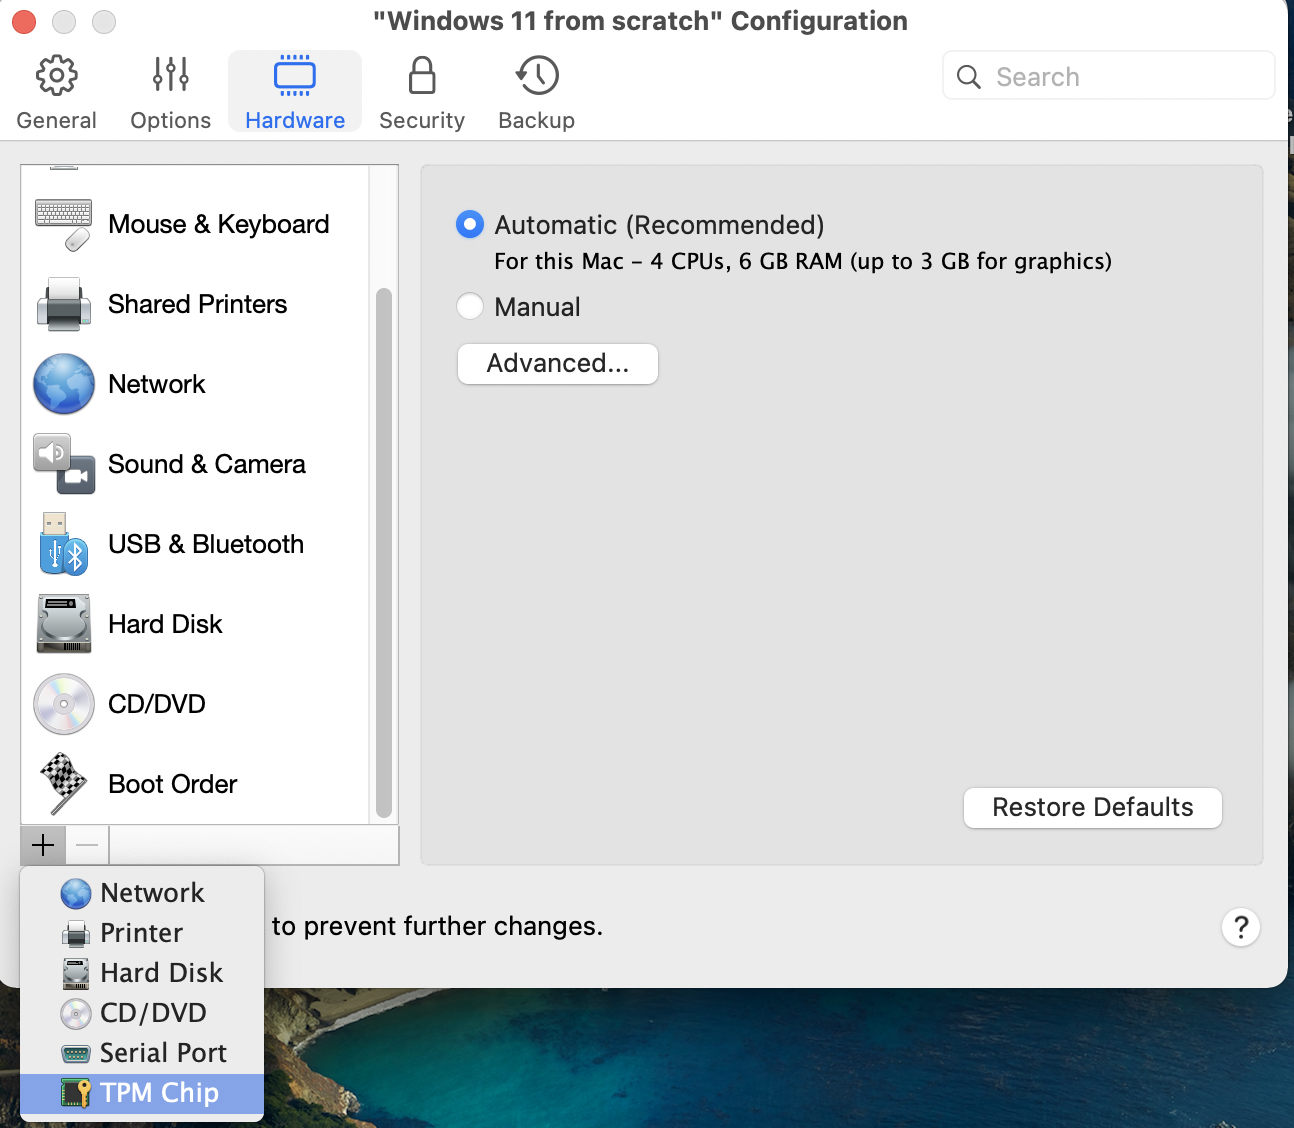
3. Launch Windows. Windows will automatically detect the TPM chip. You can now use Windows features and applications that require TPM.
Note: there might be a delay once the upgrade to Windows 11 becomes available after adding a TPM chip. According to Microsoft, "upgrade rollout plan is being finalized and is scheduled to begin late in 2021 and continue into 2022. Specific timing will vary by device".

Move virtual machine with TPM to another Mac
Move VM with TPM using iCloud (recommended)
By default, starting with Parallels Desktop 17.1.0, if you use the same Apple Account and have iCloud set up on source and target Mac computers Parallels Desktop will automatically transfer respective Keychain Access.app records for your VM using iCloud. Follow the steps below to use this option:
1. Make sure you have the latest Parallels Desktop version installed on both Mac computers.
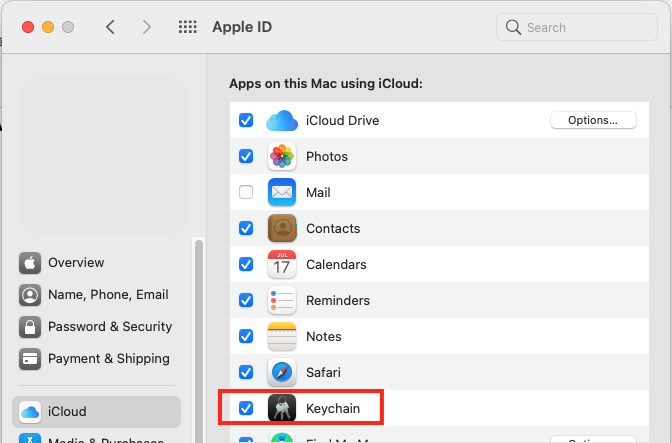
2. Login to iCloud on the source and target Mac System Preferences with the same Apple Account and make sure Keychain sync is enabled on each computer:
3. Both Macs should be connected to the Internet.
4. Locate the VM you want to move and copy it to the target Mac. Learn more at KB 114118.
5. Double-click the copied VM on the target Mac to start it.
Note: starting with Parallels Desktop 18, if Parallels Desktop can't find a TPM password for TPM storage in Mac Keychain, it'll automatically rename the migrated storage as a backup and create new TPM storage, encrypt it with a new password and create a new Keychain record for it.
Move VM with TPM manually
The section below is applicable for Parallels Desktop 18+.
Note: it's not currently possible to move a VM with TPM manually in Parallels Desktop App Store Edition.
On the Source macOS:
1. Open Parallels Desktop application.
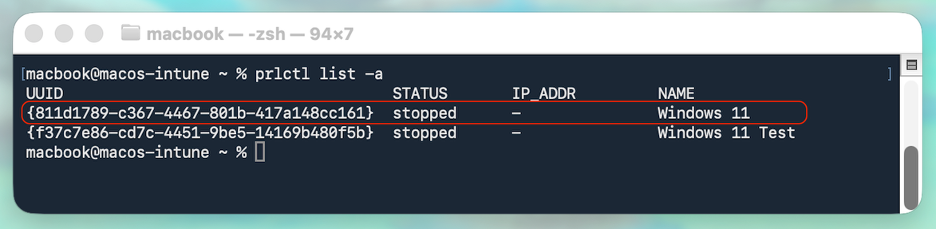
2. Open Terminal (Finder > Applications > Utilities > Terminal) and execute the command below:
and find the UUID of the VM you want to move. The UUID appears in curly brackets {}.
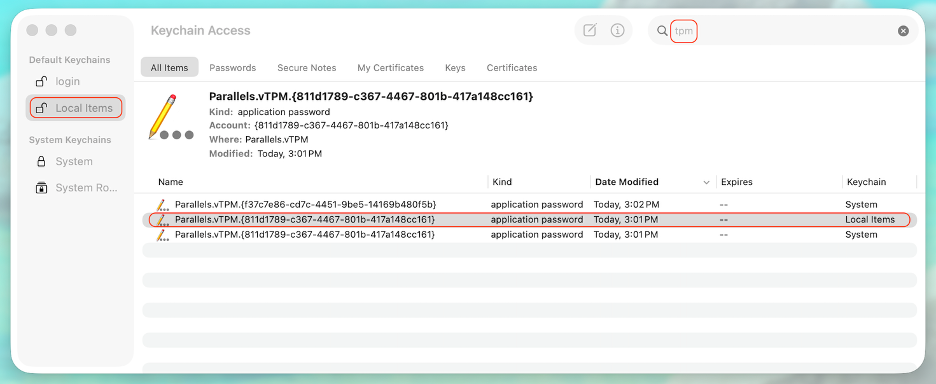
3. Open Keychain Access using Spotlight, then select Local Items or iCloud keychain in the sidebar.
4. Type in 'TPM' in the search field and find the entry that matches your VM’s UUID:
5. Right-click the matching entry and select Copy Password to Clipboard. Alternatively, open Get Info, choose Show Password, then copy it.
6. Create a plain-text file named Parallels-TPM-key.txt that contains the copied password:
In TextEdit, create a new document, paste the password, convert the document to plain text with Shift + Command + T, then save it using that exact file name
7. Copy the virtual machine to the destination Mac (learn more in KB 114118), then transfer the Parallels-TPM-key.txt file to the same destination Mac.
Note: Before proceeding to the next step, make sure the transferred virtual machine appears in the Parallels Desktop Control Center on the destination Mac. If it does not, double-click the .pvm file to add it. The TPM key cannot be imported until the virtual machine is recognized by Parallels Desktop.
On the destination macOS:
8. Run
in Terminal again to confirm the VM appears in the list and that its UUID is unchanged.
9. In Keychain Access, search for TPM and make sure there is no password entry for this VM yet
Important: If a key already exists, the VM was likely started without the correct imported key. This creates a new TPM state and the previous TPM state is lost. Remove the existing key and the copied VM, then copy the VM again from the source Mac to start with a clean copy.
10. Open Parallels Desktop, but do not start the VM. Then in Terminal run the following command:
Where:
- $VM is the UUID of the moved VM.
- file-with-tpm-key is the path to the Parallels-TPM-key.txt file.
Example:
11. Start the virtual machine on the destination Mac by double-clicking it.
Troubleshooting
TPM chip is not on the list
1) Parallels Desktop 16 doesn't support TPM on Mac computers with Apple M1 chip. Upgrade to Parallels Desktop 17 to use this feature.
2) Parallels Desktop versions older than Parallels Desktop 17 don't support TPM on Mac computers with Intel processors in Standard Edition, only in Pro and Business Editions.
3) If you go to Hardware > + on your Mac with an Intel processor, but a TPM chip isn't there, it might be caused by the fact your Windows virtual machine is based on Legacy BIOS. TPM chip will work with UEFI/EFI BIOS only.
0. Check if your virtual machine has Legacy BIOS by following the steps from KB 115815.
- If Legacy is set, create a new Windows virtual machine.
-
When you get to the Name and Location window when creating a machine, enable Customize settings before installation.
-
In the automatically opened configuration window go to Hardware, click + > select TPM chip > Add.
-
Close the configuration window and proceed with Windows installation.
4) Please note that if you have set Parallels Desktop to run Windows from the BootCamp partition, Parallels Desktop doesn't support adding a TPM chip to such virtual machines as it might lead to some issues or even corruption of the BootCamp partition. That's why the option to add a TPM chip to such virtual machines is absent. To upgrade your virtual machine to Windows 11, import your BootCamp virtual machine as described here.
PRL_ERR_TPM_SETUP_KEYCHAIN_FAILED error after trying to add a TPM chip
This issue has been fixed in Parallels Desktop App Store Edition 1.7.1. Please make sure you have the latest version of Parallels Desktop App Store Edition installed.
Deploy Windows 11 to end users' computers
Starting with Parallels Desktop 18, you can deploy Windows 11 to end users' computers. Upon migrating a Windows VM to a new hardware, Parallels Desktop will automatically create new TPM storage, encrypt it with a new password, and create a new Keychain record for it.
As one of the available options, you can use Provisioning a corporate VM image feature in My Account.
Was this article helpful?
Tell us how we can improve it.