The below guide is a step by step configuration guide for deploying Microsoft Azure Load Balancer to front-end and load-balance Parallels RAS Environment deployed on Microsoft Azure on Infrastructure as a Service (IAAS).
Note: It is assumed that reader has a basic understanding of both Microsoft Azure and Parallels RAS. This guide will only focus on the configuration of Microsoft Azure Load balancer and Parallels Secure Client Gateways’ load balancing.
Pre-requisites and Assumptions
Prior to deploying the Microsoft Azure Load Balancing. make sure that:
- Parallels RAS core infrastructure components such as Parallels RAS Publishing Agent and RD Session Host have been created
- Microsoft Azure Infrastructure Network Design and Configuration carried out
- The required Parallels RAS ports identified here are to be opened both from the Azure Network Security Groups (NSG) and the Windows firewall on the Virtual machines (VMs) in question.
- This guide focuses on the Basic load balancer configuration, not the Standard. However, both are supported to be implemented to load balance frontend traffic to Parallels RAS infrastructure.
Document process flow
Following the high level logical design (in the next section) this document will take the reader through the following process to complete Azure Load balancer configuration with Parallels RAS Secure Client Gateways:
- Create an Availability Set
- Create VMs as part of the Availability Set
- Create Azure Load Balancer
- Create a Back-end Pool
- Create Health Probe
- Create Load Balancing Rules
- Test and Evaluate Load Balancing
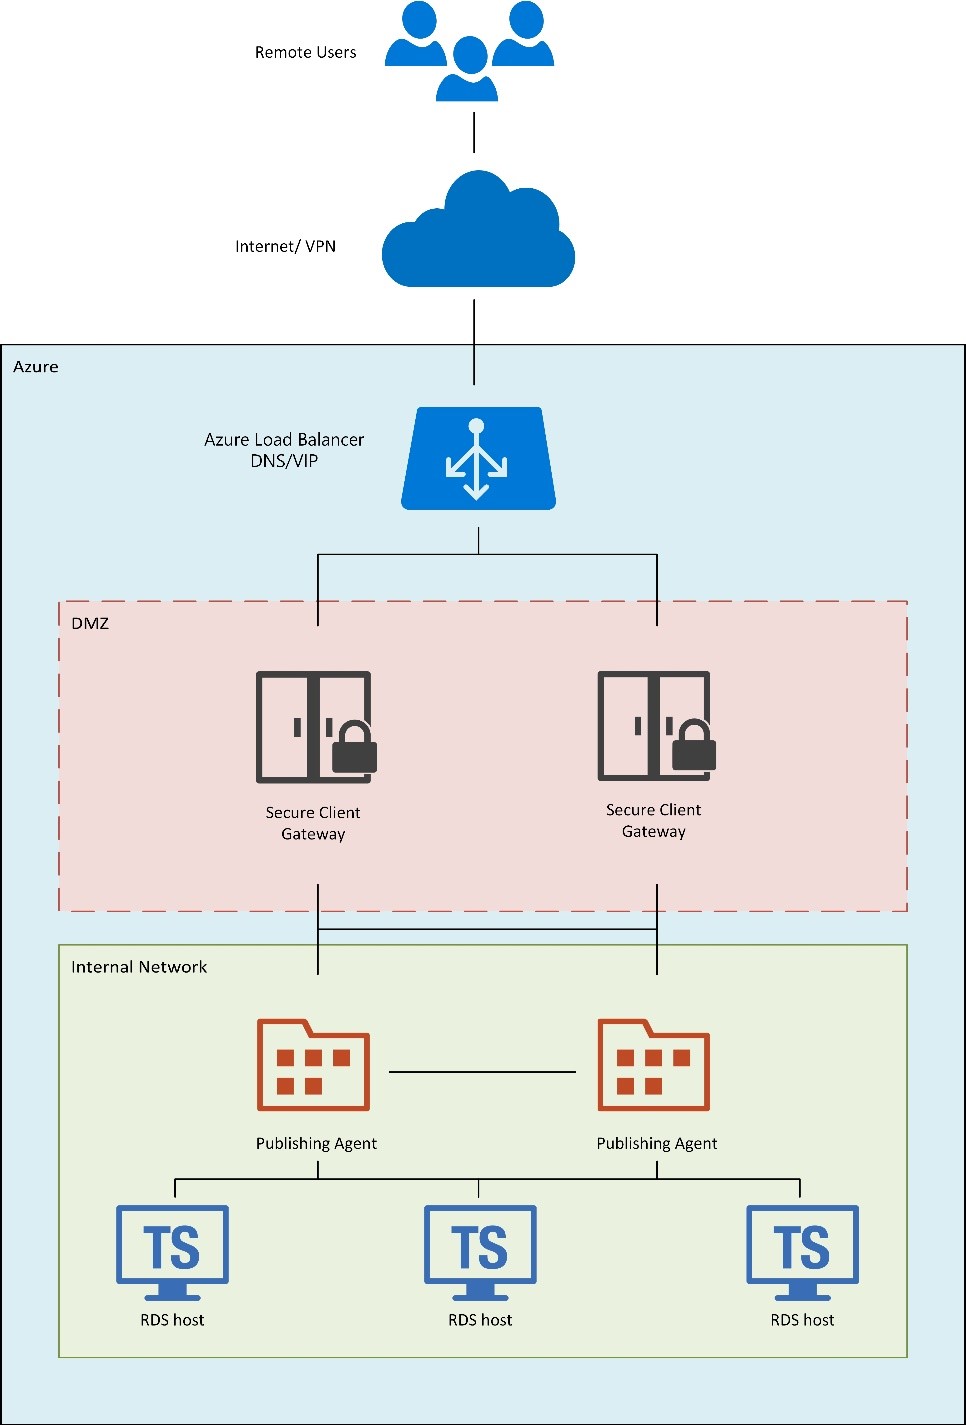
High-level logical Diagram
The following high-level logical diagram shows a load-balanced endpoint for external traffic that is shared and load balanced among two instances acting as Parallels RAS Secure Client Gateways which are setup in high availability and located in a segregated secured network (DMZ).
Step 1 - Create an Availability Set
Prior to deploying Parallels RAS Secure Client Gateway servers on Microsoft Azure as Infrastructure as a Service (IAAS), it is important to create an Availability Set.
Using Availability Sets will increase the availability and reliability of your Parallels RAS Secure Client Gateways (SCG) and is required if you are planning to load balance front-end traffic from the Azure LB to more then one Virtual Machine (VM) which will host the Parallels RAS SCG
An Availability Set is a logical grouping capability that you can use in Azure to ensure that the VM resources you place within it are isolated from each other when they are deployed within an Azure datacenter. Azure ensures that the VMs you place within an Availability Set run across multiple physical servers, compute racks, storage units, and network switches
In this guide, we are illustrating the creation of on an availability set as part of the creation of VM itself via the Azure portal.
- Under Settings – Configure optional features, choose Availability set and choose Create New
- Set Name of the Availability Set
- Choose Fault domain - Defines the group of virtual machines that share a common power source and network switch.
- Choose Update Domain – Indicates groups of virtual machines and underlying physical hardware that can be rebooted at the same time
Please see here for further information regarding fault domain and update domain.
Microsoft Tip: To provide redundancy to your application, we recommend that you group two or more virtual machines in an availability set. This configuration ensures that during a planned or unplanned maintenance event, at least one virtual machine will be available and meet the 99.95% Azure SLA.

Additionally, please see here for other methods to create an Availability Set.
It is important to note
- A VM can only be added to an availability set when it is created
- The availability set of a virtual machine can't be changed after it is created.
- You need to delete and then recreate the virtual machine if you require to change the availability set after VM creation.
Step 2 - Complete VMs' Creation and Parallels RAS SCG Installation
Complete the creation of VMs that are planned to host the Parallels RAS SCG. VM creation is out of scope for this guide, however can be easily carried out from the Azure Portal VM creation wizards. Please see here for quick create guide.
Once VMs are created, you can go ahead with the Parallels RAS SCG installation and configuration. For more information on Parallels RAS SCG installation, please see Parallels RAS Administration Guide here
Step 3 - Create Azure Load Balancer
Once the VMs have been created in their Availability Set hosting the Parallels RAS SCG as mentioned in Step1 and Step2 above, you can move on with creating the actual Azure Load Balancer.
Load balancing provides a higher level of availability and scale by spreading incoming requests across multiple virtual machines (VMs).
We will be creating a public basic load balancer from the Azure portal.

- On the upper-left side of the portal, select Create a resource > Networking > Load Balancer.
- In the Create load balancer pane, enter these values:
- Name for the name of the load balancer - RASonAzureLB
- Type of the load balancer - Public
- Create a new public IP or use existing. In this example we created a new PublicIP RASonAzureLB_PublicIP for the public IP with SKU set as Basic and Assignment set as Static
- Make sure that the right subscription is chosen
- Create a new Resource Group or use existing. In this example a new resource group has been created
- Select Create.
Note: This deployment is based on a Basic SKU however both Basic and Standard can be used. Please see here to note the difference
Once deployment has been successful you should see the resources created including the Azure Load Balancer and the Public IP.

Step 4 - Create a Back-end Pool
To distribute traffic to the VMs created earlier, a back-end address pool needs to be created. This will contain the IP addresses of the virtual NICs that are connected to the load balancer.
Create the back-end address pool RASonAzure_LBPool to include RAS1 and RAS2 acting as RAS SCGs from the Availability set created in Step 1.
- Select All resources on the left menu, and then select RASonAzureLB from the resource list.
- Under Settings, select Backend pools, and then select Add.
- On the Add a backend pool page, do the following, and then select OK:
- For Name, enter RASonAzure_LBPool.
- For Associated to, from the drop-down menu, select Availability set.
- For Availability set, select.
- Select Add a target network IP configuration to add each virtual machine (RAS1 and RAS2) that you created to the back-end pool.

We need to create a load balancing rule to be able to choose what traffic is going to be load balanced on to our load balancing pool. Prior to this, at least one health probe must exist.
Step 5 - Create a Health Probe
The load balancer created previously needs to monitor the status of the backend servers to be able to distribute traffic successfully. This can be achieved by using health probes. The health probe dynamically adds or removes VMs from the load balancer rotation based on their response to health checks.
Using the Azure Portal we can create a health probe as below
- Navigate to your Load balancer settings -> Health probes.
- Click +Add.
- Configure the below settings for your health probe
- Name: RASon Azure_HP1_TCP_443
- Protocol: In this case we choose TCP
- Port: In this case we choose 443 (this is the default secure port that the Parallels SCG is listening on. If this is changed from the RAS Console, this health probe should reflect this change.)
- Interval: Signifying the amount of time between probe attempts. By default and minimum value is 5 seconds but can be changed as required.
- Unhealthy threshold: Which specifies the number of consecutive probe failures that must occur before that particular VM is considered unhealthy/down. By default and minimum value is 2 consecutive failures but can be changed as required.
It is recommended to create a Health probe for each Load Balancing rule specifying the port and protocol.

Step 6 - Creating Load Balancing Rules
A load balancer rule is used to define how traffic is distributed to the VMs, in our case the Parallels SCGs. The frontend IP configuration, for the incoming traffic, and the back-end IP pool to receive the traffic, along with the source and destination ports are configured.
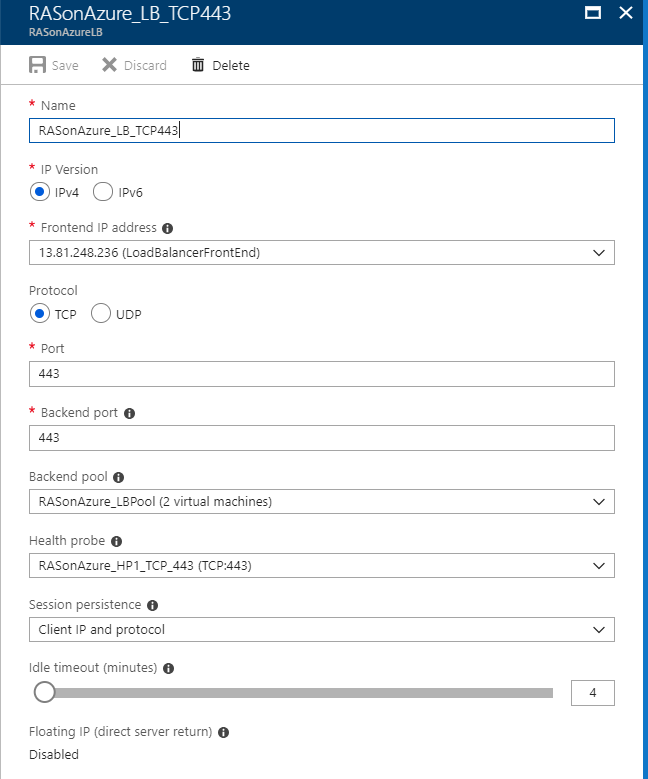
Create a load balancer rule named RASonAzure_LB_TCP443 for listening to port 443 in the front end load balancer. The rule is also for sending load-balanced network traffic to the back-end address pool RASonAzure_LBPool, also by using the health probe RASonAzure_HP1_TCP443.
- Select All resources on the left menu, and then select RASonAzureLB from the resource list.
- Under Settings, select Load balancing rules, and then select Add.
- Use these values, and then select OK:
- RASonAZure_LB_TCP443 for the name of the load balancer rule
- TCP for the protocol type
- 443 for the port number
- 443 for the back-end port
- RASonAzure_LBPool for the name of the back-end pool
- RASonAzure_HP1_TCP443 for the name of the health probe
- Client IP and Protocol for session persistency
- Note:
- (optional) Add another TCP 80 load balancing rule if you require auto redirection from 80 to 443
- When using Azure Load Balancer, UDP traffic is not loadbalanced
Step 7 - Evaluate
The final step is to test the Azure load balancer that was deployed to load balance frontend traffic to the Parallels Secure Client Gateways.
Testing can be done from the native Parallels Client installed on the device or from the HTML5 Client portal by putting the Azure Load balanced Virtual IP (VIP) or DNS name which should load balance traffic to one of the specified Secure Client Gateways.


Was this article helpful?
Tell us how we can improve it.