This article explains how to configure F5 BIG‑IP LTM to load balance Parallels RAS Secure Gateways for high availability and optimized performance. It covers two supported topologies—SSL Passthrough and SSL Bridging—and provides step‑by‑step instructions for creating Virtual Servers, pools, and persistence profiles on BIG‑IP, as well as the required settings in Parallels RAS. Reference documents are provided in 11. Appendix — References
1. Overview
There are two tested topologies described:
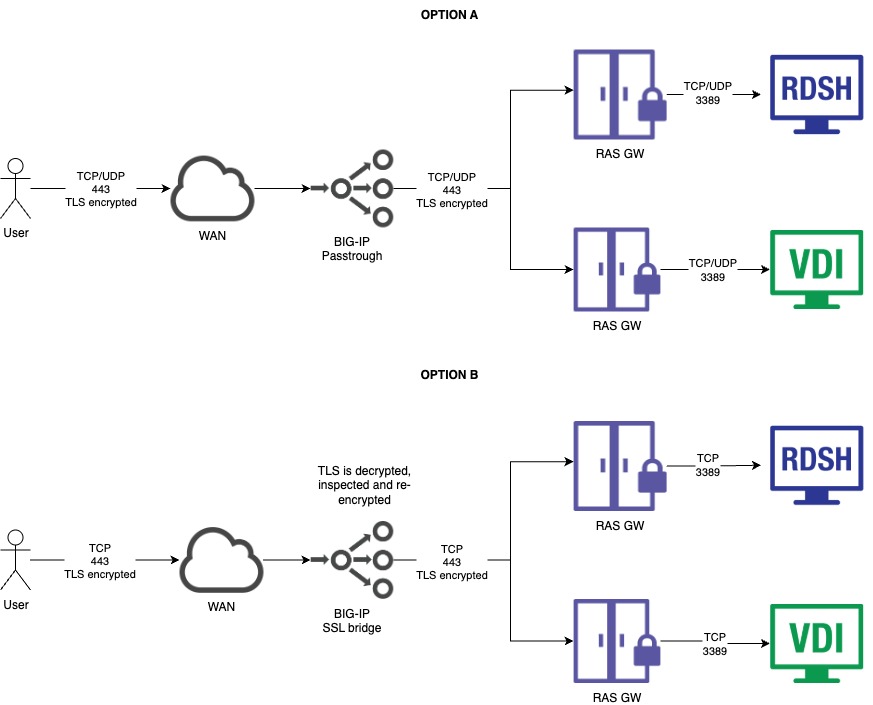
- Option A — SSL Passthrough (TCP+UDP): BIG‑IP forwards encrypted traffic to RAS GW and does not terminate TLS. This is the simplest way to publish RAS and preserves UDP 443 for improved RDP performance when RDP UDP Data Tunneling is enabled in RAS.
- Option B — SSL Bridging (TCP only): BIG‑IP terminates TLS from clients and re‑encrypts to the RAS GW, enabling security features on BIG‑IP (SSL visibility, iRules/WAF, etc.). UDP 443 cannot be bridged (TLS is TCP‑based). So this option cannot make use of RDP UDP tunneling in RAS.
You may configure a separate UDP passthrough VS or configure DTLS on separate VS if you still want the UDP data channel.
2. Supported components & ports (quick reference)
- Parallels RAS Secure Gateway: TCP/UDP 443 (Parallels Client connections), RDP UDP tunneling
- F5 BIG‑IP LTM: Standard Layer 4 Virtual Server, SNAT Auto Map, Source Address persistence, SSL Bridging
3. Prerequisites
- F5 BIG-IP is receiving Source IP addresses of Parallels Client connections, not DNATed IP address. Session persistence based on Source Addresswill be used.
- In case F5 BIG-IP is not able to get Source IP addresses of Parallels Client connections (internal load-balancing), RAS User Portal (HTML5 web client) will require session persistence based on cookie. So, the additional Virtual Server should be added with HTTP profile attached to it.
- RAS Secure Gateways installed and reachable from BIG‑IP; each listens on 443. If you want UDP acceleration, enable Enable RDP UDP Data Tunneling in the Gateway’s Network tab.
- SSL/TLS:
- Option A (Passthrough): BIG-IP forwarding traffic to pool, TLS terminated on RAS Gateway.
- Option B (SSL Bridging): Import certificate and private key to BIG‑IP Client SSL and configure Server SSL to re‑encrypt to the Gateway.
- Firewall: Allow TCP/UDP 443 from Internet to the VIP and from VIP to Gateways.
- Routing/SNAT: enable SNAT Auto Map on the BIG-IP VS.
4. Architecture diagram
Option A — SSL Passthrough (TCP + UDP)
Option B — SSL Bridging (TCP)
5. Option A — SSL Passthrough (TCP + UDP)
5.1 Design decisions
-
TLS passthrough: BIG‑IP forwards TLS to RAS; the RAS Gateway terminates TLS. (Keep your SSL certificate on RAS.)
-
Protocols: Publish both TCP/443 and UDP/443. UDP enhances RDP experience when enabled in RAS
-
"All‑protocols” VS multiple VSs:
-
Recommended: A single “All Protocols” VS (Standard/Performance L4).
-
Alternative: Two Virtual Servers, one TCP/443, one UDP/443, each pointing to an appropriate pool/monitor. This provides protocol-specific health checks and persistence; however, in passthrough mode, it may introduce unnecessary complexity.
-
-
Persistence: Use Source Address persistence; Avoid HTTP persistence, as Parallels Client traffic is not HTTP/HTTPS.
-
if you run separate TCP/UDP VS, enable Match Across Virtual Servers so UDP follows TCP to the same Gateway.
-
Although the Parallels Client for Web (User Portal) uses HTTP/HTTPS, session persistence is still maintained via the TCP protocol.
-
-
SNAT: Use SNAT Auto Map unless you have symmetric routing.
-
LB method: Start with Least Connections (member) or Round Robin per F5 guidance.
5.2 Step‑by‑step
On BIG-IP instance
-
Create new Pool
-
go to Local Traffic > Pools > Pool list > press Create..
- Specify Pool settings as follows:
Name: friendly name of the pool
Description: optional description of the pool
Health monitors: find tcp in Available table and click arrow to move to the left in Active table
Load Balancing Method: Round Robin
New members: add by specifying their Name, Address and Service Port and clicking Add button

- Press Finished and check that the Pool is created and has a green Status

-
-
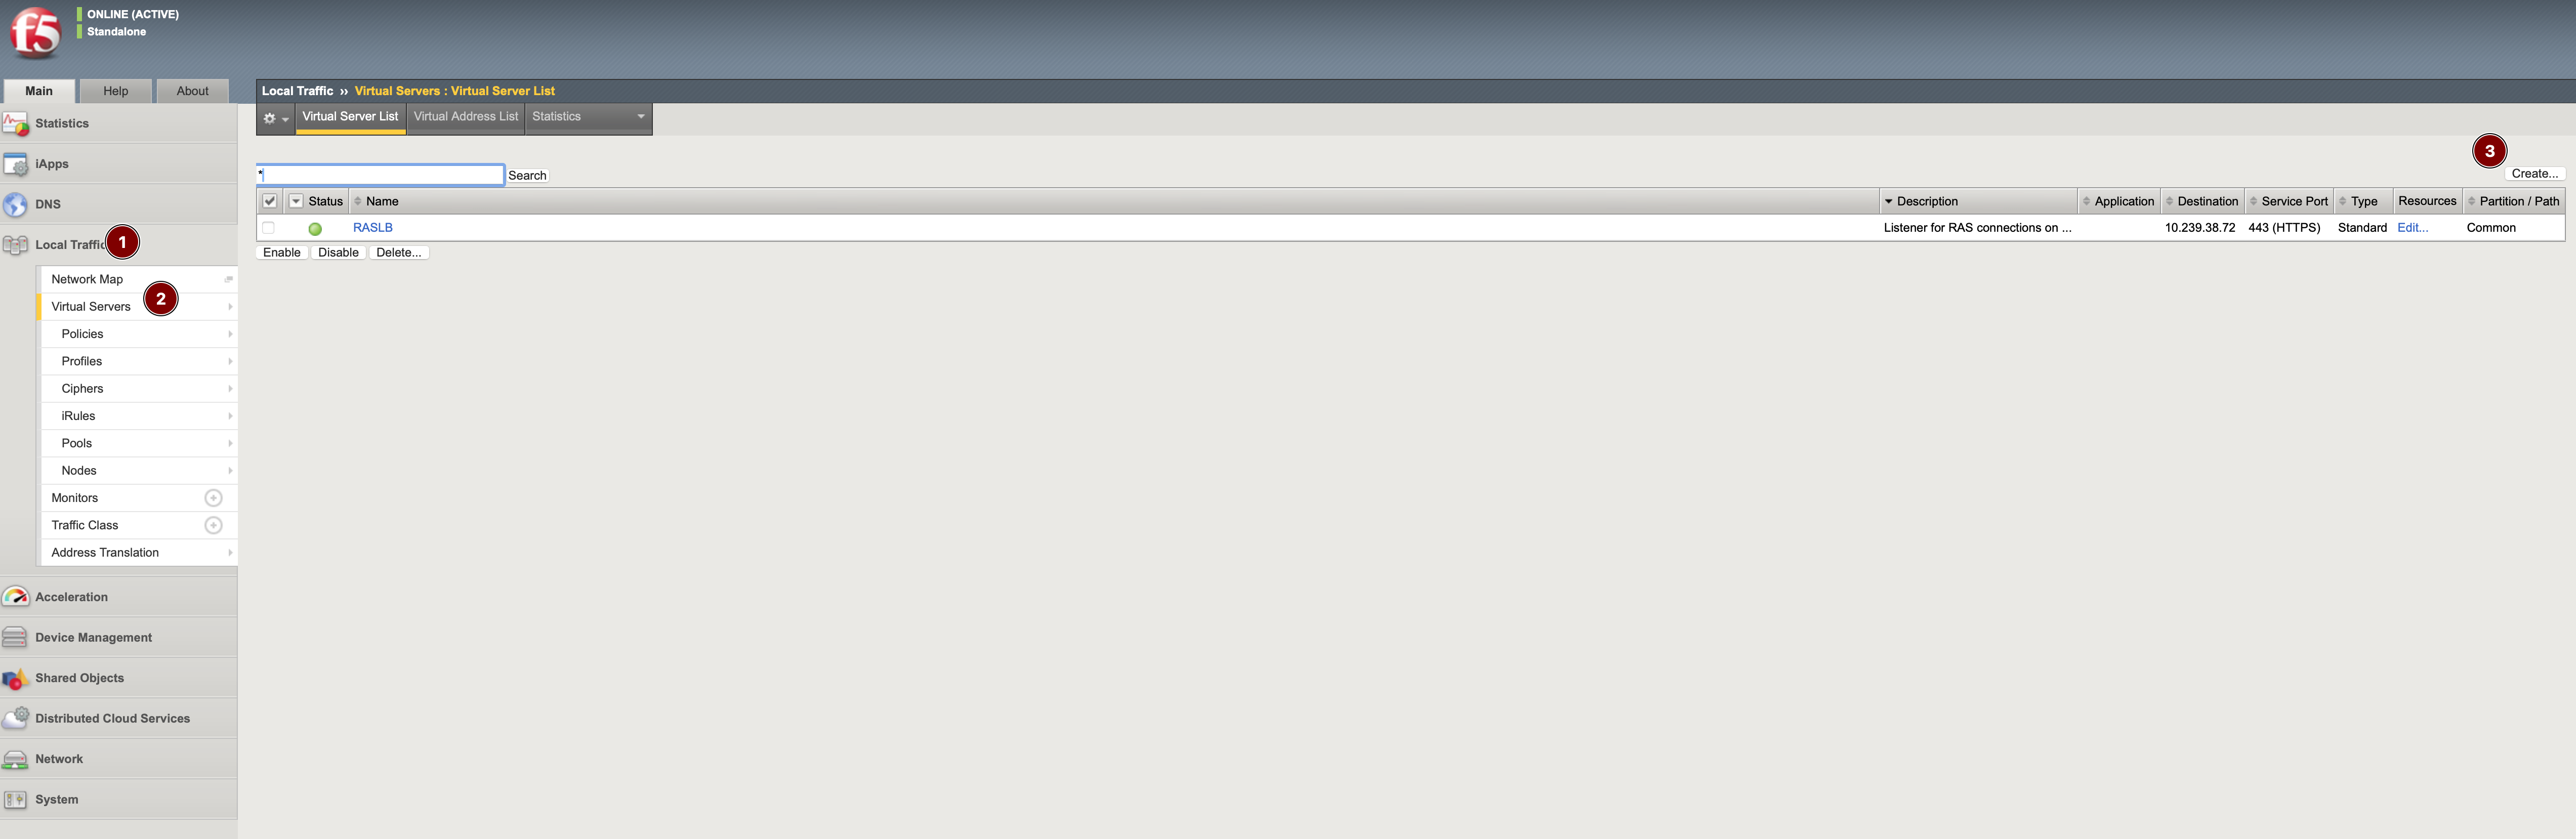
Create new Virtual Server
-
go to Local Traffic > Virtual Servers > Virtual Server list > press Create...
-
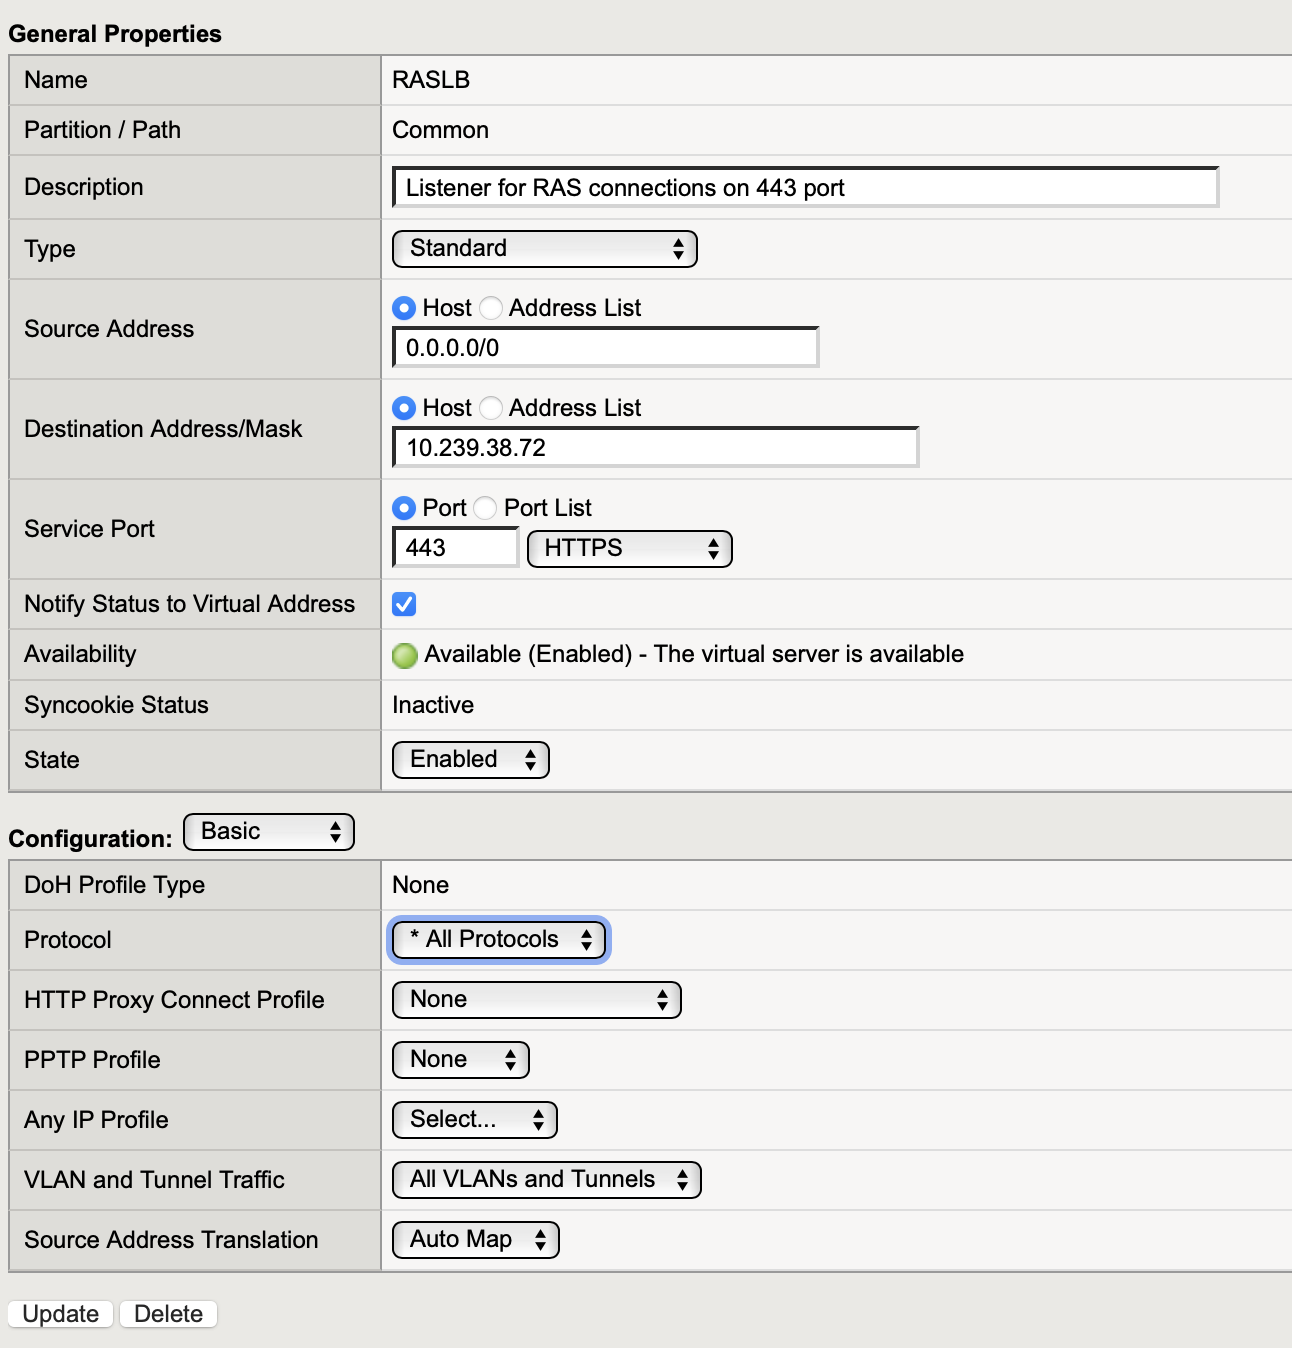
Specify Virtual Server properties as follows:
Name: friendly name of the Virtual Server
Description: optional description of the Virtual Server
Type: Standard
Source Address: Host > 0.0.0.0/0
Destination Address/Mask: Host > BIG-IP address
Service Port: Port > 443
Protocol: All protocols
Source Address Translation: Auto Map
-
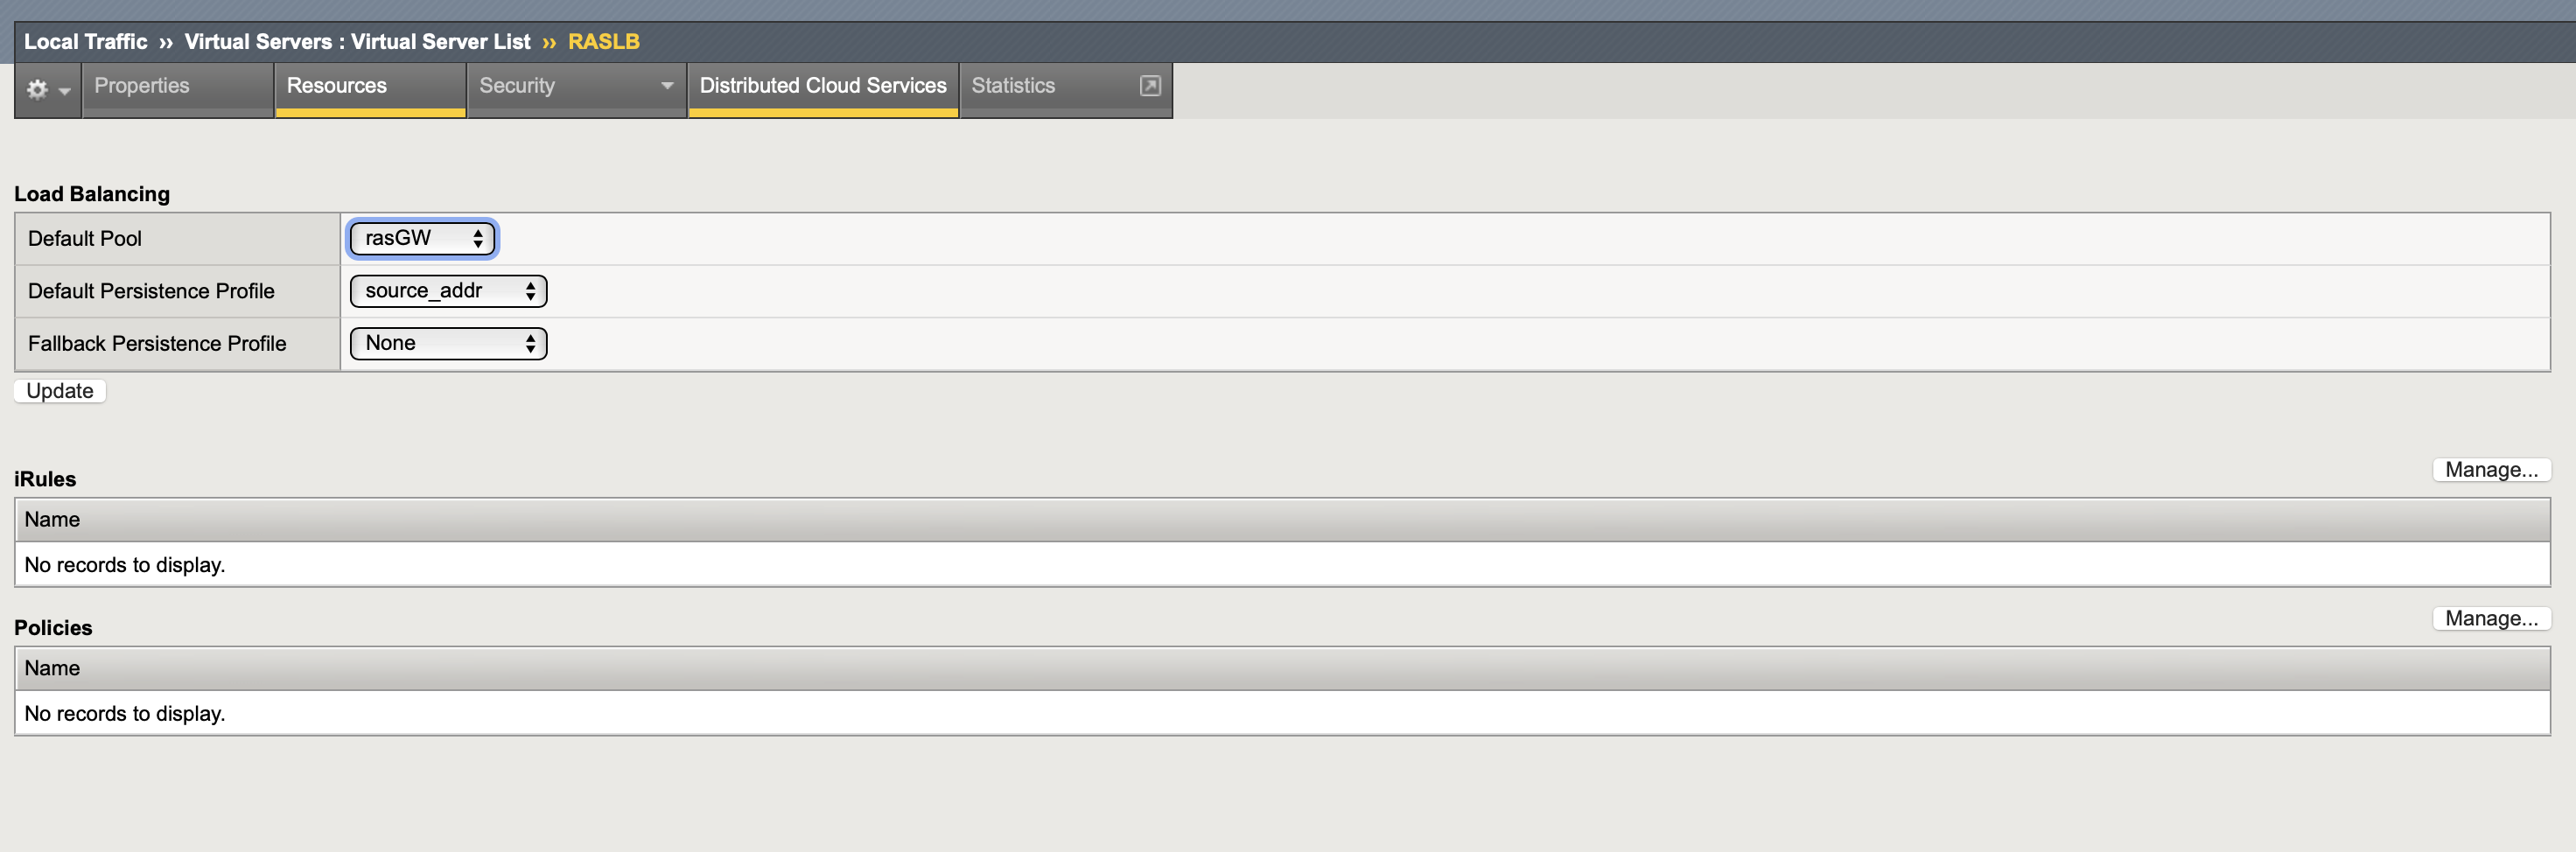
On the Resources tab
Default pool: the pool that was created
Default Persistent profile: source_addr (Source address session persistence)
-
Press Finished and check that the Virtual Server is created and has a green Status

-
5.3 Validation
- Using Parallels Client for native platform (Windows, for example) and browser for User portal, access BIG-IP FQDN/IP address and confirm you are able to log on to RAS.
- Launch a published app/desktop; confirm steady performance.
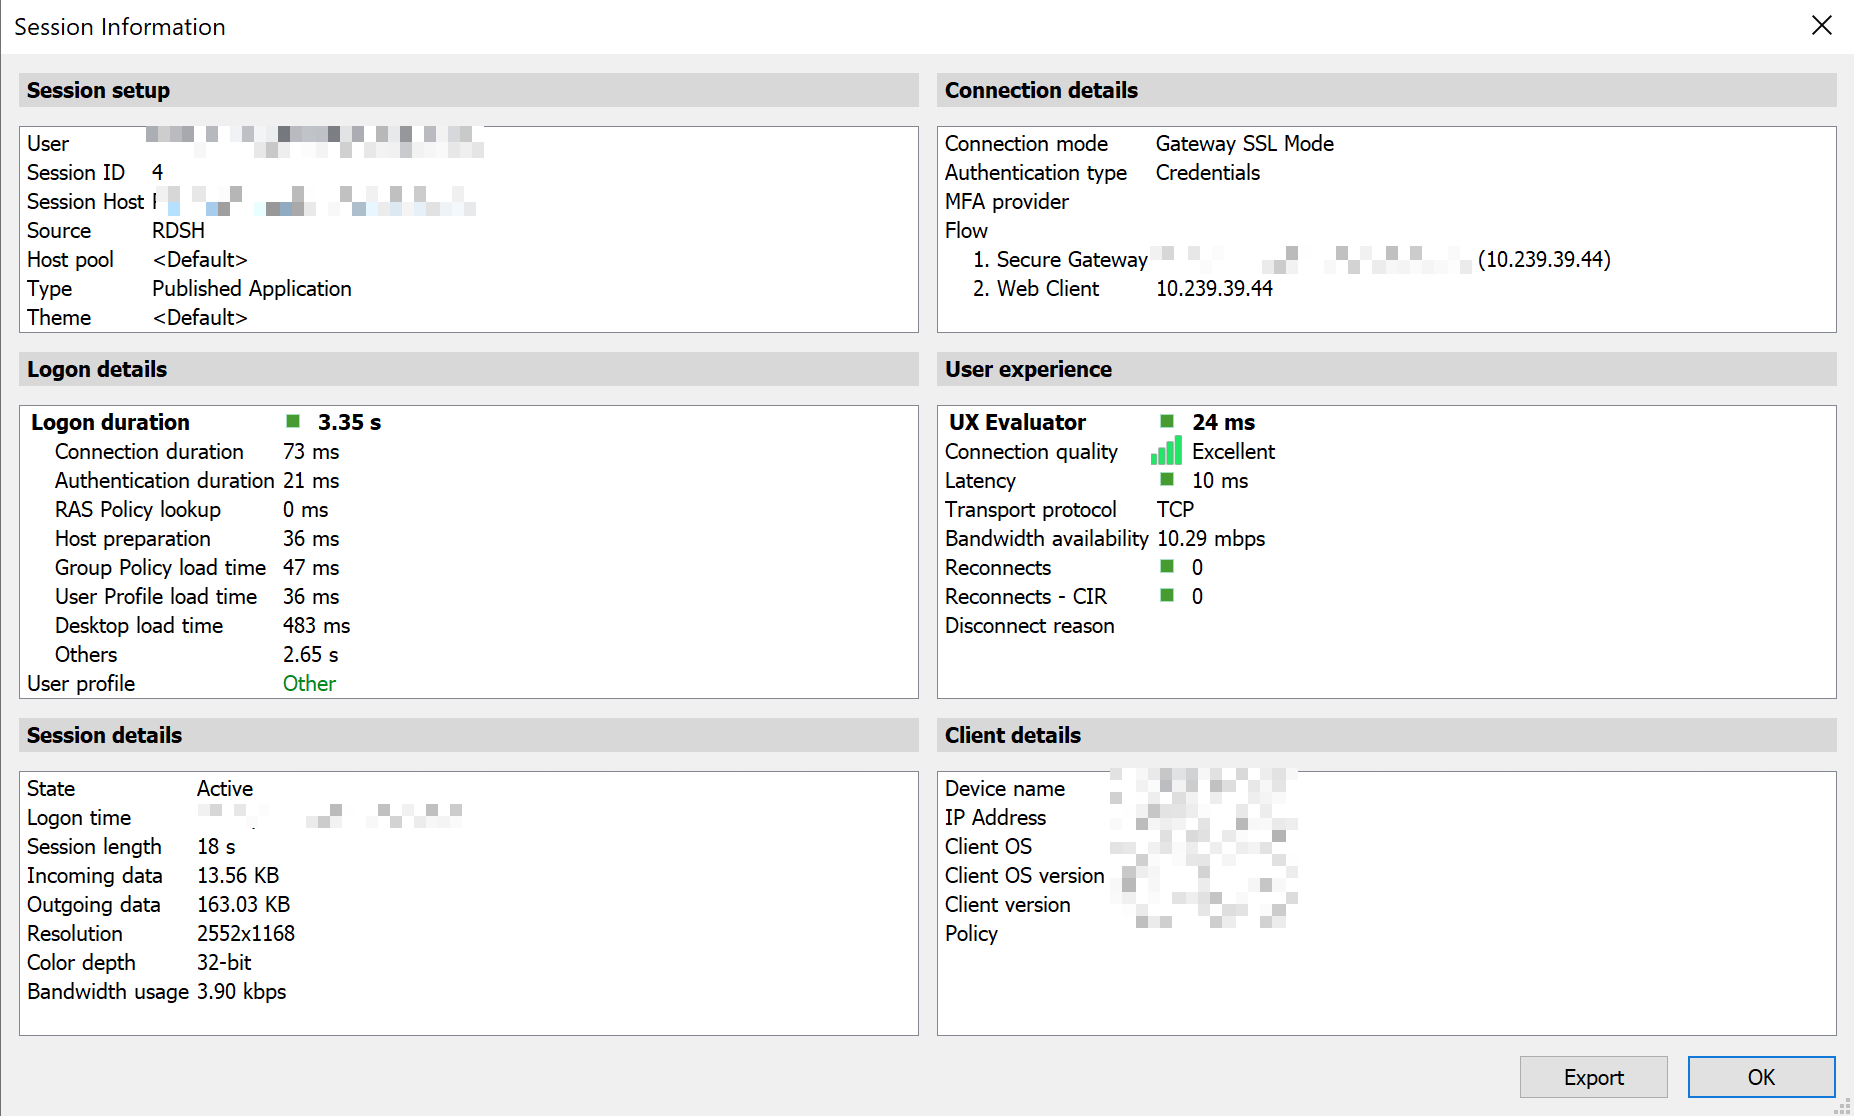
- Check RAS Console > Session > Session details
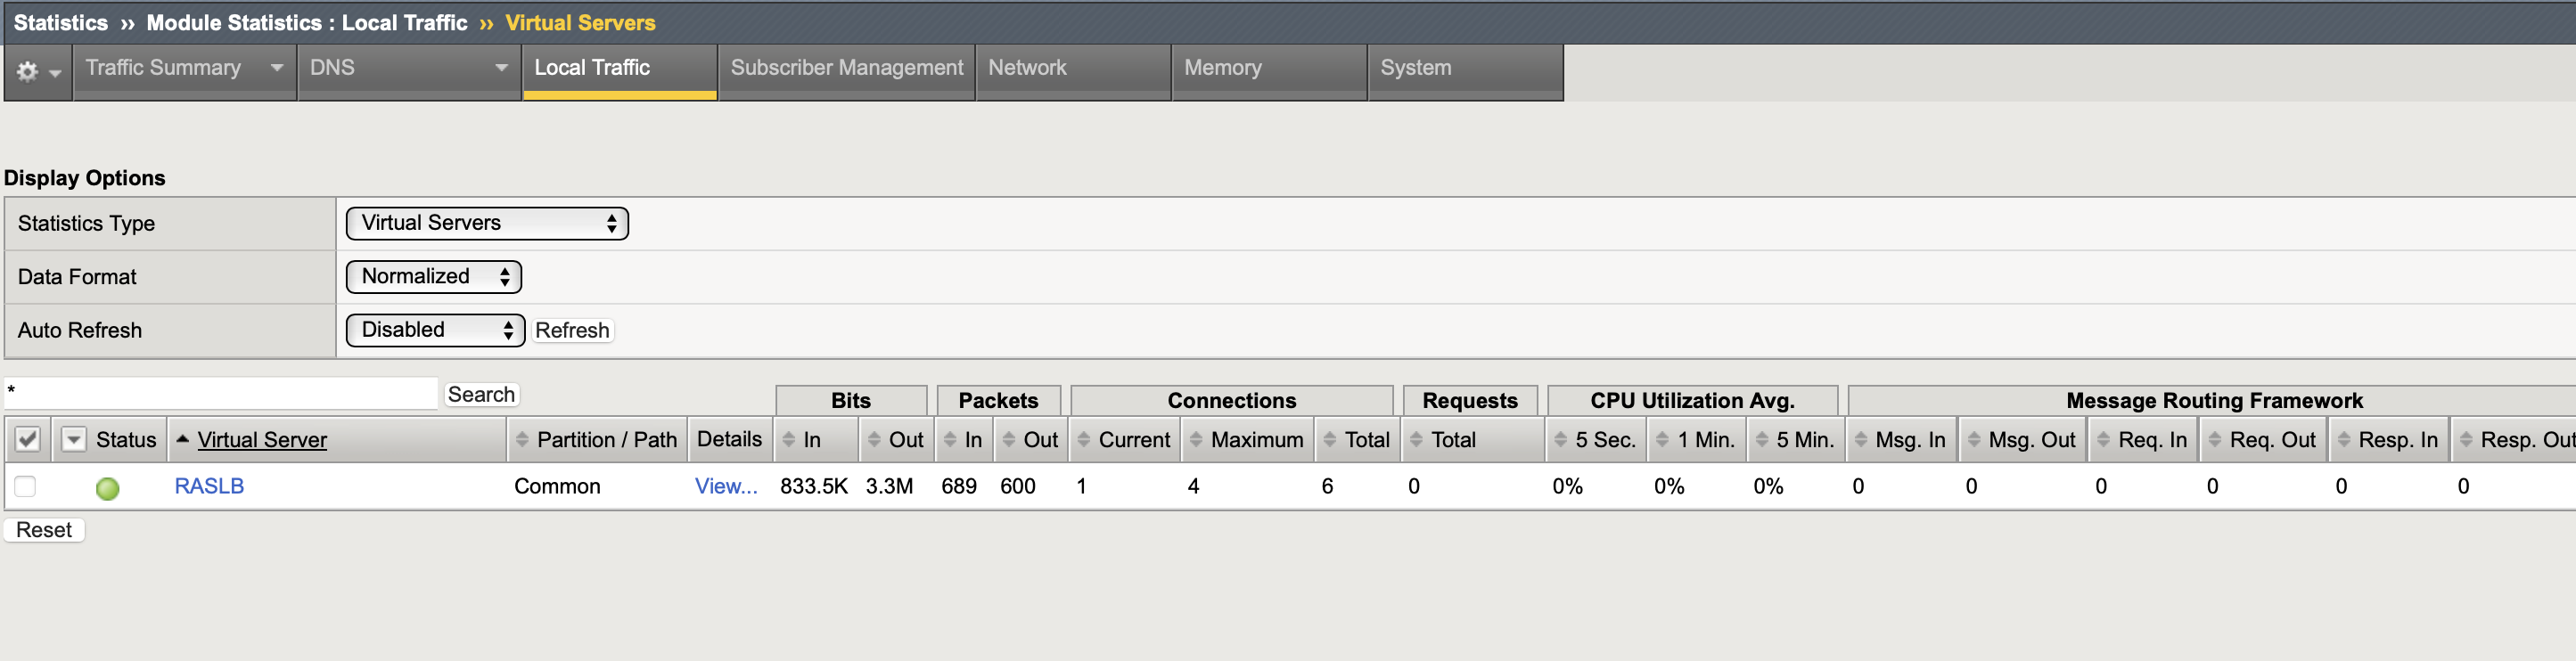
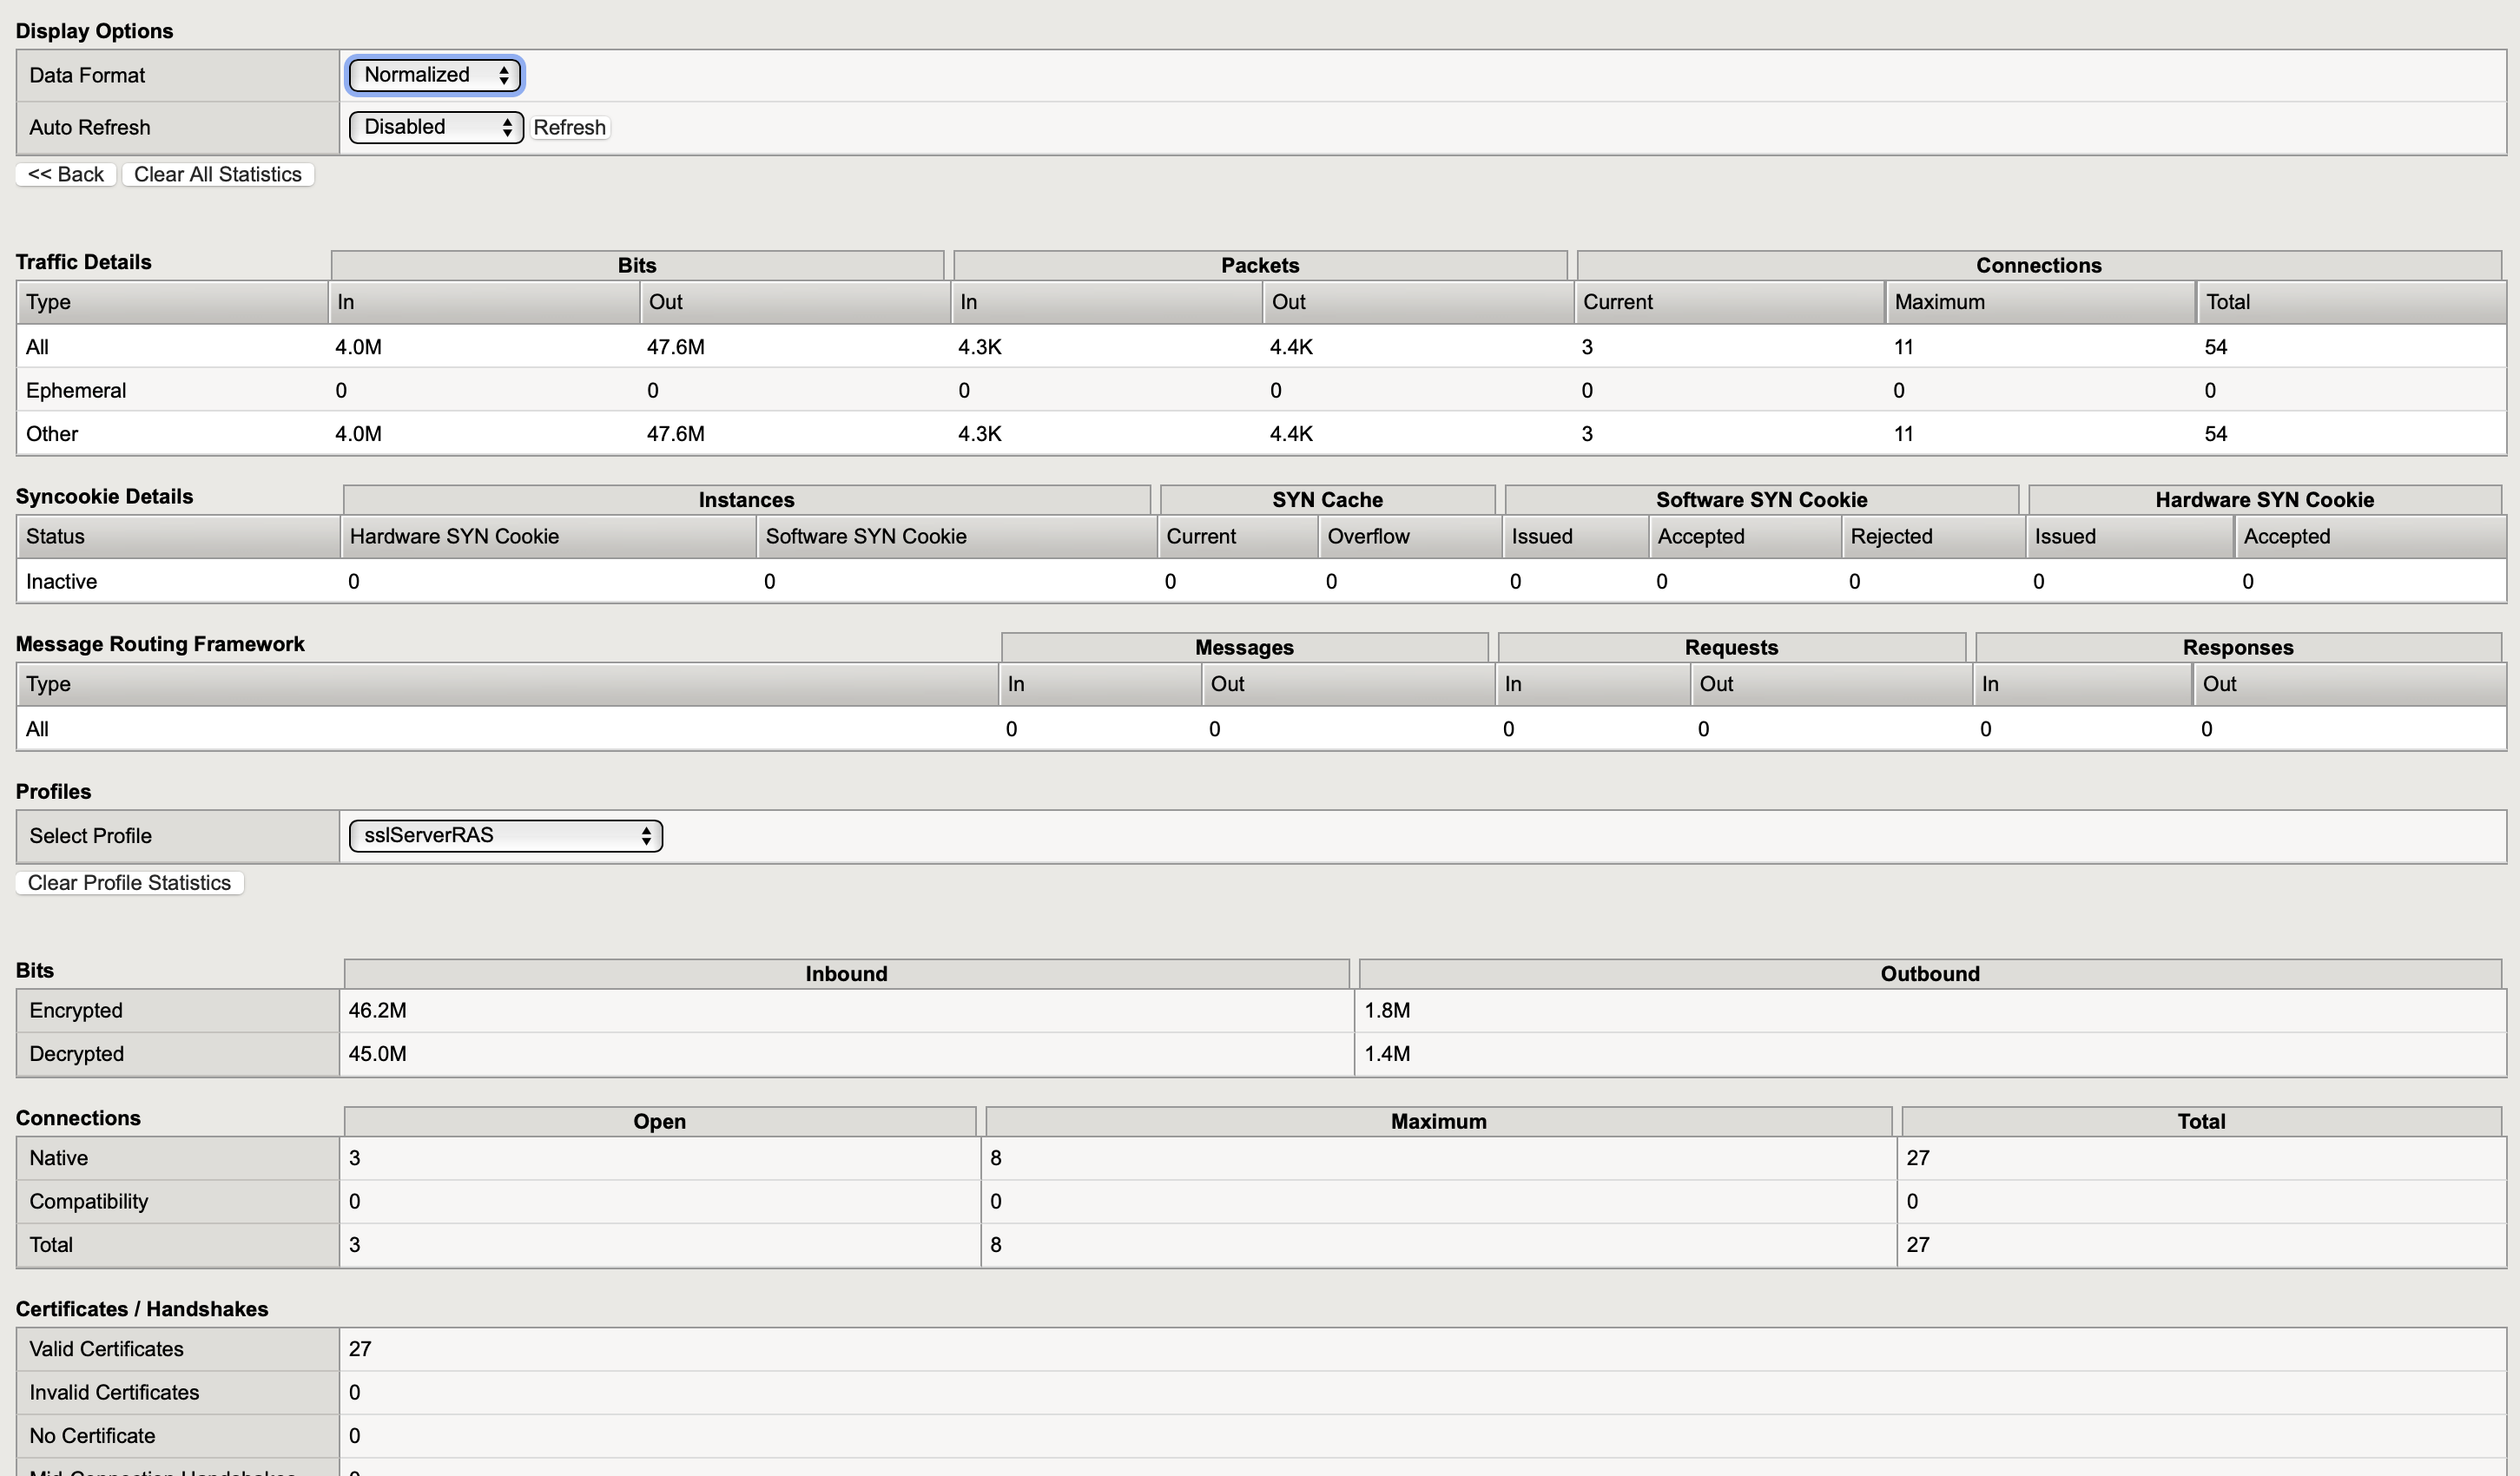
- On BIG‑IP > Statistics > Module Statistics > Local traffic > Virtual Servers
SNAT note: BIG‑IP chooses a translation address from self IPs when Auto Map is used - RAS GWs won't be able to detect Source/Client Public IP.
6. Option B — SSL Bridging (TCP)
6.1 Design decisions
- TLS termination on BIG‑IP using Client SSL profile; BIG‑IP then re‑encrypts to the Gateway using Server SSL profile (SSL bridging). This enables inspection and security on F5 BIG-IP instance.
- UDP 443 cannot be bridged (TLS is TCP‑only). Choose one:
- B1 (TCP‑only): Disable RDP UDP Data Tunneling in RAS to force TCP.
- B2 (Mixed): Keep UDP enabled and add a separate UDP/443 passthrough VS alongside the TCP bridging VS. Use Source Address persistence with Match Across Virtual Servers so both VSs select the same Gateway.
- B3 (DTLS): Investigate possibilities to make use of Datagram TLS termination on BIG-IP
- SSL Bridge over SSL Termination with the later traffic is passing to the pool members unencrypted
- SNAT: Auto Map unless you manage symmetric routing.
6.2 Step‑by‑step
-
This configuration will be based on the previous with adding SSL Bridging to it
-
Import Certificate and key to BIG-IP (import one by one)
-
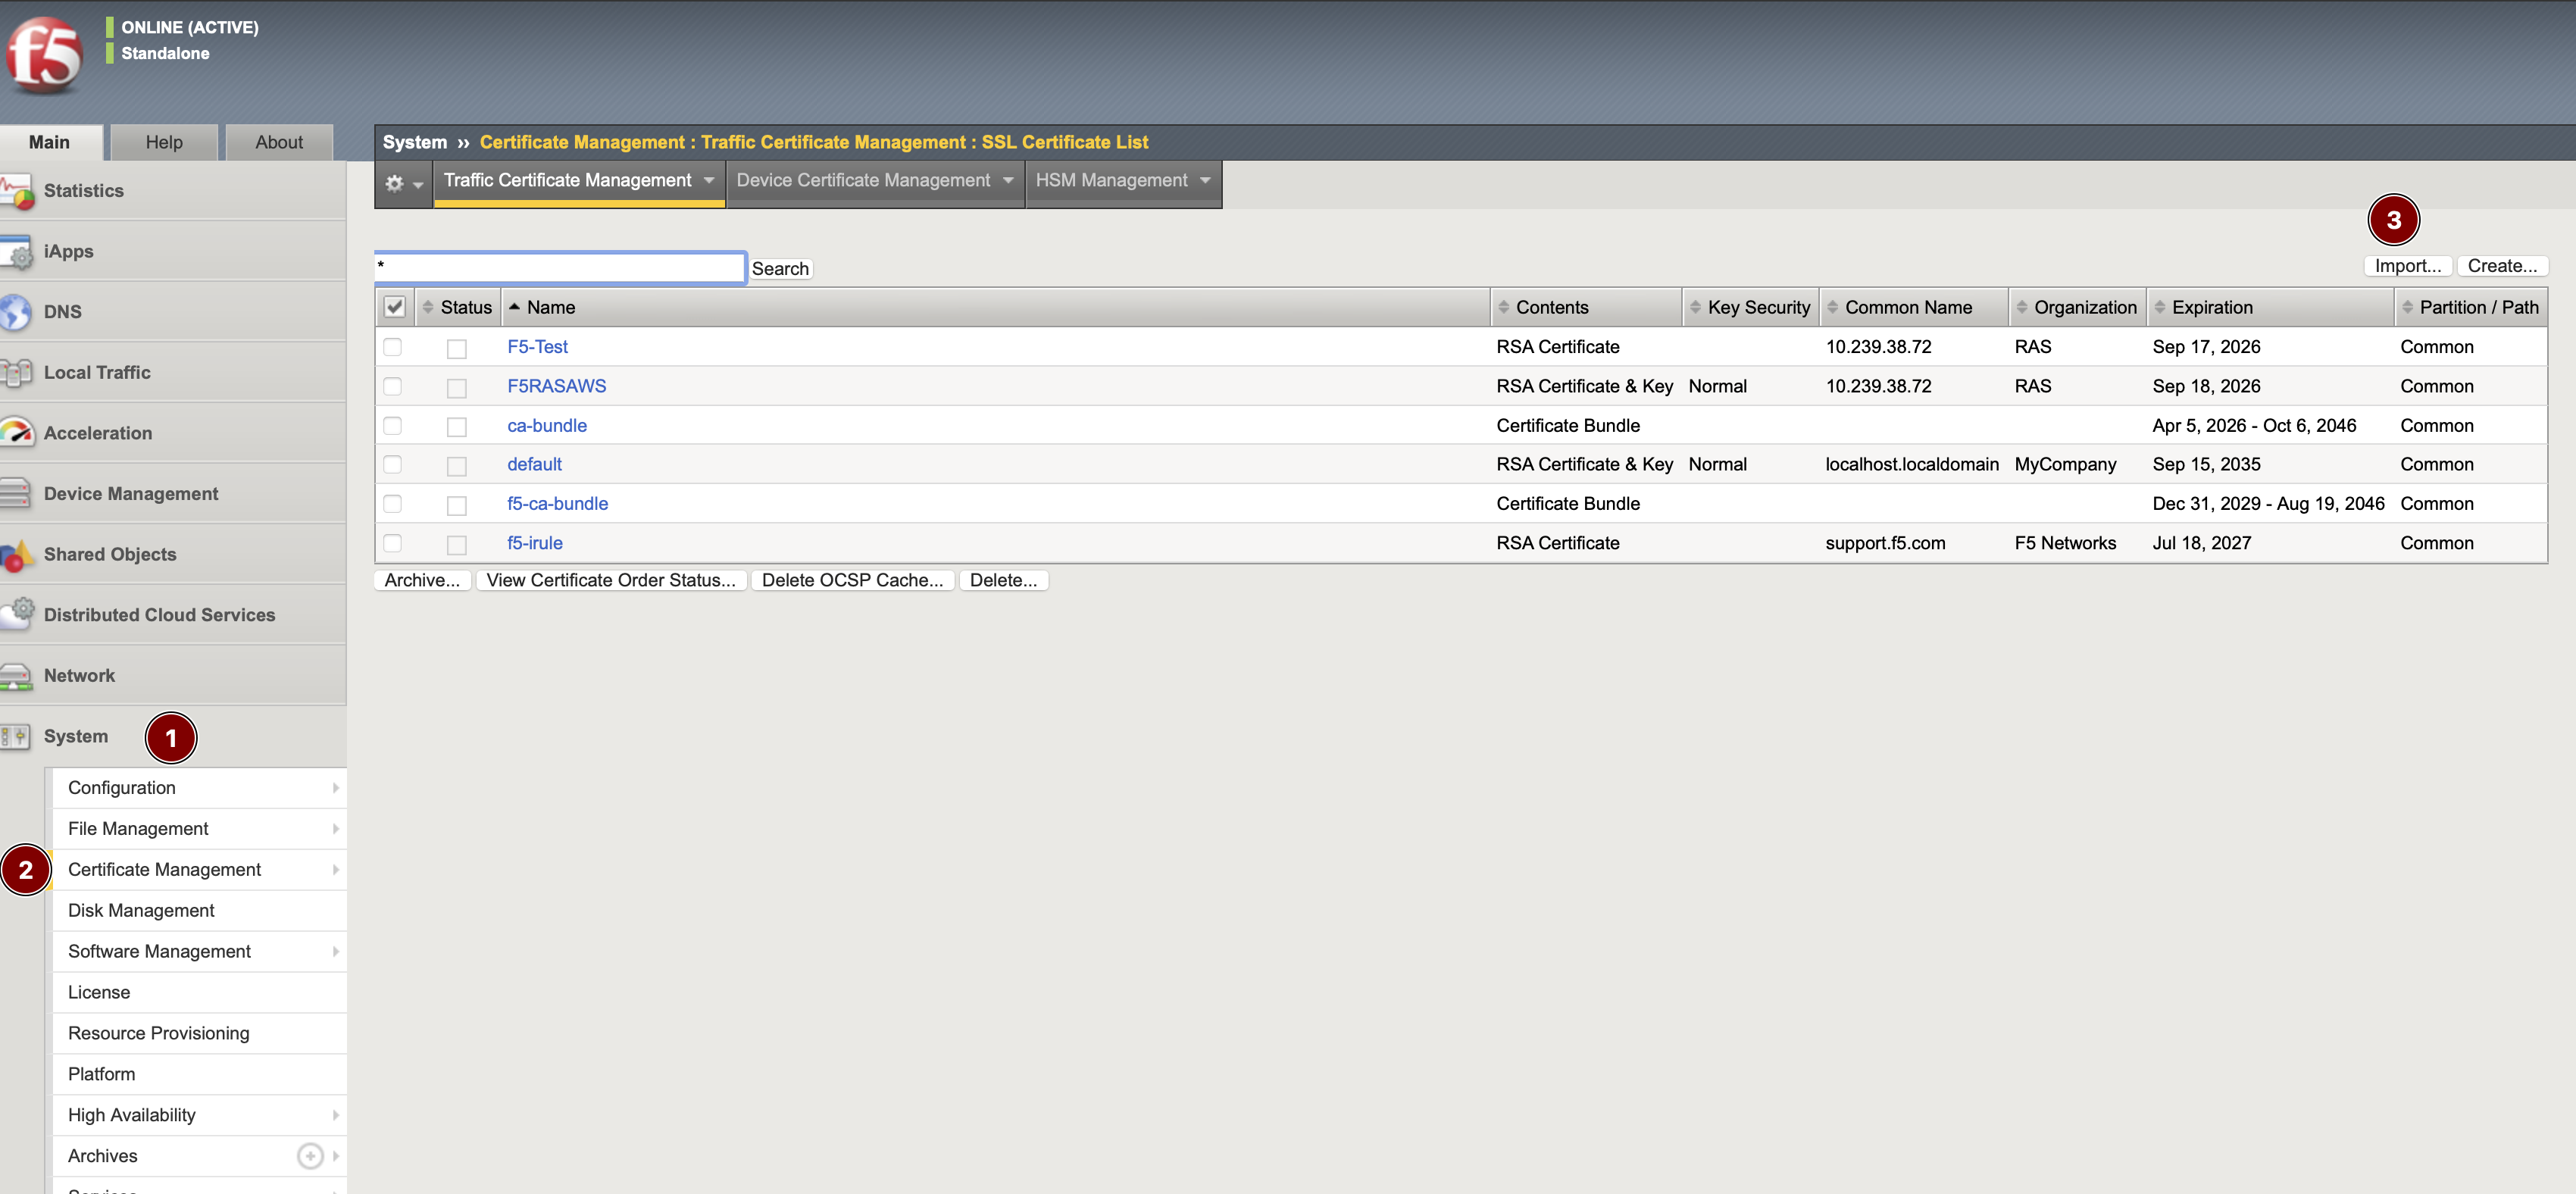
go to BIG-IP System > Certificate management > Traffic Certificate Management > SSL Certificate List > press Import...
-
Import type: Certificate for your Certificate file and Key for your key file
Name: friendly name
Source: upload or paste in text format
-
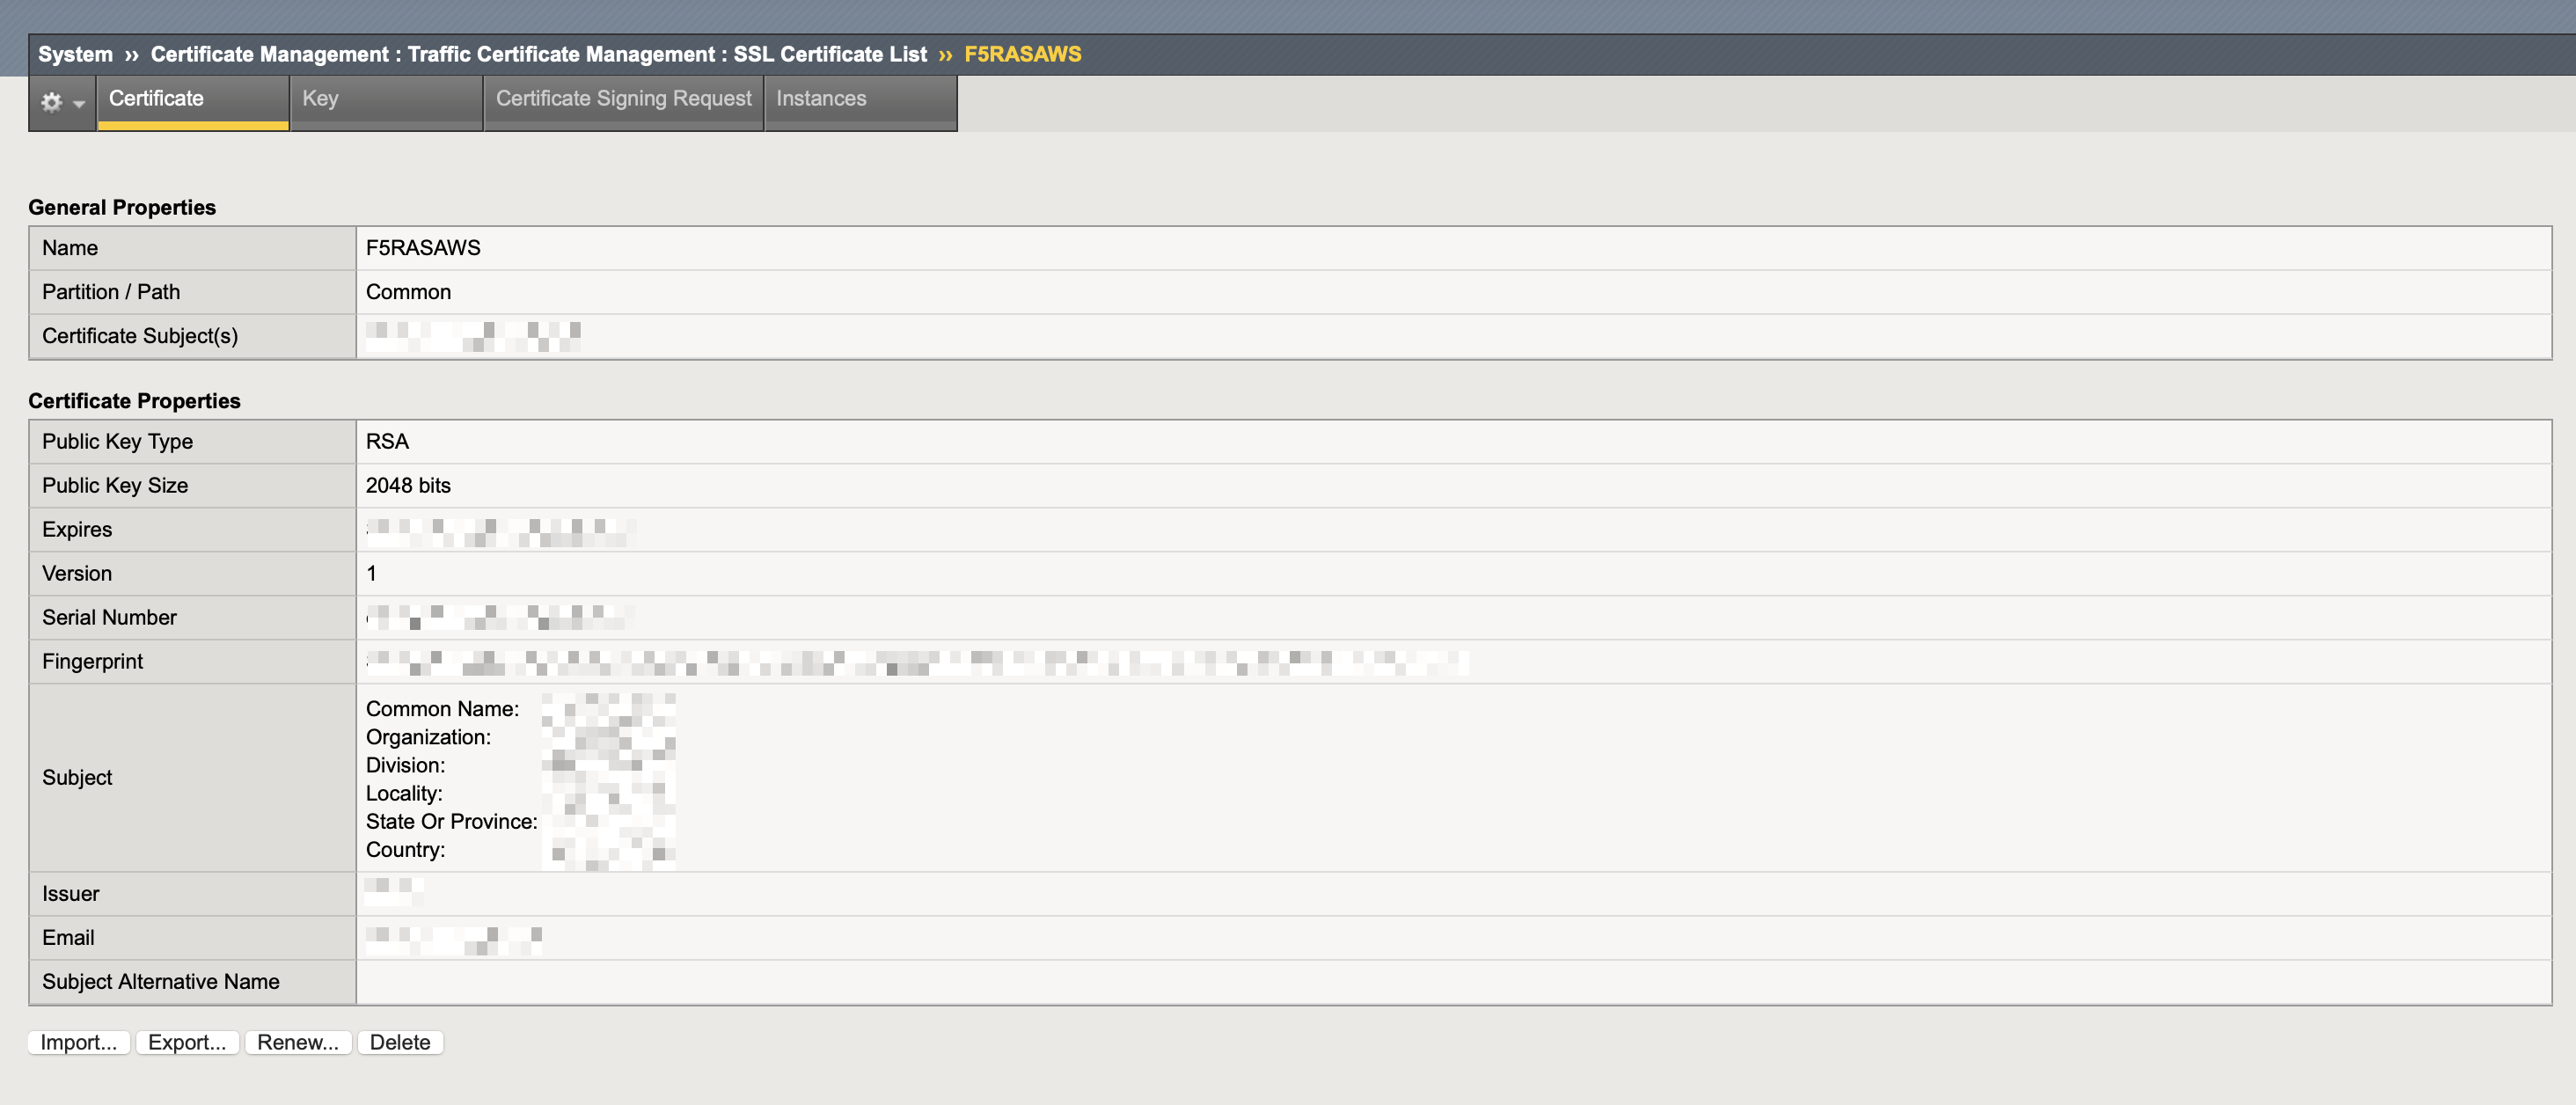
Press Import and verify that your Certificate and corresponding Key are available
Certificate tab
Key tab
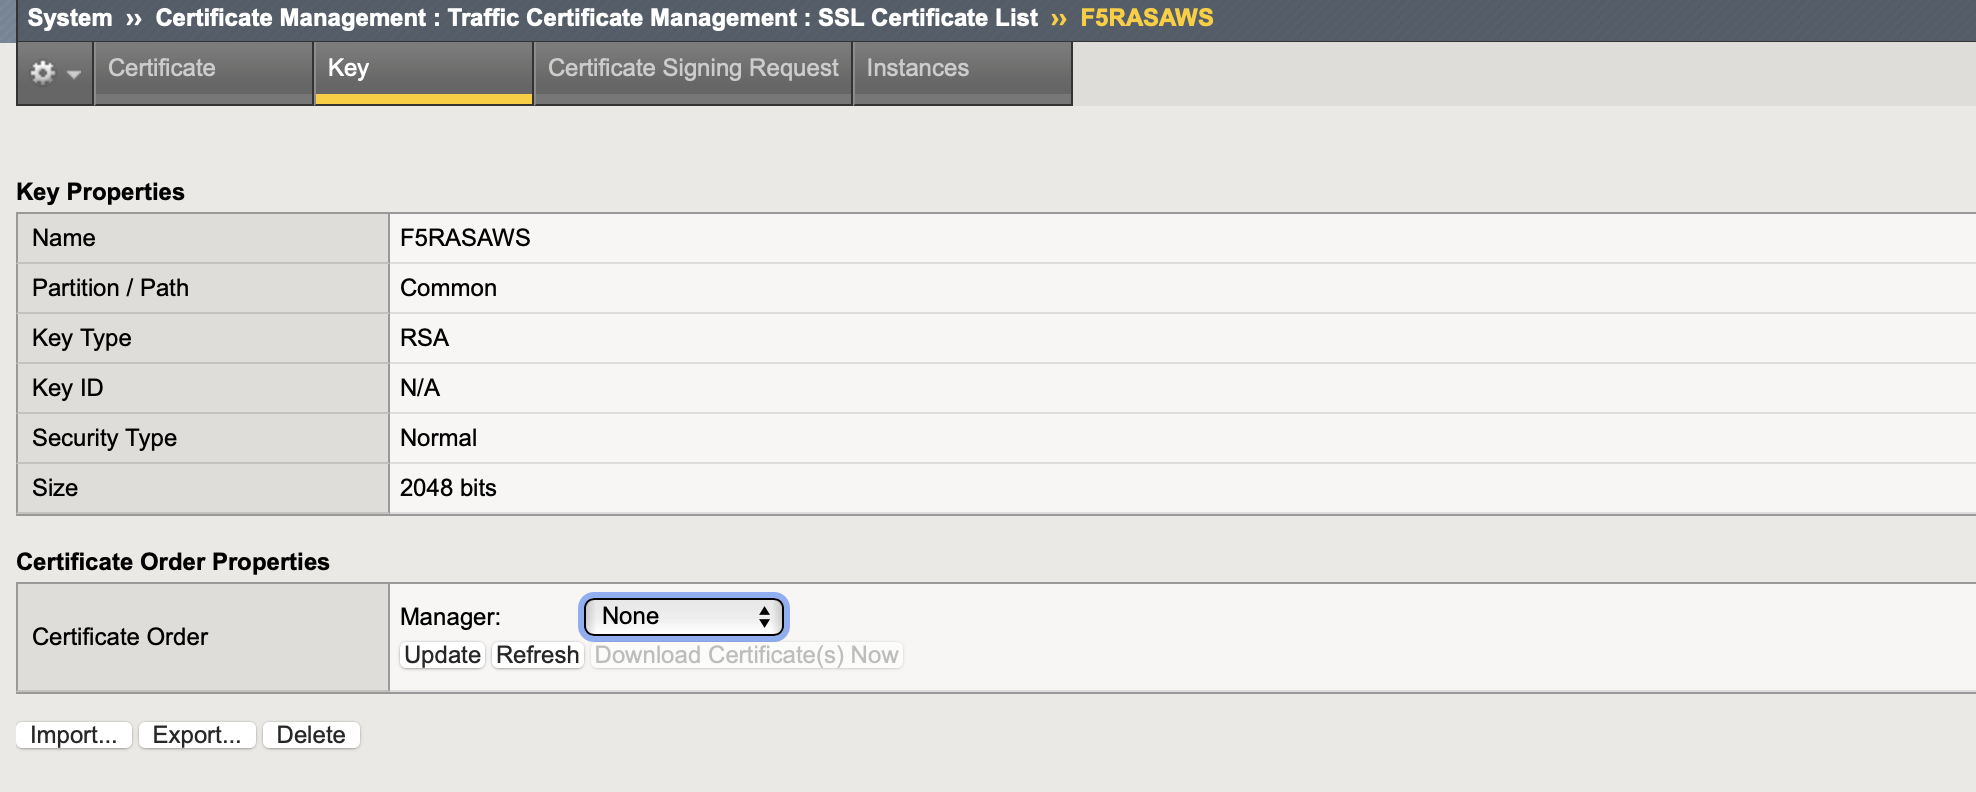
-
-
Create SSL Profiles
- go to Local Traffic > Profiles > SSL > Client > press Create...
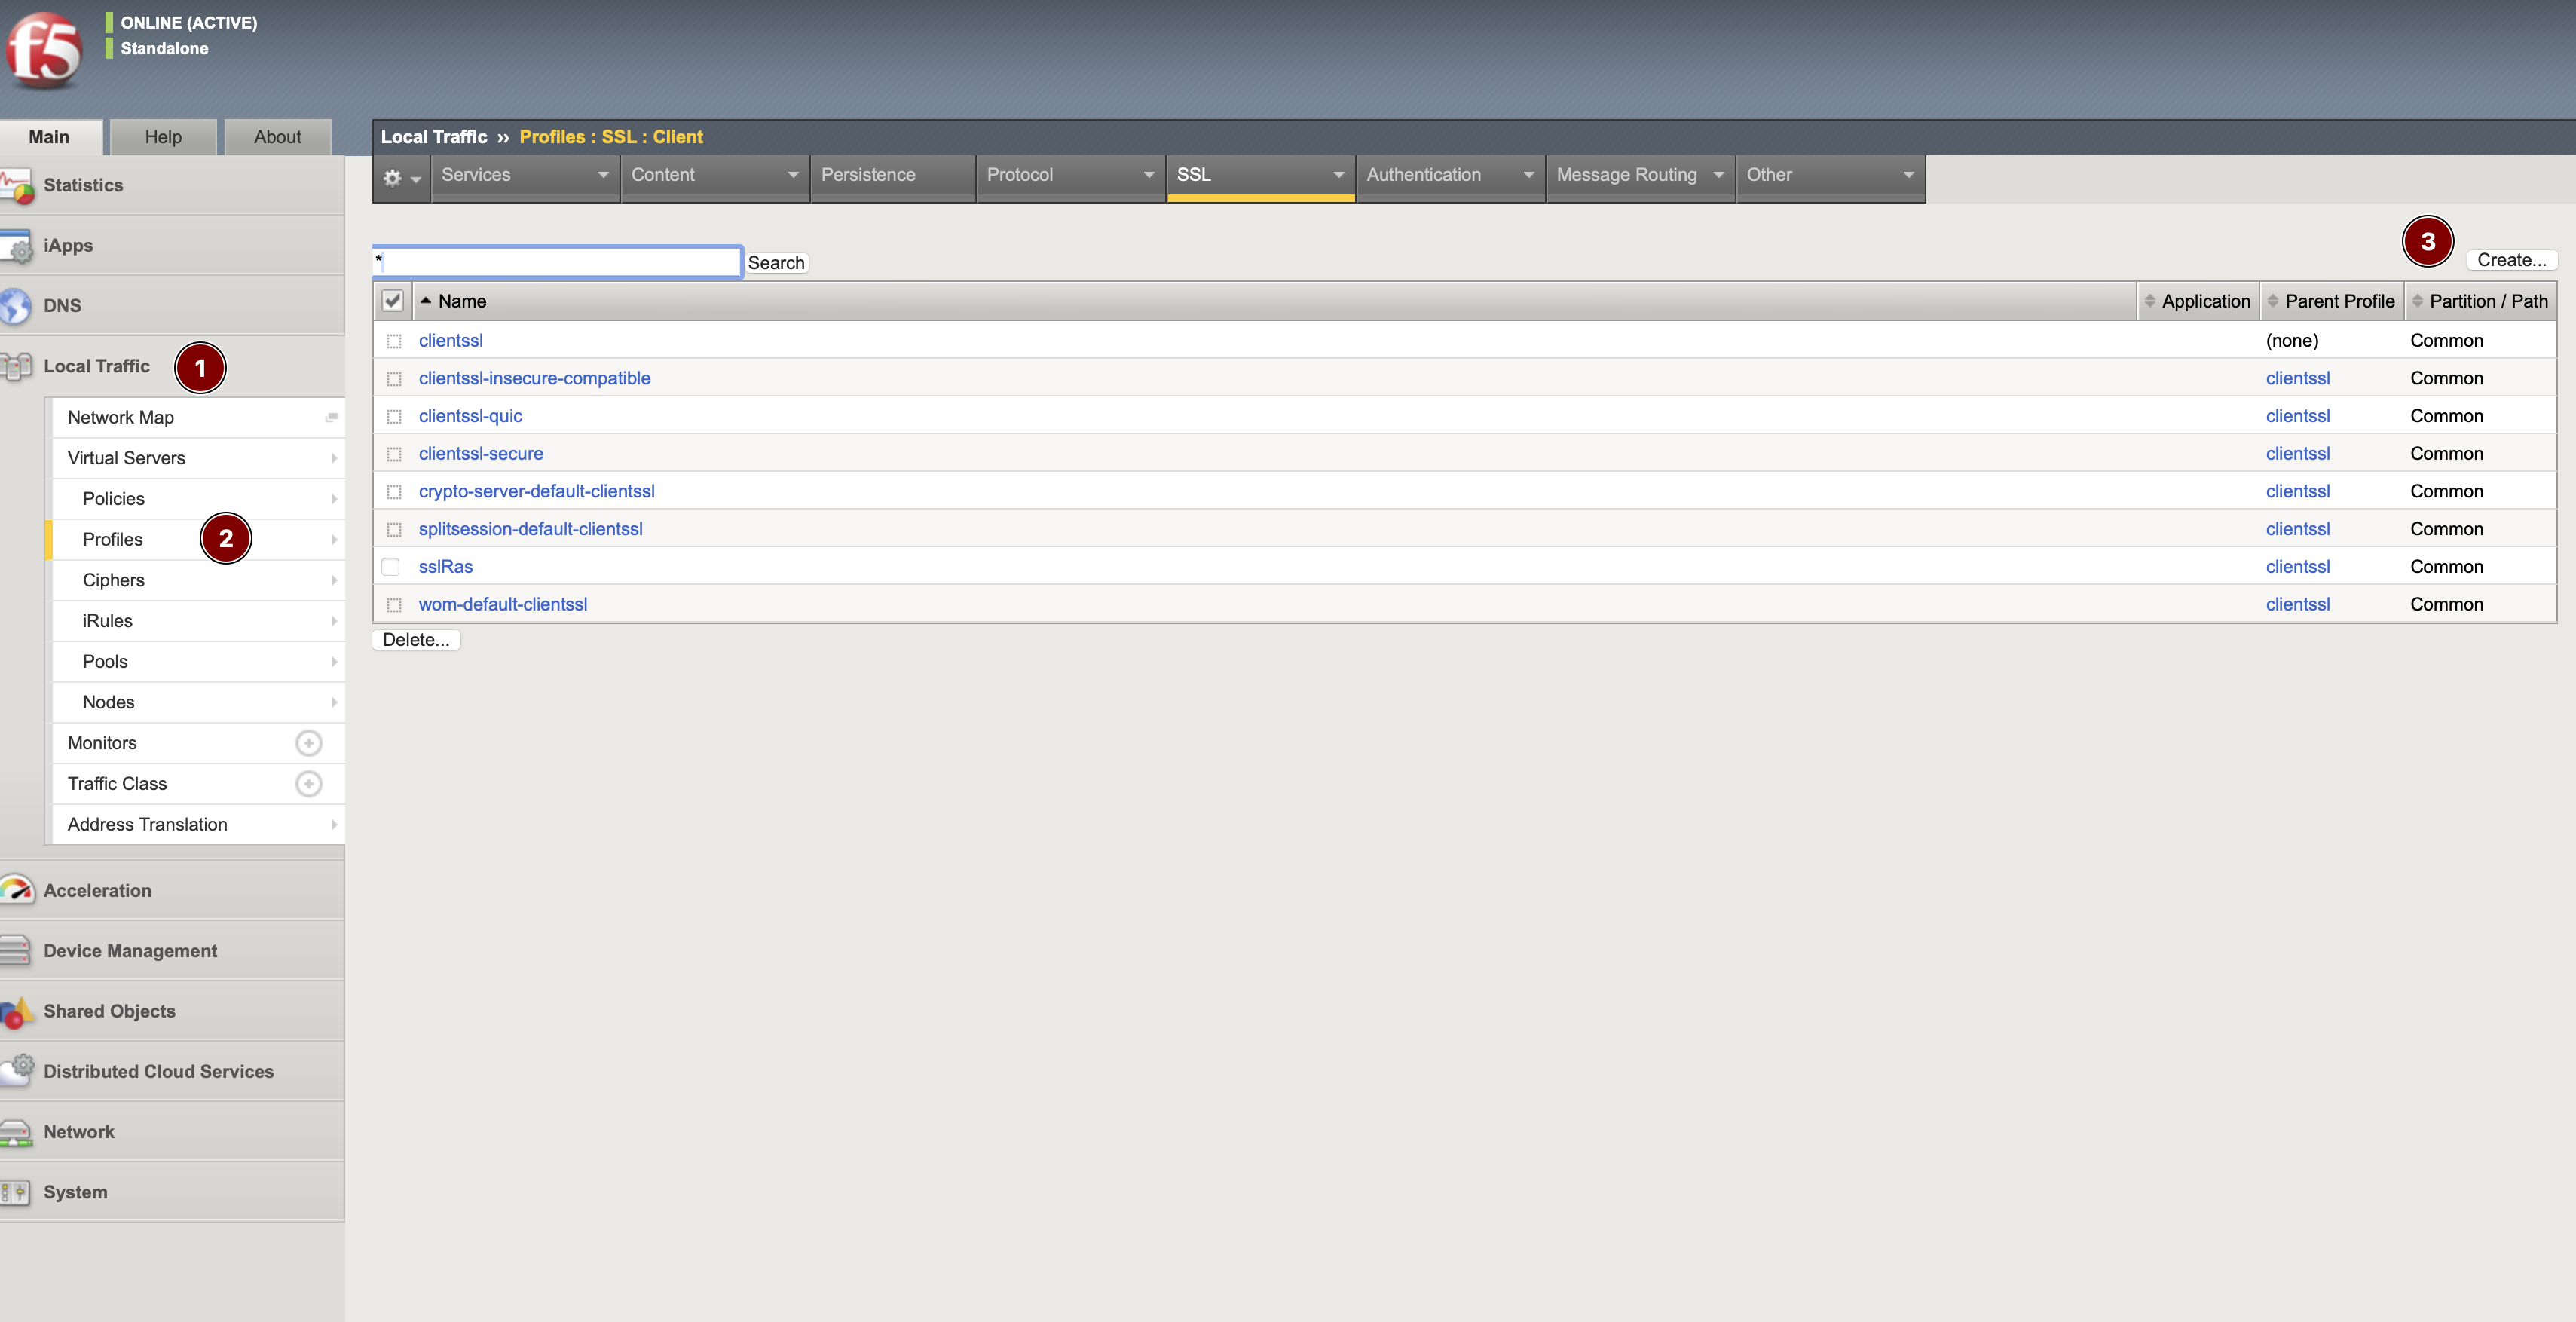
- Configure SSL Client profile as follows
Name: friendly name
Parent Profile: clientssl
Configuration: Basic, check the Custom checkbox
Certificate Key Chain: specify the certificate and key that were just imported
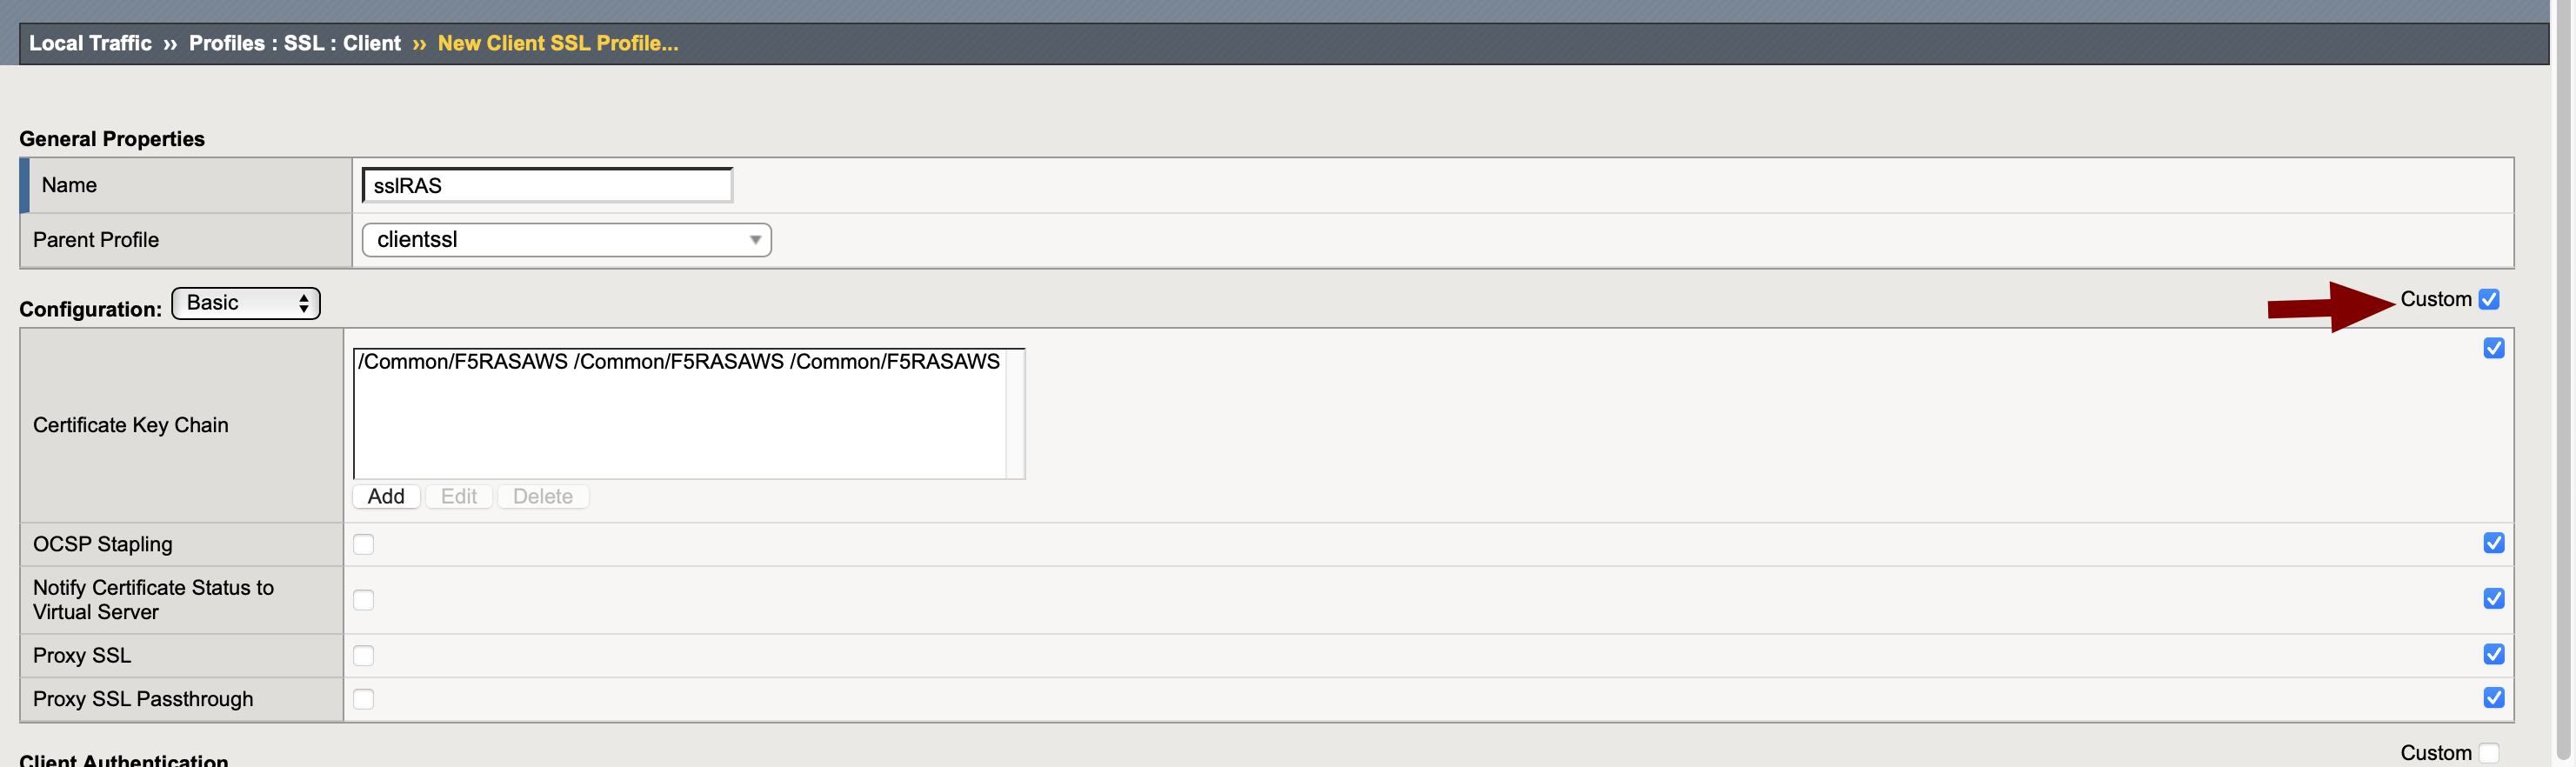
Press Finished once done
- go to Local Traffic > Profiles > SSL > Server > press Create... and configure SSL Client profile as follows
Name: friendly name
Parent Profile: serverssl
Configuration: Basic, check the Custom checkbox
Certificate: choose the certificate that was just imported
Key: choose the key that was just imported
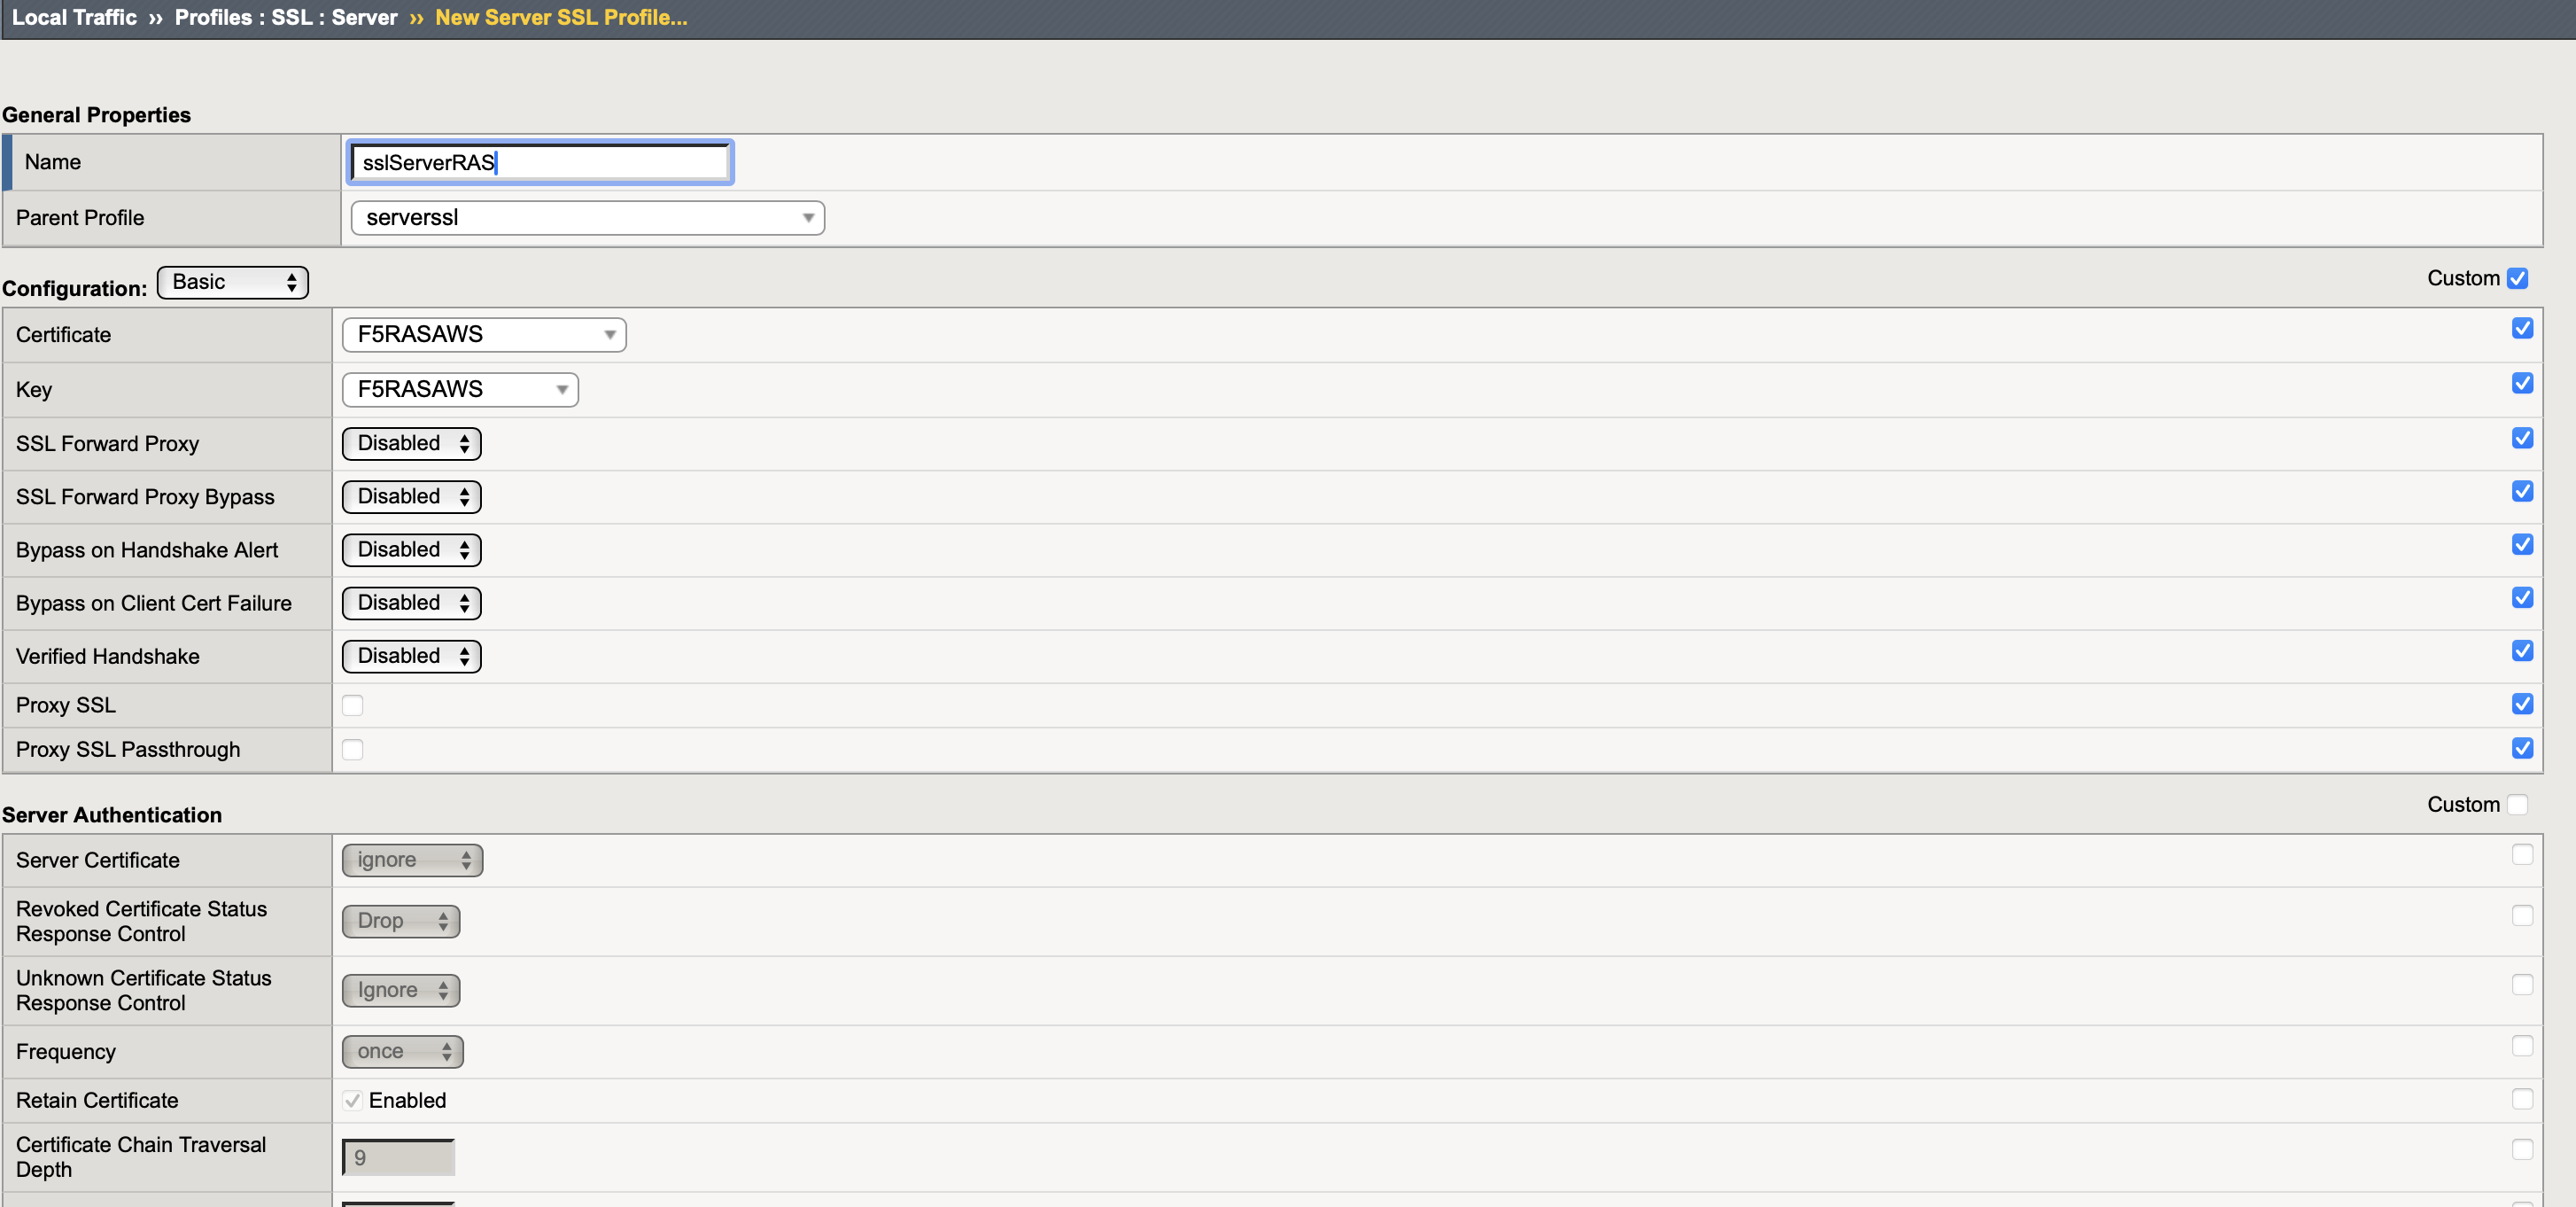
Press Finished once done
- go to Local Traffic > Profiles > SSL > Client > press Create...
-
Reconfigure Virtual Server
-
go to the properties of the Virtual Server that was created and configure as follows
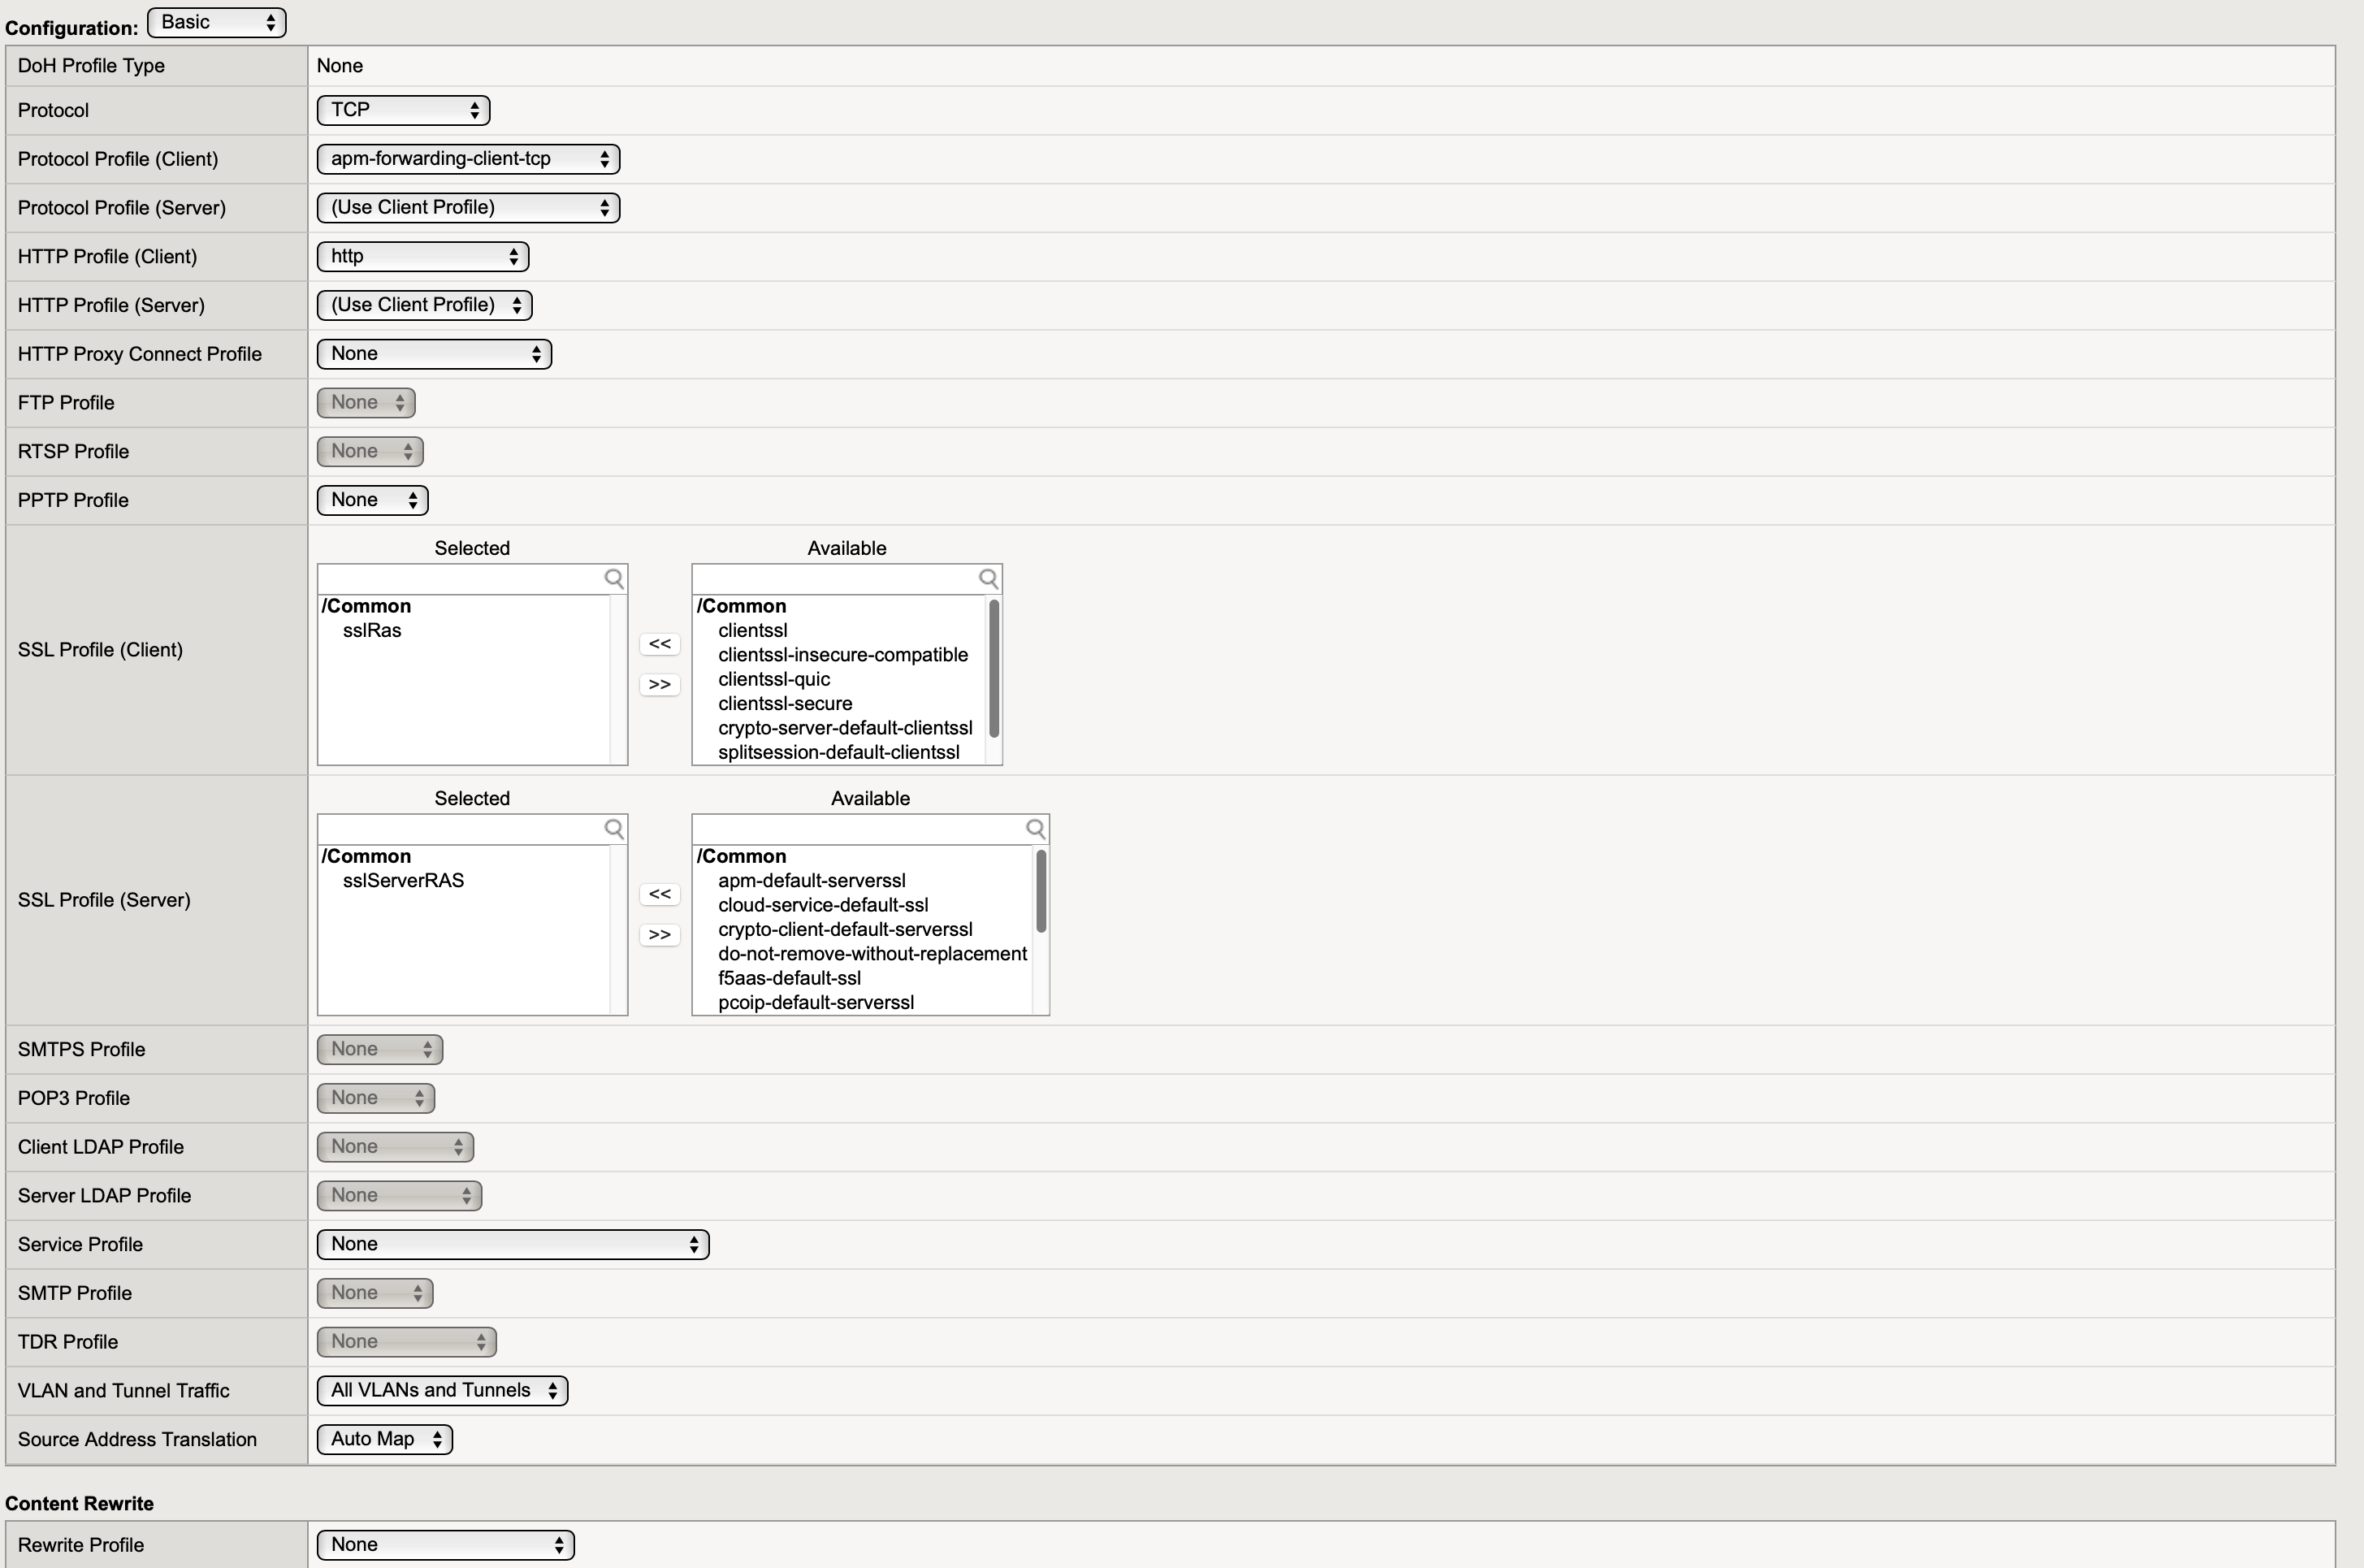
Protocol: TCP
SSL Profile (Client): find SSL client profile that was created in Available table and click arrow to move to the left in Active table
SSL Profile (Server): select SSL server profile that was created
Press Update once done
-
6.3 Validation
- Using Parallels Client for native platform (Windows, for example) and browser for User portal, access BIG-IP FQDN/IP address and confirm you reach is able to logon to RAS.
- Launch a published app/desktop; confirm steady performance.
- Check RAS Console > Session > Session details
- On BIG‑IP > Statistics > Module Statistics > Local traffic > Virtual Servers > select profile SSL Server or Client
7. Additional Virtual Server for User Portal
7.1 Design decisions
- This is additional configuration to address scenarios where F5 BIG-IP unable to receive Source IP address of Parallels Client. This condition will make different users connecting to BIG-IP visible as the same Source IP of DNAT device in front of the LB, so the session persistence cannot be maintained for User Portal. To address that, the cookie-based session persistence is required.
- Traffic will be split in 2 streams on the entry point before RAS GWs. User Portal on 443 TCP (default HTTPS) and Parallels Client on 444 TCP/UDP (could be other available custom port). The Pool remains the same, the RAS GW on the 443 port.
- Ensure this additional port is allowed through the firewall and security group.
- This additional Virtual Server could be part of the Option A or B depending on the requirements
- HTTP security policies could be attached to this stream and this won't affect Parallels Client for native platforms.
7.2 Step‑by‑step
- Option B will be used as a baseline. With this setup, the service port for it must be changed to a custom port, for example 444. Refer to section 5.2 and change Service port to 444
- The persistence profile is required, create it as follows:
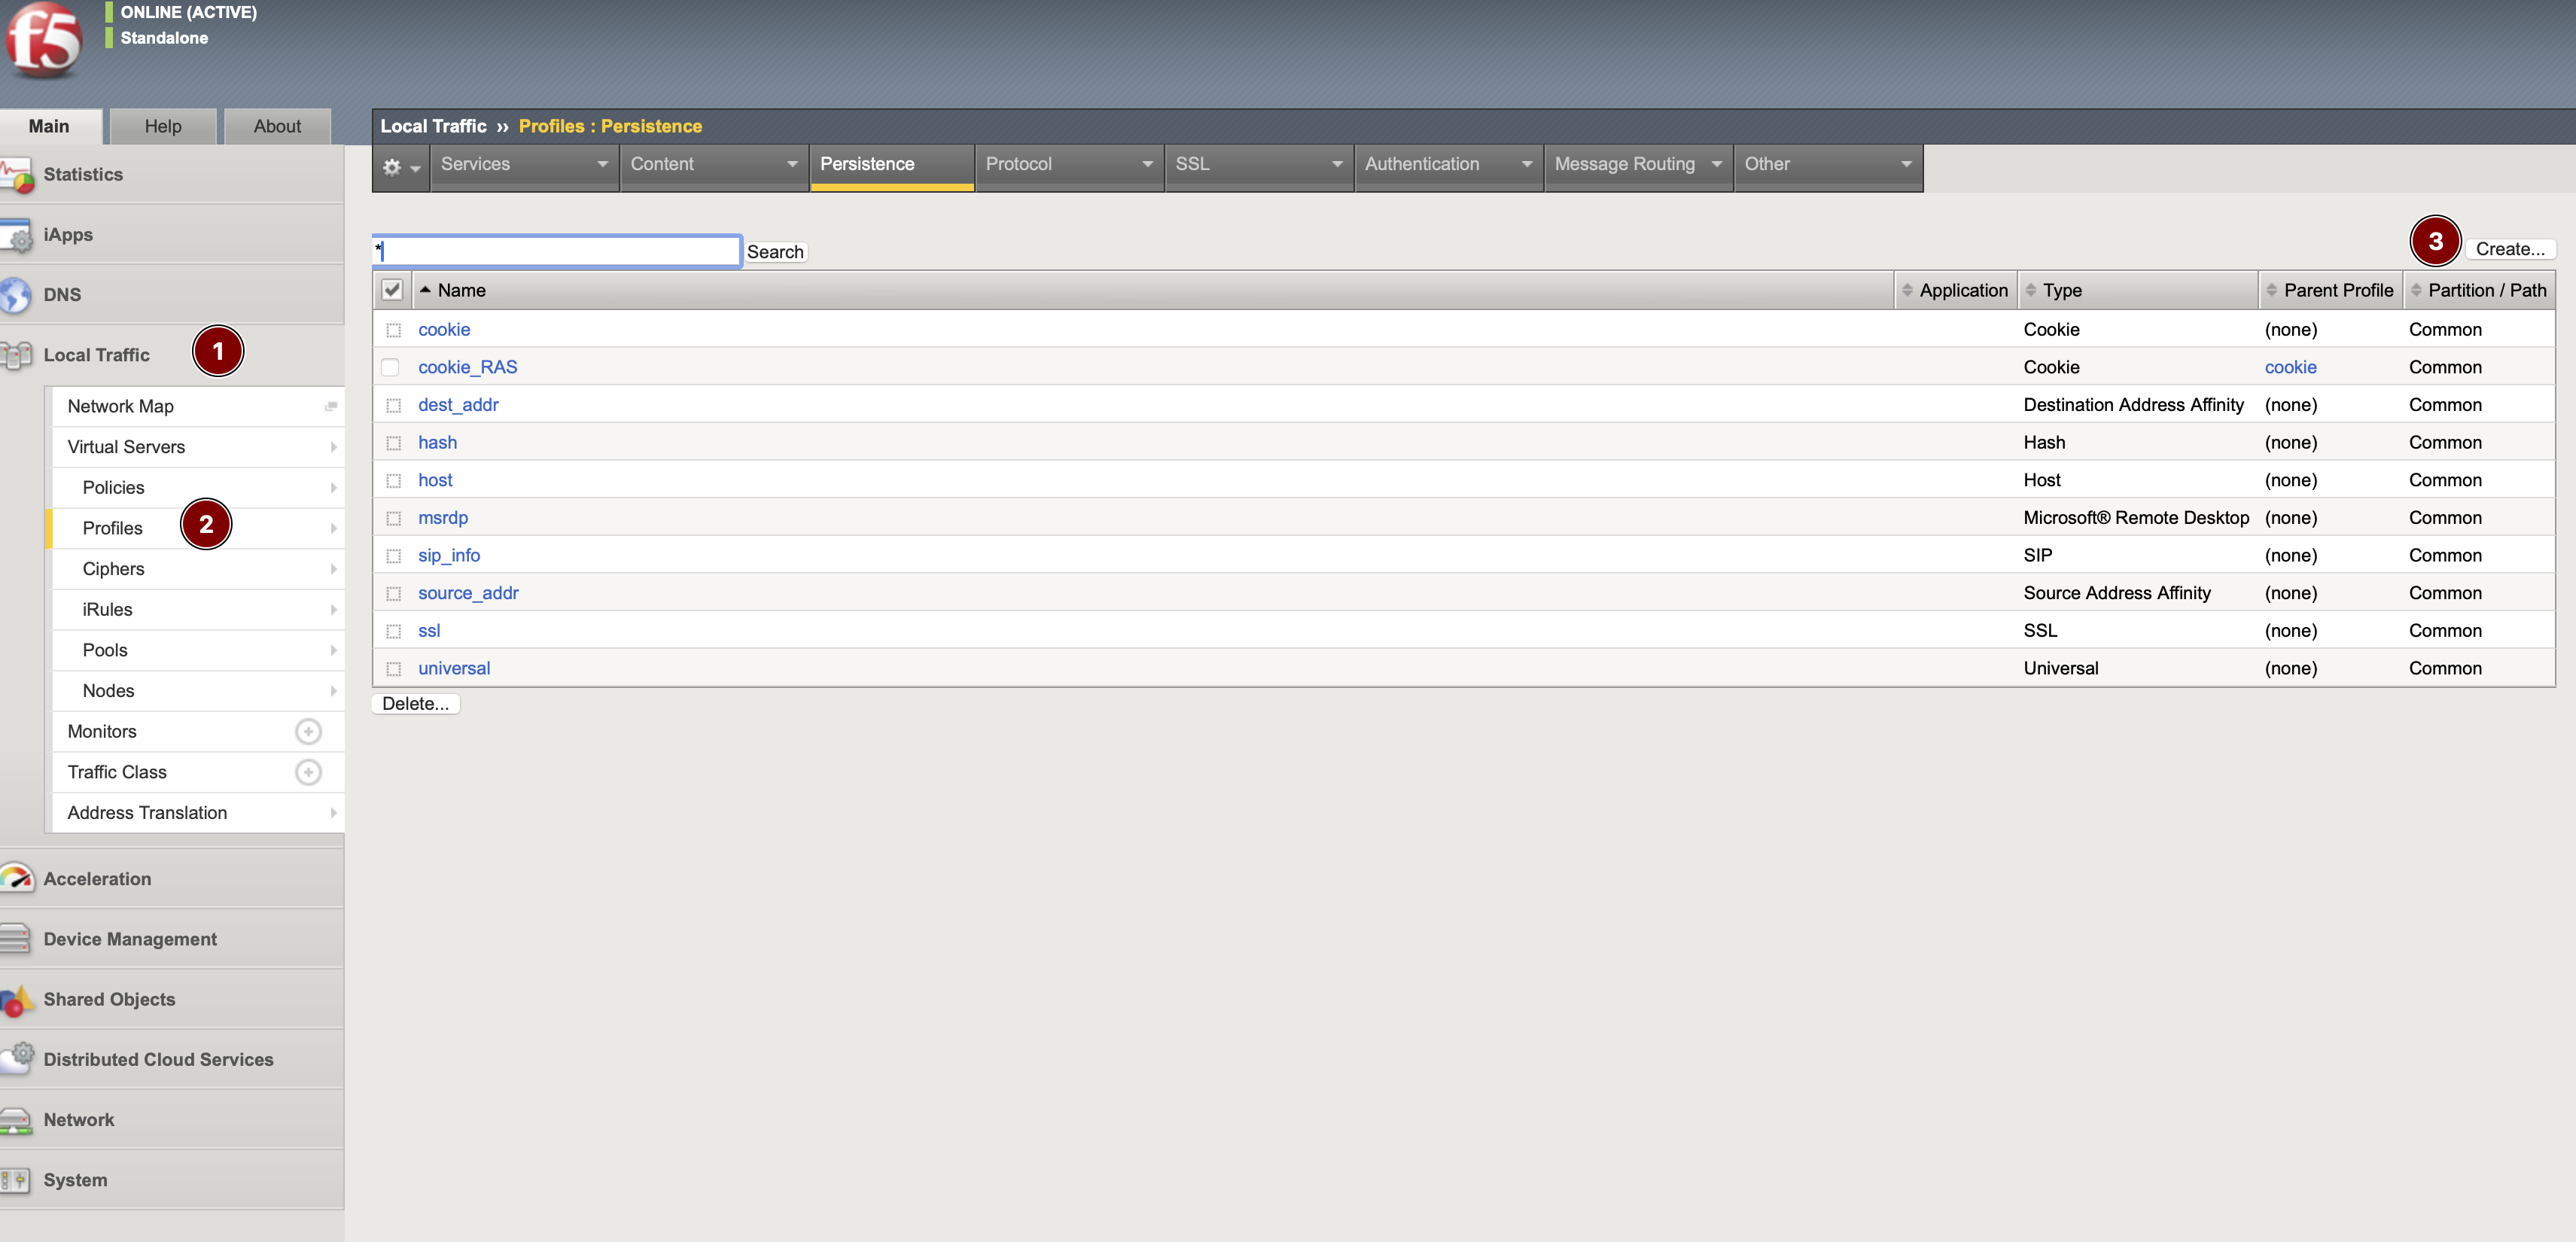
- go to BIG-IP Local Traffic > Profiles > Persistence > press Create...
- Create a new Virtual Server for HTTPS traffic, Refer to section 5.2.
Name: friendly name
Persistence type: cookie
Cookie method: HTTP Cookie Rewrite
Cookie name: ASP.NET_SessionId (could be custom, but should be then specified on RAS GW properties > Web)
Always send cookie: checked
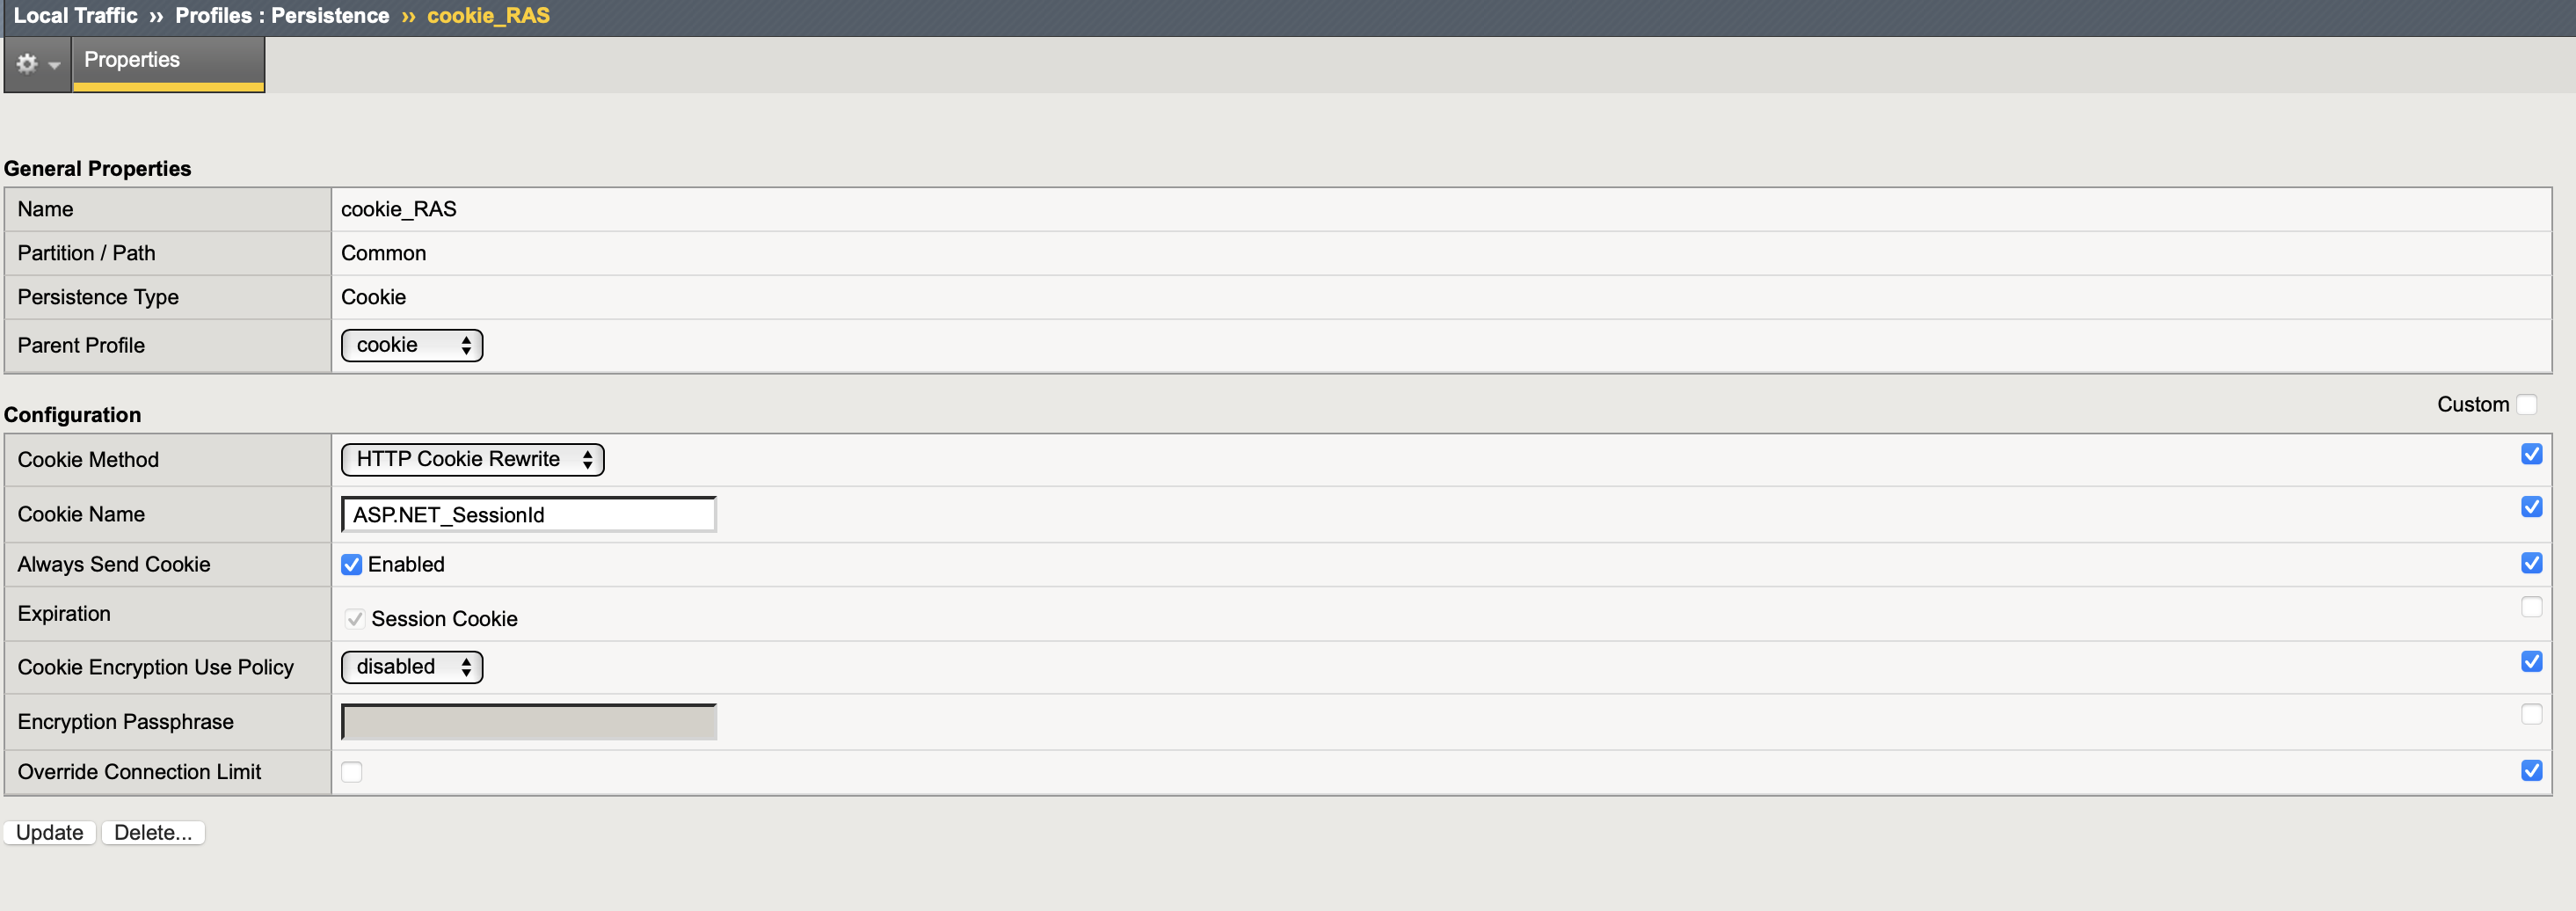
- press Finished and check that the Persistence profile is created
- go to BIG-IP Local Traffic > Profiles > Persistence > press Create...
- Create a new Virtual Server for HTTPS traffic, refer to Refer to section 5.2.
- Create a new Virtual Server
Service port: 443
Protocol: TCP
HTTP profile client: http
SSL Profile (Client): select SSL client profile that was created
SSL Profile (Server): select SSL server profile that was created
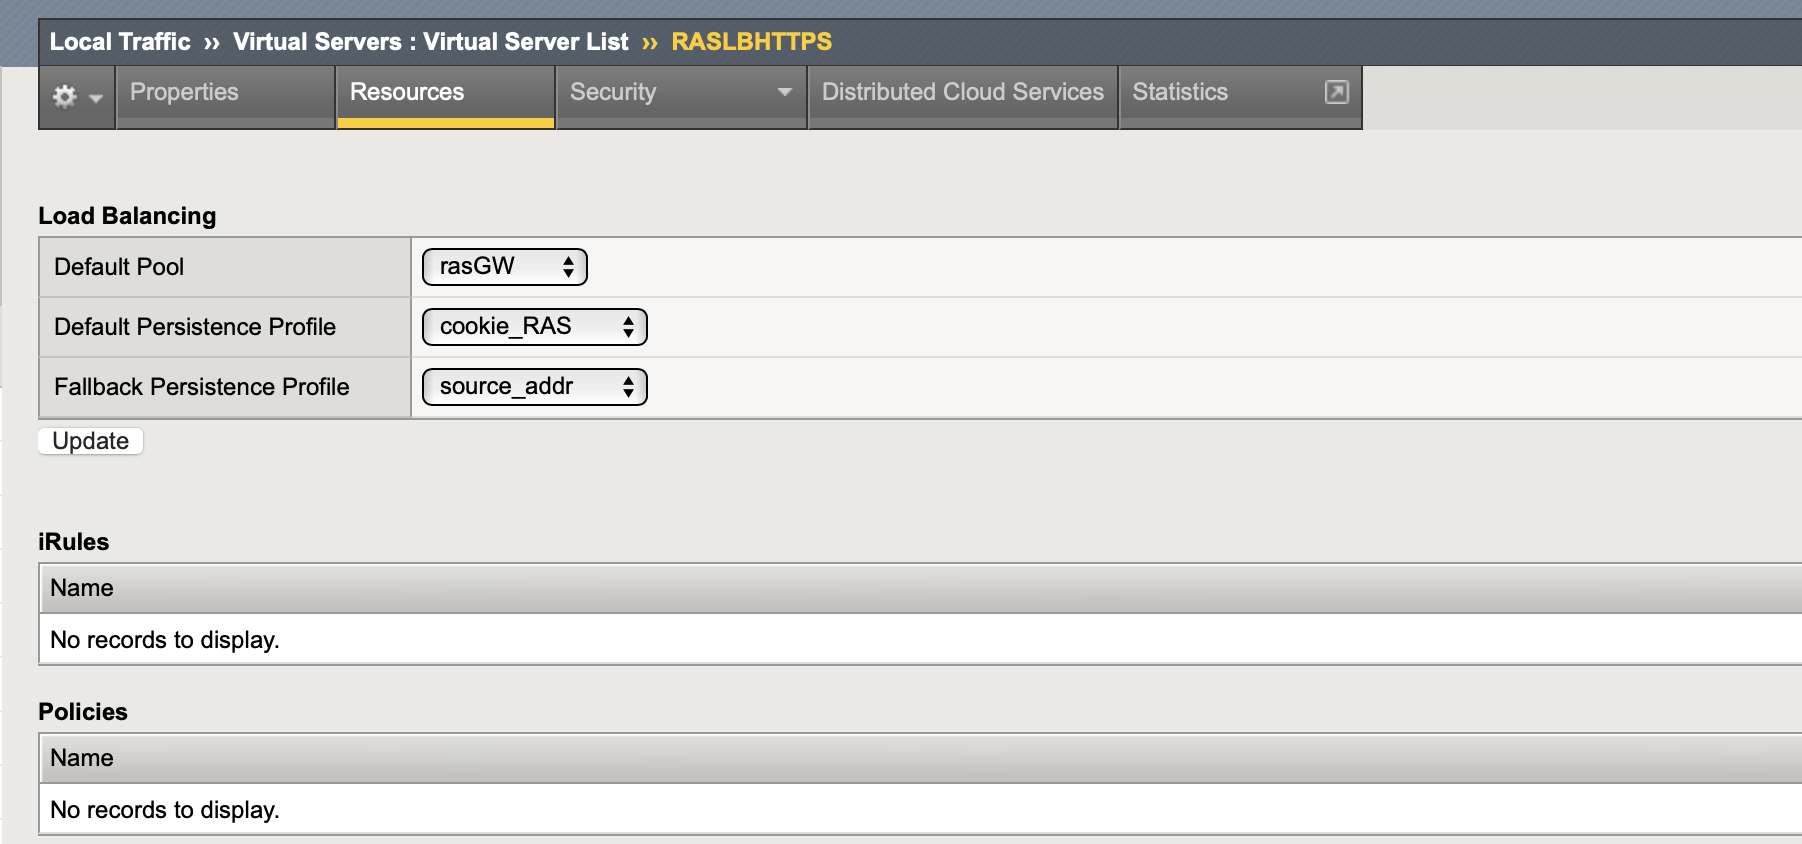
- On Resources tab:
Default pool: the Pool that was created
Default persistence profile: the Persistence profile that was created
Fallback persistence profile: the Persistence profile that was created
- Create a new Virtual Server
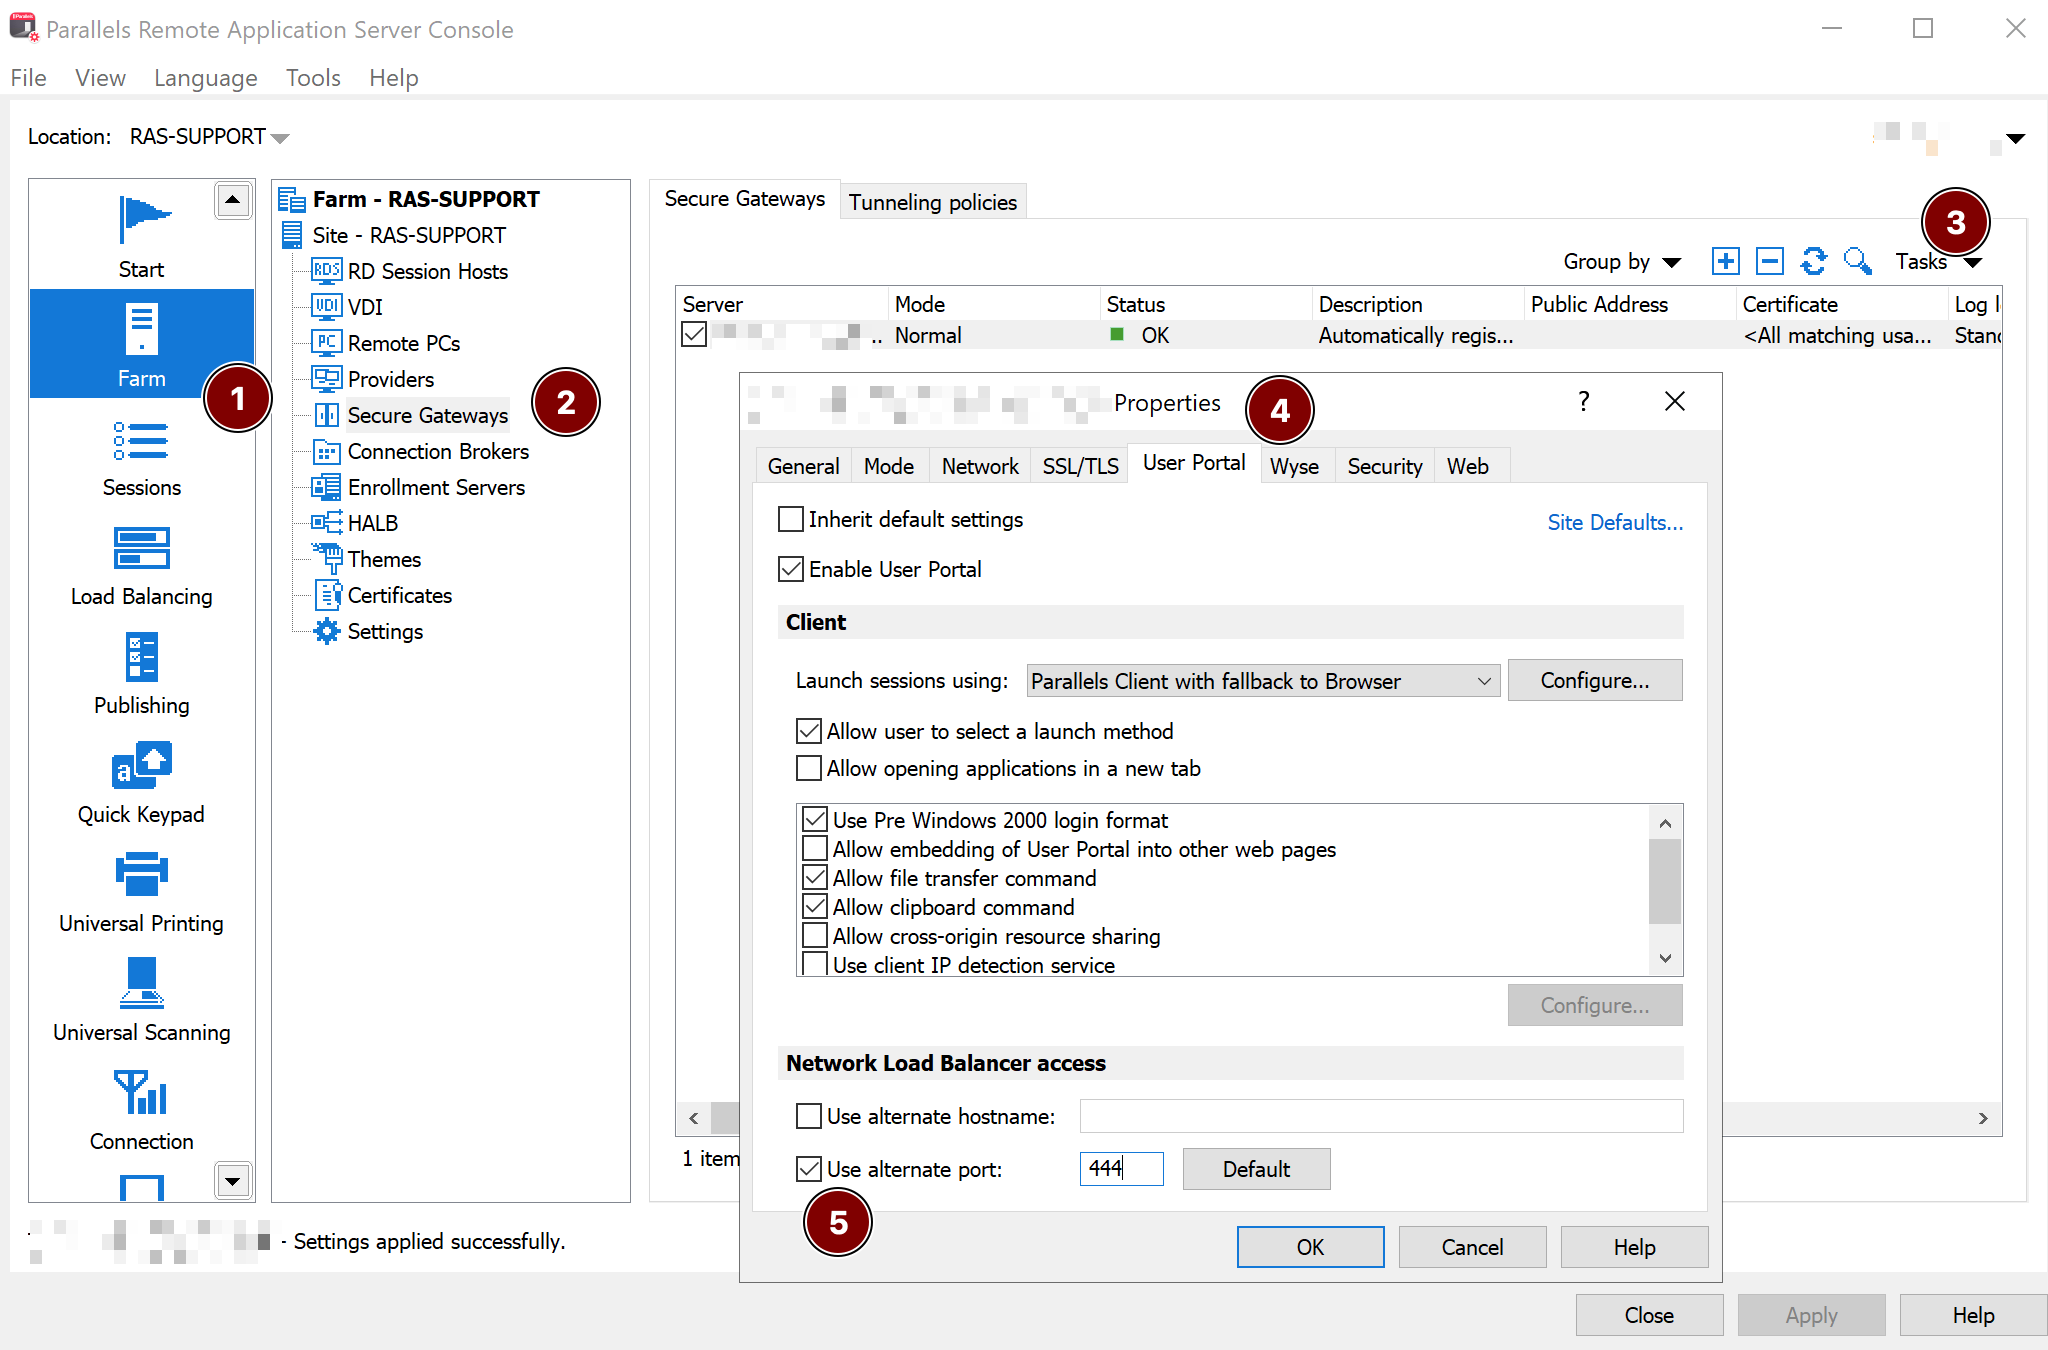
- On the RAS Console, configure Network Load Balancer Access > Use alternate port to 444 so resource redirection from User portal to Parallels Client will work via separate Virtual Server
7.3 Validation
- Using Parallels Client for native platform (Windows, for example) and browser for User portal, access BIG-IP FQDN/IP address on 444 port and confirm you reach is able to logon to RAS.
- Using browser, connect to User Portal access BIG-IP FQDN/IP address and confirm you reach is able to logon to RAS.
- Launch a published app/desktop; confirm steady performance.
8. Validation checklist
- RAS Gateway listening on 443
- If Big-IP in Passthrough mode with RDP UDP Data Tunneling enabled, the Parallels Client user sessions are utilizing UDP protocol
- If Big-IP in SSL Bridging mode, both SSL Client and SSL Server profiles are not containing errors, warning in statistics
- No HTTP profile on VSs that carry RDP/TLS streams
- Parallels Client user sessions are not interrupted with Network or Decryption errors
9. Troubleshooting
- Handshake/Timeout: Remove any HTTP profile from the VS—Parallels Client for native platforms is not HTTP/HTTPS.
- Asymmetric returns: Enable SNAT Auto Map or correct routing; review BIG‑IP’s self‑IP selection logic for SNAT.
- UDP path not used with option A Passthrough mode:
- Confirm Enable RDP UDP Data Tunneling in RAS.
- Ensure firewall allows UDP/443 end‑to‑end.
- Stickiness not honored across Pool members: network disconnections during the user session, especially using User Portal. The cause might be the Session persistence cannot be maintained for HTTP traffic, then need to use cookie based session persistence for it - refer to section 7. Additional Virtual Server for User Portal
- Health checks: verify that TCP healtcheck is used and Pool members are online.
10. Security considerations
- Option A (Passthrough): Simplest path; preserves end‑to‑end TLS and UDP performance; fewer inspection options on BIG‑IP.
- Option B (Bridging): Enables TLS visibility on BIG‑IP to apply iRules/security policies; Any additional security measures are not covered in the scope of this article. Refer to F5 documentation.
- With the addtional Sirtual Server for HTTP, the HTTP security policies and WAF are available.
11. Appendix — References
- Parallels RAS Secure Gateway (ports & UDP tunneling option): Parallels Admin Guide and Reference Architecture.
- F5 BIG‑IP
Was this article helpful?
Tell us how we can improve it.