This article is a step-by-step guide for configuring Windows Server to comply SAML prerequisites.
Configuring User Account for Enrollment Agent
1. Create Enrollment Agent user account in AD. Any username can be used (for example, enrolman@domain)
2. Delegate it Read & Write permissions for Alt-Security-Identities attribute (contains mappings for X.509 certificates or external Kerberos user accounts to this user for the purpose of authentication) either at domain (CN=USERS) or OU level where user accounts of the RAS users which will use SAML.
- Right-click on the container and select Delegate Control…
- At the Welcome screen, click Next: At Users and Groups, click Add… and enter the name of the enrollment agent account then click OK and Next.
- At Tasks to Delegate, click Create a custom task to delegate and then click Next.
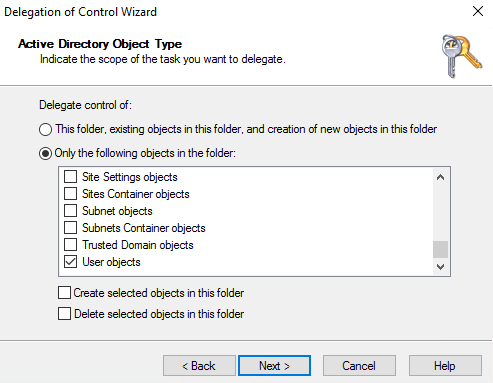
- At Active Directory Object Type, click Only the following objects in the folder, check the User objects checkbox, and then click Next.
- At Permissions, check the Property-specific checkbox, check the Read altSecurityIdentities and Write altSecurityIdentities checkboxes and click Next.

- At Completing the Delegation, click Finish.

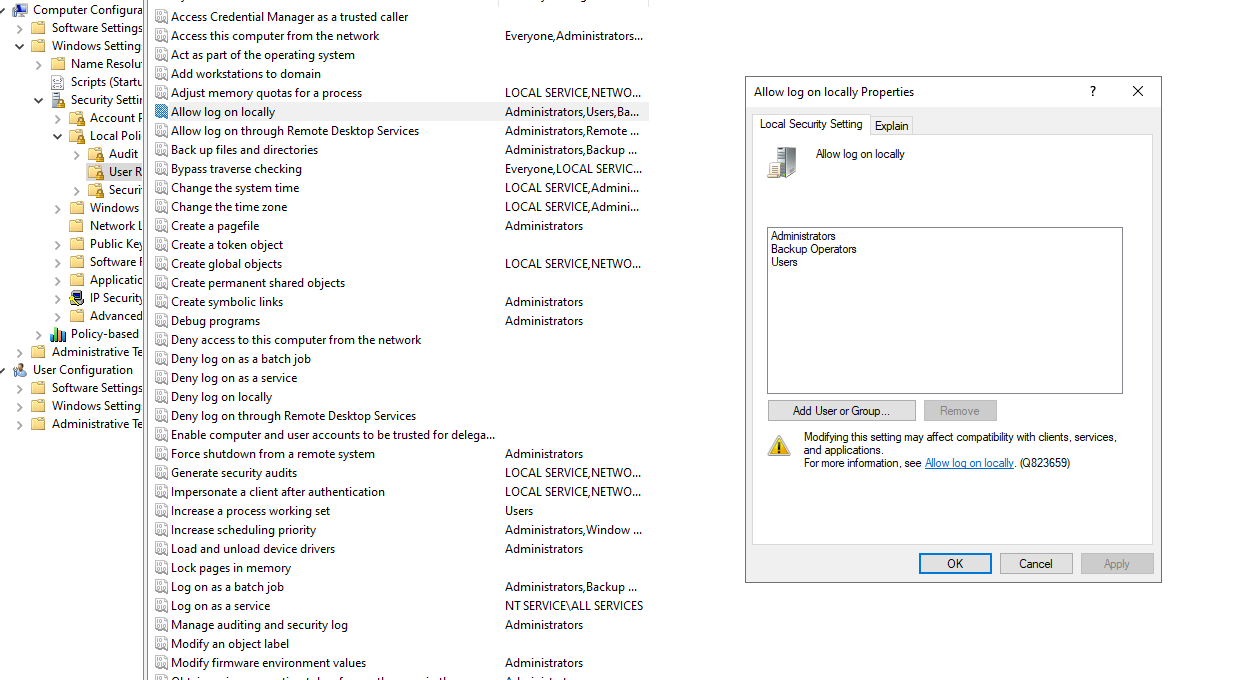
Note: Enrollment user account should have "Allow log on locally" permissions on the Enrollment server
Configuring NLA user account
1. Create NLAUser user account. The purpose of this service account to initiate an RDP session to a host machine, receive logon error and trigger RAS credentials provider to supply user smart card.
2. NLAUser user account must be a member of local "Remote Desktops Users" group on RDS hosts and VDI guests
3. At the same time, it MUST be prohibited from logon via RDP. Use GPO to configure group membership. Create a new GPO or use "Default Domain Policy" GPO:
- Open the Group Policy Management Editor and navigate to Computer Configuration > Policies > Windows Settings > Security Settings > Restricted Groups.
- Right click and choose Add Group > enter Remote Desktop users → In the next window under “Members of this group:” click Add and choose the NLA user to add to Remote Desktop users.
- Navigate to Computer Configuration > Policies > Windows Settings > Security Settings > Local Policies > User Rights Management >enable Deny log on through Remote Desktop Services
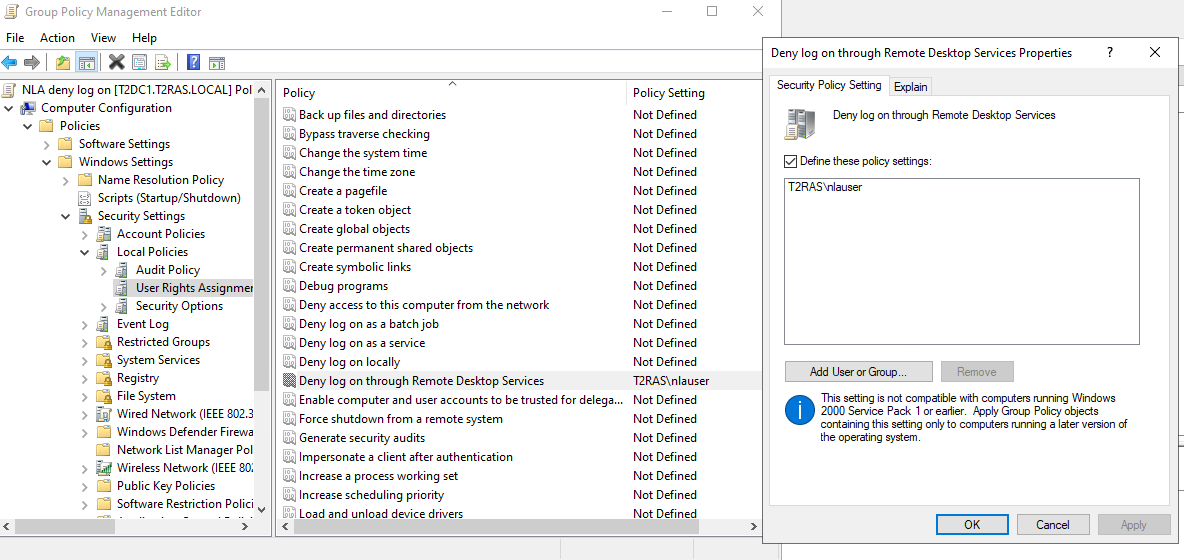
Note: NLA user account should have "Allow log on locally" permissions on the Enrollment server
Installing and Configuring Active Directory Certificate Services role
- At Server Manager choose Add Roles and Features, select target server and proceed with installing the Certification Authority component of Active Directory Certificate Services role:

Reboot the machine if required
- Once role installed, proceed with configuring it:
Click on the appropriate button at Server Manager

Proceed with the wizard.
- Specify the credential used for configuring the role:


- Should you configure the environment from scratch, specify the type of your CA as Enterprise and Root. If you already have Root CA, proceed with setting up Subordinate CA.


- Either create a new private key or use an existing one:

- Set the key length to 4096 and name it as you wish (the name must differ from the server's hostname.)


- Specify validity period and database locations


- On the Confirmation page click Configure


Once the configuration succeeded, close the wizard.
Final checks
Go to Administrative Tools > Certification Authority > your CA > Issued Certificated and make sure that AD CS and DC machines received certificates.

Configuring Certificate Authority Templates
Create an Enrollment Agent Template
- Launch Certificate Authority snap-in from Administrative Tools
- Right-click on Certificate Templates node > Manage.
- Right-click on the Enrollment Agent template > Duplicate Template.

- The new template properties window is opened now. Configure it as follows:
- General tab:
NOTE: Type the template name PrlsEnrollmentAgent (this name is required).
- Template display name: PrlsEnrollmentAgent
- Template name: PrlsEnrollmentAgent
- Validity period: 2 years
- Renewal period: 6 weeks
- Publish certificate in Active Directory = ON
- Do not automatically reenroll if a duplicate certificate exists in Active Directory = OFF

- Cryptography tab:
- Provider category = Legacy Cryptographic Service Provider
- Algorithm name = Determined by CSP
- Minimum key size: 2048
- Choose which cryptographic providers can be used for requests = Requests must use one of the following providers: Microsoft Strong Cryptographic Provider

- Security tab:
- Click Add
- Add the Enrollment Agent user account
- Allow (enable) the “Enroll” permission
- Click Apply and OK.

![]() Create Smartcard Logon Certificate Template
Create Smartcard Logon Certificate Template
- Launch Certificate Authority snap-in from Administrative Tools on the CA machine.
- Right-click on Certificate Templates node > Manage.
- Right-click on the Smartcard Logon template > Duplicate Template.
- The new template properties window is opened now. Configure it as follows:
- General tab:
NOTE: Type the template name PrlsSmartcardLogon (this is the required name).
-
-
- Template display name: PrlsSmartcardLogon
- Template name: PrlsSmartcardLogon
- Validity period: 1 years
- Renewal period: 6 weeks
- Publish certificate in Active Directory = OFF
- Do not automatically reenroll if a duplicate certificate exists in Active Directory = OFF
-

-
- Cryptography tab:
- Provider category = Legacy Cryptographic Service Provider
- Algorithm name = Determined by CSP
- Minimum key size: 2048
- Choose which cryptographic providers can be used for requests = Requests must use one of the following providers
- Providers: Microsoft Strong Cryptographic Provider
- Cryptography tab:

-
- Issuance Requirements tab:
- CA certificate manager approval = OFF
- This number of authorized signatures: 1
- Policy type required in signature: Application policy
- Application policy: Certificate Request Agent
- Same criteria as for enrollment = ON
- Issuance Requirements tab:

-
- Security tab:
- Click Add
- Add the Enrollment Agent user account
- Allow (enable) the “Enroll” permission
- Click Apply and OK.
- Security tab:

-
- Request Handling tab:
- Purpose = Signature and encryption
- Delete revoked or expired certificates (do not archive) = OFF
- Include symmetric algorithms allowed by the subject = OFF
- Archive subject's encryption private key = OFF
- Allow private key to be exported = OFF
- Renew with the same key = OFF
- For automatic renewal of smart card certificates, use the existing key if a new key cannot be created = OFF
- Do the following when the subject is enrolled and when the private key associated with this certificate is used: = Prompt the user during enrollment
- Request Handling tab:

-
- Subject name tab:
- Build from this Active Directory information = ON
- Subject name format: = Fully distinguished name
- Include e-mail name in subject name = OFF
- E-mail name = OFF
- DNS name = OFF
- User principal name (UPN) = ON
- Service principal name (SPN) = OFF
- Subject name tab:

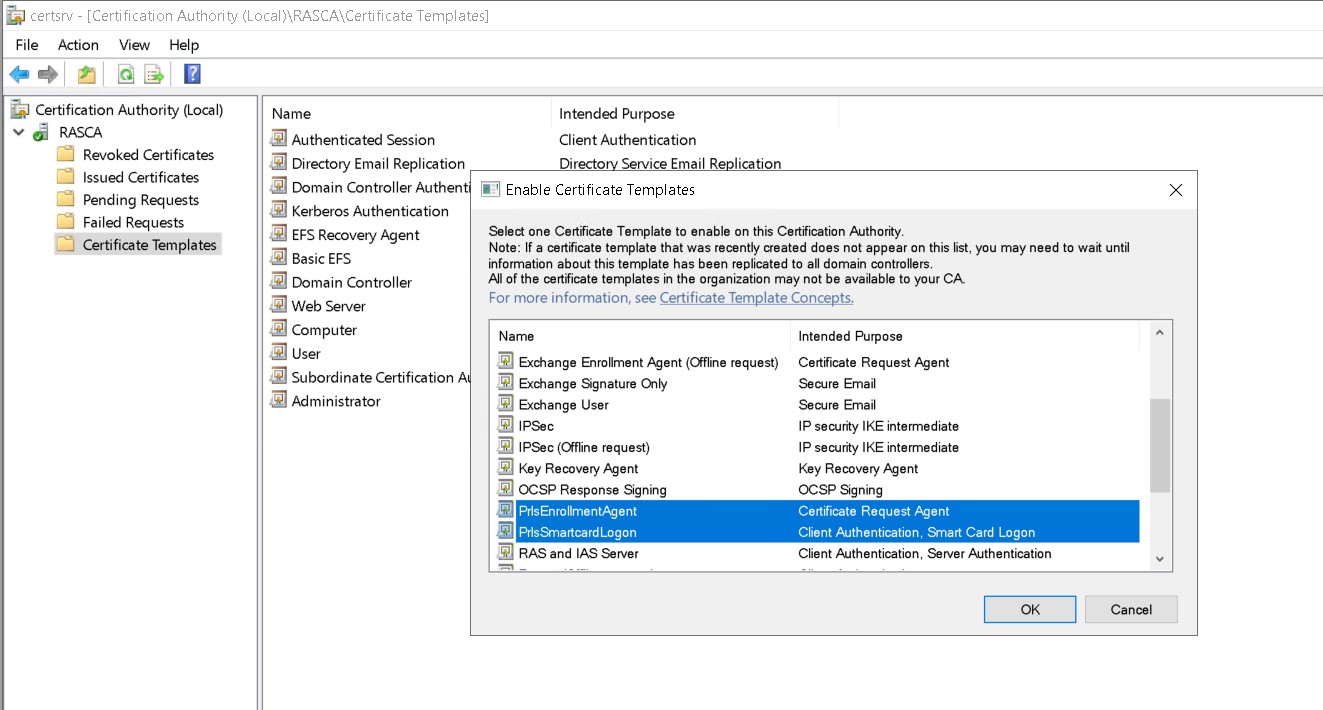
6. Right Click on the Certificate Templates node, select New, and then select “Certificate Template to Issue”.
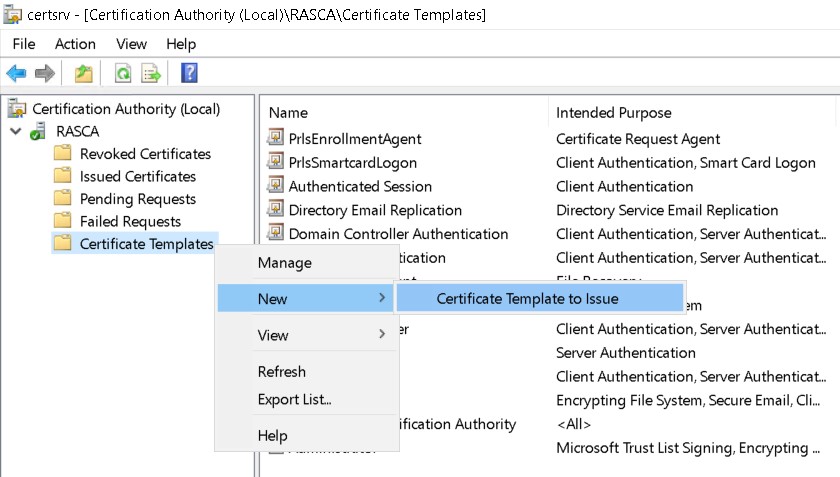
7. You need to select the template you just created (PrlsSmartcardLogon and PrlsEnrollmentAgent ) and click "OK":
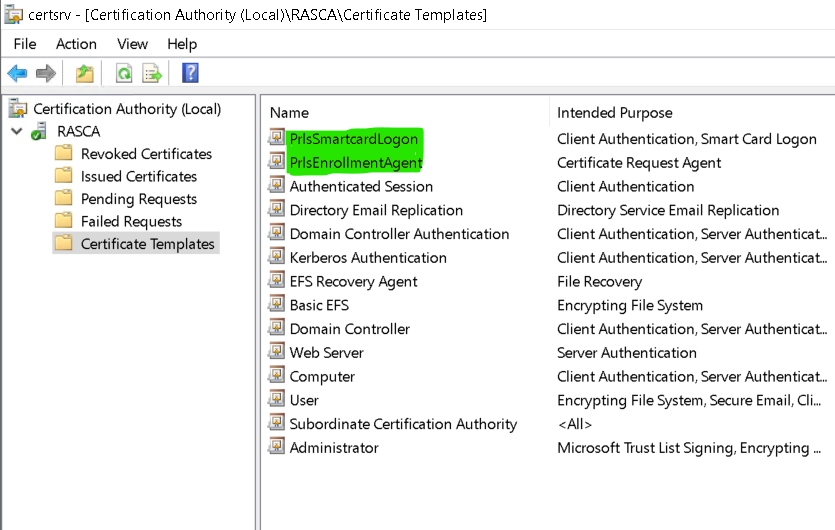
8. PrlsSmartcardLogon and PrlsEnrollmentAgent templates should appear in the list:
Restarting Active Directory Certificate Services
On the Certificate Authority machine go to services.msc and restart Active Directory Certificate Services service:

Certificate Services connection string
Via certutil, you can browse all the available CA and when one is selected, a ping is applied to understand if the certificate services is responsive or not.
1. Please execute the command
certutil -config - -ping
2. Choose the required CA in the opened window:

3. After you choose a CA, click OK and check the result of ping test:

Note: The connection string required for RAS Enrollment Server to be able to enroll certificates for users should be in the format highlighted in the screenshot above. i.e. computer name\CA name
Issuing PrlsEnrollmentAgent certificate to Enrollment Agent user
1. On the Certification Authority server, open mmc.exe as the Enrollment Agent user you created previously and open the Certificates snap-in
2. Right-click on Personal folder > All Tasks > Request New Certificate…

3. Select PrlsEnrollmentAgent from the list, click Enroll and proceed with the wizard/


Was this article helpful?
Tell us how we can improve it.