Note: starting with Parallels Desktop 19, the feature has been deprecated. This article applies only to Intel-based Mac computers. Migrating a PC to a Parallels Desktop virtual machine running on a Mac with Apple silicon is currently not possible.
Version 18.3.3 of Parallels Desktop for Mac does not support transferring a Windows installation from a PC. If you still want to perform the transfer, install an 18.3.2 release available here, complete the transfer, and then upgrade to 18.3.3.
I am going to migrate my PC into a virtual machine. What should I check before the migration?
Check system requirements
To migrate data from a physical computer, you need to install Parallels Transporter Agent on it. Parallels Transporter Agent can be downloaded from the Parallels Download Center and installed on computers that meet the following requirements:
Hardware requirements:
- 700 MHz (or higher) x86 or x64 processor (Intel or AMD)
- 256 MB or more of RAM
- 50 MB of hard disk space for installing Parallels Transporter Agent
- Ethernet or Wi-Fi network adapter for migrating over network or an external storage device, such as a USB hard disk.
Supported Windows and Linux versions:
- Windows 10
- Windows 8.1
- Windows 7
- Windows Vista
- Windows XP
- Windows Server 2003
- Windows 2000
- Red Hat Enterprise Linux 5.x, 6.x
- Ubuntu Linux 10.04 LTS, 14.04
Note: Parallels Desktop does not support migrating Windows dynamic volumes and Linux logical volumes (LVM).
Before you migrate your PC into your Mac
-
Make sure your PC is not using EFI/UEFI firmware interface and does not have GPT on its hard drive.
Note: Parallels Desktop supports migrating computers with GPT partitions and EFI/UEFI starting from version 10. Parallels Desktop 9 and earlier do not support migrating computers with GPT partitions and EFI/UEFI and Parallels Transporter Agent will fail to detect the operating system.
-
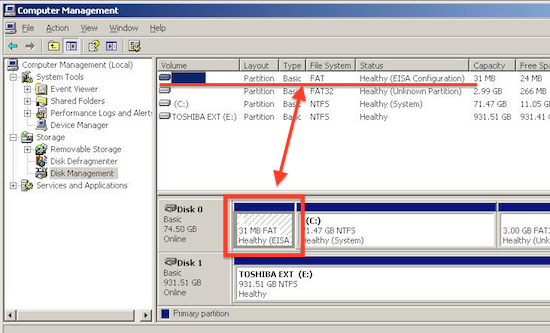
Make sure Your PC Hard drive does not have hidden EISA partition:
- Press Win + R > Type diskmgmt.msc and hit Return/Enter.
-
If it has the EISA partition like this:
-
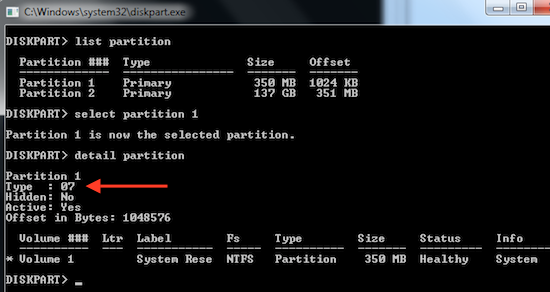
In case there are listed one or more EISA partitions, press Win + R > Type cmd and hit Return/Enter. In Command Prompt execute the following command one-by-one:
DISKPART

select disk 0

list partition
Choose the partition that corresponds to EISA partition in Disk Management (in most cases it is "Partition 1") and execute commands in Command Prompt:
select partition 1

detail partition
Check the output. If partition type is 12 or 27 it means it is a hidden partition. Parallels Transporter currently cannot migrate such partitions.
- Check your PC for viruses.
-
Check your PC for system errors (for Windows Vista,7,8,8.1,10):
-
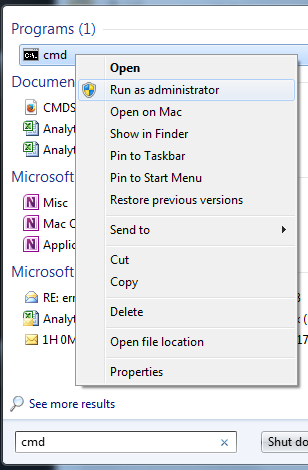
Go to Start. Type in the Search field cmd and then launch cmd application with administrative privileges (Right-click > Run as Administrator).
-
In Command prompt type in sfc /scannow press Enter/Return and wait till the operation completes.
sfc /scannowpress Return and wait till the operation completes.

Note: In such a case, it is necessary to repair Windows before the migration, as it may result in corrupted .pvm file:
- Reboot Windows.
-
-
Check all hard disks installed on your PC for errors.
Note: It is very important to check hard disk before the migration.
-
Disable or even uninstall your antivirus / firewall / Internet Security solution on the PC. You may enable / reinstall them later after the migration is done.
- (optional) We recommend to transfer all your data like documents, pictures, music and movies to the Mac separately using Migration Assistant or manually. Also please check Apple KB #ht1408 and #ht4796. This will help to reduce the space occupied by the virtual machine on your Mac hard Disk after migration is complete.
Migrate your PC to your Mac.
-
Install Parallels Transporter Agent on your PC and follow KB #115007
-
On the Select name and location screen choose Customize. Please exclude any hidden/system/recovery partitions and also any data partitions from migration . Click OK.

- Continue with migration.
As an alternative resource on this topic, we also recommend visiting this blog post:
Was this article helpful?
Tell us how we can improve it.