Resolution
If you have only one Windows Virtual Machine, and you do not want to upgrade this machine to Windows 8, but create a standalone Windows 8 machine, here are the steps to upgrading to Windows 8 and keeping your current Windows Virtual Machine (VM), using an example of upgrading from Windows 7 to Windows 8.
NOTE! For EULA and restrictions applied to Microsoft Windows products in your country please contact with your local Microsoft office!
Update to the latest build of Parallels Desktop, boot your Windows 7 VM and install all Windows updates if necessary
In the Parallels Desktop menu, select Parallels Desktop > Check for Updates... and if an update is available then install it.
Duplicate your Windows VM
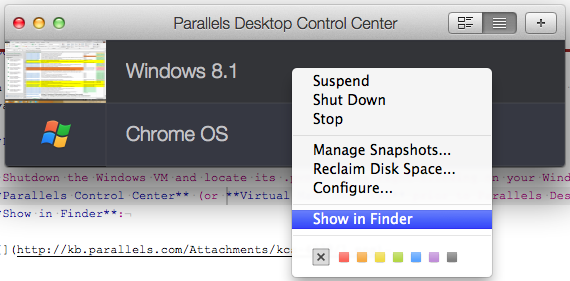
- Shutdown the Windows VM and locate its .pvm file by right-clicking on your Windows VM in the Parallels Control Center (or Virtual Machines list prior to Parallels Desktop 10) and select Show in Finder:

Then make a copy of this .pvm file in the same folder.
Rename the duplicate Windows VM. For example, rename it Win_to_8_VM.pvm
Double click this copied VM to start
- Select Copied on the next Parallels Desktop dialog:

Change the Virtual Machine name from within Windows to prevent any confusion on the network
To do this, open the Control Panel > System in Windows, and click on Change Settings:

Then, click on the Change... button in the System Properties dialog and rename the computer:
- Note: you will have to reboot this Windows VM to complete this name change.

Note: make sure your Windows license allows you to create one more instance of Windows Virtual Machine.
You are ready to start the upgrade to Windows 8
Read the full KB article to understand how the upgrade to Windows 8 is different depending on the version of Windows you are upgrading:
#114985 Windows 8 upgrade: step by step instructions and tips for Parallels Desktop users
Start with the part of the KB article which says My Virtual Machine is ready for upgrade. What should I do next?.
Was this article helpful?
Tell us how we can improve it.